
Best Free Fire Characters for Ranked and Clash Squad (OB55)

The best Free Fire character for ranked depends on mode, team role and the current patch. In OB55, Kenta and Wukong gained stronger reasons to be retested, while Morse and Luna lost part of their previous advantage. Battle Royale still rewards rotation, sustain and late-fight resets; Clash Squad rewards immediate pressure, wall interaction, information and round-winning trades.
For a safe ranked starting pool, test Alok or K for sustained value, Tatsuya for repositioning, and Dimitri for coordinated squad recovery. In OB55, retest Kenta for teleport entry and Wukong for more frequent ambush windows. Treat Morse and Luna as situational until their reduced windows still justify a slot in your build. Use the role table before copying a universal tier list.
How to use this ranking with combo and pet guides
Start here when the decision is the character who should own the active role. Move to the skill-combo guide only after that role is clear, and add a pet after the four-skill shell exposes a repeated weakness. A popular combo does not automatically make its active character the best standalone ranked pick.
| Question | Correct guide | What stays out of this ranking |
|---|---|---|
| Which character best fills entry, anchor, support or information? | This ranked list | Full four-skill recipes and pet optimization |
| Which active plus three passives form one plan? | Skill combo guide | Universal character tier claims |
| Which pet fixes the preset's remaining weakness? | Character and pet guide | Standalone character rankings |
ManaBuy five-point role-fit score
Give a character one point for each condition the preset can reproduce: the skill trigger is reliable, the effect fits the mode, the role fills a real squad gap, the preferred weapon range supports the skill, and the plan includes a reset or exit after the first engagement.
| Score | Use | What to do next |
|---|---|---|
| 4–5 | Main-pool candidate | Build the four-skill shell and test the character in the intended mode. |
| 2–3 | Situational pick | Keep it for the map, weapon or squad condition that activates the value. |
| 0–1 | Do not force the pick | Choose a character whose trigger and role appear in normal matches. |
Use squad composition as the final tiebreaker. A lineup with three aggressive picks often gains more from a reliable support or anchor than a fourth entry character. In solo queue, self-sufficient effects move up; in a coordinated squad, information and team utility gain value because teammates act on them consistently.
OB55 Characters to Retest First
 Kenta
 Wukong
 Morse
Kenta and Wukong gained stronger reasons to test new timings, while Morse and Luna need a stricter slot-value check after their reductions. The board identifies the four patch-sensitive characters before the broader role tables.
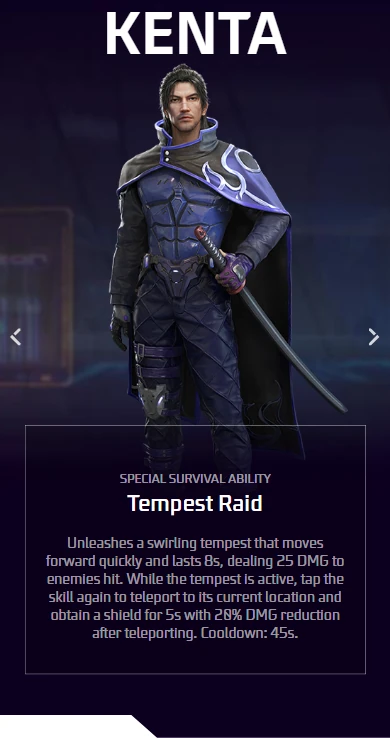
Kenta's current official description supports testing him as a timed entry and reposition active.
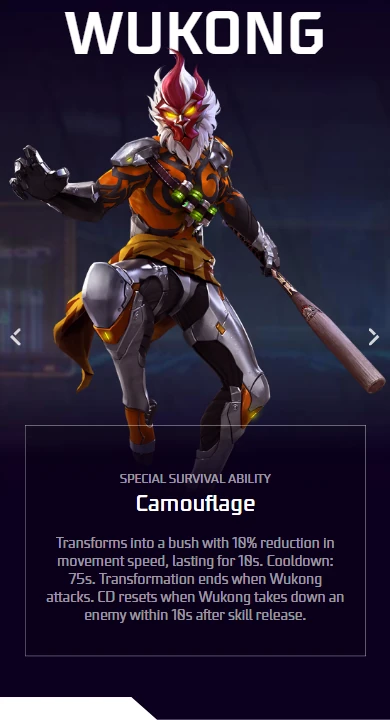
Wukong's official page shows the current Camouflage duration, movement penalty and cooldown conditions.
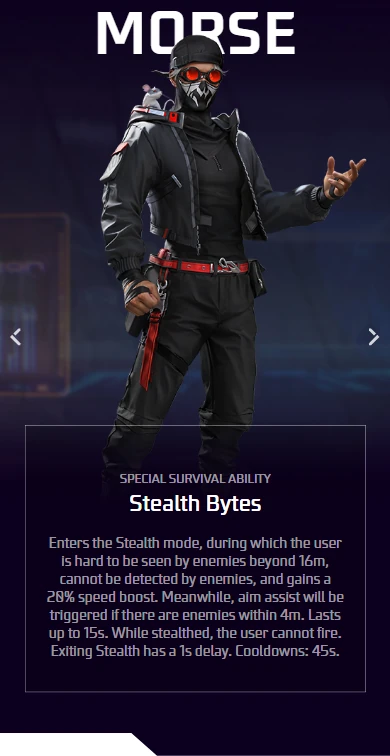
Morse's current official text defines the visibility, movement and firing limits behind the situational ranking.
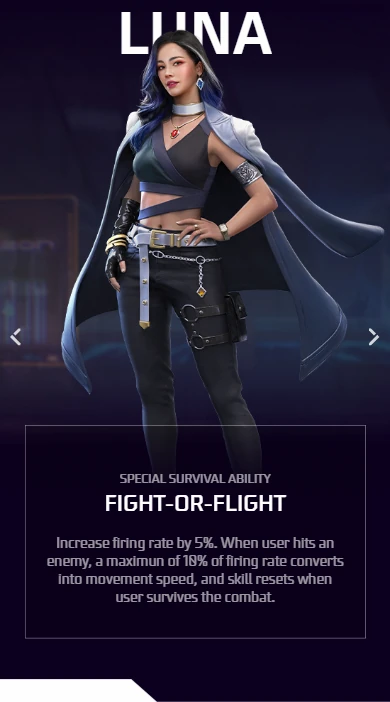
Luna's official page confirms the current firing-rate and movement-speed conversion conditions used in the retest advice.
How This Ranked List Is Evaluated
Swipe horizontally to compare →
| Criterion | What earns a higher recommendation | What lowers a pick |
|---|---|---|
| Repeatability | The skill creates value in many normal rounds, not only highlights. | A rare trigger or strict setup. |
| Mode fit | The timing matches BR rotations or CS first contact. | Value arrives after the mode’s decisive moment. |
| Team conversion | Squadmates can follow the pressure, heal, scan or reset. | The effect is difficult for the team to use. |
| Counterplay | The skill still works when enemies understand it. | One obvious counter removes most value. |
| Patch stability | Current skill text and patch changes support the role. | The recommendation depends on old numbers or behavior. |
Best Character Pools for Ranked Battle Royale
Swipe horizontally to compare →
| Priority | Characters to test | Best for | Why |
|---|---|---|---|
| Safe all-round pool | Alok, K | Sustain, movement and resource control. | Useful across many ordinary BR situations and forgiving for developing players. |
| Reposition pool | Tatsuya, Kenta | Crossing danger, entry and escape timing. | Movement can fix a bad angle before raw damage matters. |
| Squad reset pool | Dimitri, Kassie | Healing, trade recovery and coordinated support. | Best when teammates can stay near and act on the reset window. |
| Ambush pool | Wukong, Morse | Flanks, baiting and information denial. | High ceiling, but enemies can punish obvious use and OB55 changed both windows. |
| Wall-pressure pool | Skyler, Oscar | Teams that repeatedly fight around Gloo Walls. | Converts cover interaction into entry pressure. |
Best Character Pools for Clash Squad
Swipe horizontally to compare →
| CS job | Characters to test | Use when | Main caution |
|---|---|---|---|
| First entry | Kenta, Tatsuya, Oscar | The team can follow a fast opening and trade immediately. | An isolated entry gives enemies a free focus target. |
| Wall pressure | Skyler, Oscar | Rounds stall behind repeated Gloo Wall placement. | Do not spend the active window before teammates are ready. |
| Recovery | Dimitri, Kassie, Alok | The team often gets a first knock but loses the second trade. | Healing cannot replace poor cover or economy. |
| Ambush and reset | Wukong | You can use the shorter OB55 cooldown to create more than one meaningful window. | Transformation in obvious positions is easy to punish. |
| Information and denial | A124, Clu, Moco | The squad communicates and acts quickly on information. | Scans and marks are wasted without coordinated focus. |
OB55 Winners and Losers to Retest
Swipe horizontally to compare →
| Character | Official OB55 change | Ranking effect |
|---|---|---|
| Kenta | New tempest passes through Gloo Walls; the second activation teleports and grants a temporary shield with damage reduction. | Moves into the active CS entry and BR reposition test pool. |
| Wukong | Transformation cooldown reduced from 90 seconds to 75 seconds. | More frequent ambush opportunities improve repeatability. |
| Morse | Aim-assist counterplay begins at a longer range and maximum stealth falls from 15 to 13 seconds. | Drops as a default recommendation; keep for practiced flankers. |
| Luna | Rate-of-fire bonus reduced from 8% to 5%. | Recheck whether her passive still beats a more direct role skill. |
These directions come from the official OB55 notes. Use the official character directory and the current in-game skill description to confirm any character that was not changed in the patch notes.
Choose by Account and Skill Level
Swipe horizontally to compare →
| Player type | Start with | Graduate when |
|---|---|---|
| New or returning | Alok, K, Kelly, Jota, Maxim or another easy-to-read sustain/movement option. | You can explain when every equipped skill triggers. |
| Solo ranked | A self-sufficient active plus passives for sustain, information and weapon comfort. | You consistently survive the first trade and need higher-ceiling timing. |
| Coordinated squad | Dimitri, Kassie, Kenta, Skyler or role-specific support. | The squad has a clear caller and can convert active windows. |
| Advanced entry | Tatsuya, Kenta, Oscar or Wukong. | You can enter without separating from trade distance. |

Check the live character or event route in your own account, confirm the region, and choose a package only after the required amount is clear.
Browse All 65 Free Fire Character Guides by Role
Start with the mode and job you actually play. Each character appears once in the directory, while individual guides explain skill timing, weapon fit and practical combinations.
Ranked Battle Royale and Rotation
11 guidesStart here for safe-zone routes, vehicles, long-range pressure, flanks and survival value across a full BR match.
 FordRead guide →Iron Will · BR routes, survival and long-range decisions
 MishaRead guide →Afterburner · BR routes, survival and long-range decisions
 NotoraRead guide →Racer's Blessing · BR routes, survival and long-range decisions
 LauraRead guide →Sharp Shooter · BR routes, survival and long-range decisions
 MaroRead guide →Falcon Fervor · BR routes, survival and long-range decisions
 RafaelRead guide →Dead Silent · BR routes, survival and long-range decisions
 RinRead guide →Gale of Kunai · BR routes, survival and long-range decisions
 ShirouRead guide →Damage Delivered · BR routes, survival and long-range decisions
 WukongRead guide →Camouflage · BR routes, survival and long-range decisions
 MorseRead guide →Stealth Bytes · BR routes, survival and long-range decisions
 MaximRead guide →Gluttony · BR routes, survival and long-range decisions
Clash Squad and Round Impact
14 guidesThese picks create value quickly through reloads, close-range trades, round economy, shields or clutch windows.
 AntonioRead guide →Gangster's Spirit · short rounds, economy and immediate trades
 CarolineRead guide →Agility · short rounds, economy and immediate trades
 ChronoRead guide →Time Turner · short rounds, economy and immediate trades
 JaiRead guide →Raging Reload · short rounds, economy and immediate trades
 JosephRead guide →Silver Spoon · short rounds, economy and immediate trades
 JotaRead guide →Sustained Raids · short rounds, economy and immediate trades
 KlaRead guide →Muay Thai · short rounds, economy and immediate trades
 LeonRead guide →Buzzer Beater · short rounds, economy and immediate trades
 LunaRead guide →FIGHT-OR-FLIGHT · short rounds, economy and immediate trades
 LuquetaRead guide →Hat Trick · short rounds, economy and immediate trades
 NikitaRead guide →Firearms Expert · short rounds, economy and immediate trades
 OscarRead guide →Valiant Dash · short rounds, economy and immediate trades
 SoniaRead guide →Nano Lifeshield · short rounds, economy and immediate trades
 SuzyRead guide →Money Mark · short rounds, economy and immediate trades
Beginner-Friendly and Flexible Picks
10 guidesUse these guides when you want an easier first build, a flexible passive or a skill trigger you can practice consistently.
 A-PatroaRead guide →Best · clear triggers and forgiving build choices
 A124Read guide →Thrill of Battle · clear triggers and forgiving build choices
 AndrewRead guide →Wolf Pack · clear triggers and forgiving build choices
 D-BeeRead guide →Bullet Beats · clear triggers and forgiving build choices
 DashaRead guide →Partying On · clear triggers and forgiving build choices
 HayatoRead guide →Art of Blades · clear triggers and forgiving build choices
 KellyRead guide →Deadly Velocity · clear triggers and forgiving build choices
 MiguelRead guide →Crazy Slayer · clear triggers and forgiving build choices
 PalomaRead guide →Shatterburst · clear triggers and forgiving build choices
 WolfrahhRead guide →Limelight · clear triggers and forgiving build choices
Support, Sustain and Team Protection
12 guidesChoose from healing, revive support, EP recovery, damage reduction and tools that keep a squad fighting.
 AlokRead guide →Party Remix · healing, recovery and squad protection
 DimitriRead guide →Healing Heartbeat · healing, recovery and squad protection
 J.BiebsRead guide →Silent Sentinel · healing, recovery and squad protection
 KRead guide →Master of All · healing, recovery and squad protection
 KapellaRead guide →Remedy Rounds · healing, recovery and squad protection
 KassieRead guide →Electro Therapy · healing, recovery and squad protection
 KentaRead guide →Tempest Raid · healing, recovery and squad protection
 OliviaRead guide →Healing Touch · healing, recovery and squad protection
 RayRead guide →Bond of Eclipse · healing, recovery and squad protection
 SteffieRead guide →Graffiti's Blessing · healing, recovery and squad protection
 ThivaRead guide →Vital Vibes · healing, recovery and squad protection
 XayneRead guide →Xtreme Encounter · healing, recovery and squad protection
Rush, Entry and Gloo Wall Pressure
10 guidesThese characters help start fights, cross dangerous space, break cover or convert shotgun and SMG pressure.
 AlvaroRead guide →Split Blitz · entry timing, close-range pressure and Gloo Walls
 IgnisRead guide →Flame Mirage · entry timing, close-range pressure and Gloo Walls
 KairosRead guide →Defense Breaker · entry timing, close-range pressure and Gloo Walls
 LilaRead guide →Gloo Strike · entry timing, close-range pressure and Gloo Walls
 NeroRead guide →Cryo Mind · entry timing, close-range pressure and Gloo Walls
 OrionRead guide →Crimson Crush · entry timing, close-range pressure and Gloo Walls
 SantinoRead guide →Shape Splitter · entry timing, close-range pressure and Gloo Walls
 ShaniRead guide →Gear Recycle · entry timing, close-range pressure and Gloo Walls
 SkylerRead guide →Riptide Rhythm · entry timing, close-range pressure and Gloo Walls
 TatsuyaRead guide →Rebel Rush · entry timing, close-range pressure and Gloo Walls
Information, Tracking and Area Control
8 guidesUse these guides for scans, marks, traps, anti-Gloo Wall tools and skills that make enemy movement easier to read.
 CluRead guide →Tracing Steps · enemy information, traps and space control
 HomerRead guide →Senses Shockwave · enemy information, traps and space control
 IrisRead guide →Wall Brawl · enemy information, traps and space control
 KodaRead guide →Aurora Vision · enemy information, traps and space control
 MocoRead guide →Enigma's Eye · enemy information, traps and space control
 NairiRead guide →Ice Iron · enemy information, traps and space control
 OthoRead guide →Memory Mist · enemy information, traps and space control
 RydenRead guide →Spider Trap · enemy information, traps and space control
Common Ranked Character Mistakes
- Using one list for both BR and Clash Squad.
- Ignoring OB55 changes to Kenta, Morse, Luna and Wukong.
- Picking a timing-heavy active skill before learning its safe activation window.
- Copying a character name without the three passives and pet that make the role coherent.
- Assuming Diamonds make a character mechanically stronger than the current skill description allows.
Free Fire Ranked Characters FAQ
Who is the best Free Fire character for ranked?
Alok and K remain safe all-round starting points, while the best specialized choice depends on role and mode. OB55 makes Kenta and Wukong important retests.
Who is best for Clash Squad in OB55?
Kenta, Tatsuya, Oscar, Skyler, Dimitri and Wukong cover common entry, wall-pressure and recovery jobs. Choose the one your team can follow.
Did OB55 nerf Morse?
Yes. The official notes increased close-range counterplay and reduced maximum stealth duration from 15 to 13 seconds.
Is Luna still worth a passive slot?
She can still fit some builds, but the rate-of-fire bonus fell from 8% to 5%. Compare the current value with a passive that fixes a clearer weakness.
How often should this ranked list be updated?
Review it after every character balance patch, new character, major mode change or official recommendation update.
Related Free Fire Ranked Character Guides
Final Pick
Choose a mode, name the role, and test the character’s current timing with a complete preset. A smaller role-based pool stays useful longer than a universal list of names.




Copyright © FUTURE OUTLOOK TECHNOLOGY LIMITED.Company Registration No.: 77374965 All rights reserved.UNIT 135,1/F.,143 WAI YIP STREET,KWUN TONG HK