
Miya MLBB Guide 2026: Best Build, Emblem, Skills, Combos and Counters

Miya is a scaling Gold Lane Marksman who wins by attacking continuously from a protected position. She is a strong choice when her team has a frontline and time to reach core items, but a risky choice against repeated dives or wide-area damage. The practical plan is simple: farm safely, control a reachable target with Arrow of Eclipse, activate Moon Arrow only when several Basic Attacks are possible, and keep Hidden Moonlight for the control or dive that would otherwise end the fight.
Quick Answer: How Should You Play Miya?
Use Corrosion Scythe, Tough Boots, Demon Hunter Sword, Golden Staff, Malefic Gun, and Rose Gold Meteor as the reliable default build. Pair it with the Marksman Emblem, Swift, Weapon Master, Weakness Finder, and Inspire. Unlock Arrow of Eclipse at level 1, prioritize Moon Arrow, and upgrade Hidden Moonlight whenever possible.
- In lane: land Arrow of Eclipse, activate Moon Arrow, then keep using Basic Attacks while the target is immobilized or slowed.
- In teamfights: stay behind the frontline and attack the nearest safe target; do not walk past tanks to chase the backline.
- With the ultimate: save Hidden Moonlight to remove debuffs and reposition. Use it to enter only when the enemy's dangerous control is already unavailable.
- At draft: pick Miya with reliable protection; avoid forcing her into several long-range area threats or repeated divers.
your team has reliable frontline control, the match can reach item spikes, and you need sustained multi-target damage.
the enemy has several long-range area threats or repeated dives and your team cannot create a safe backline.

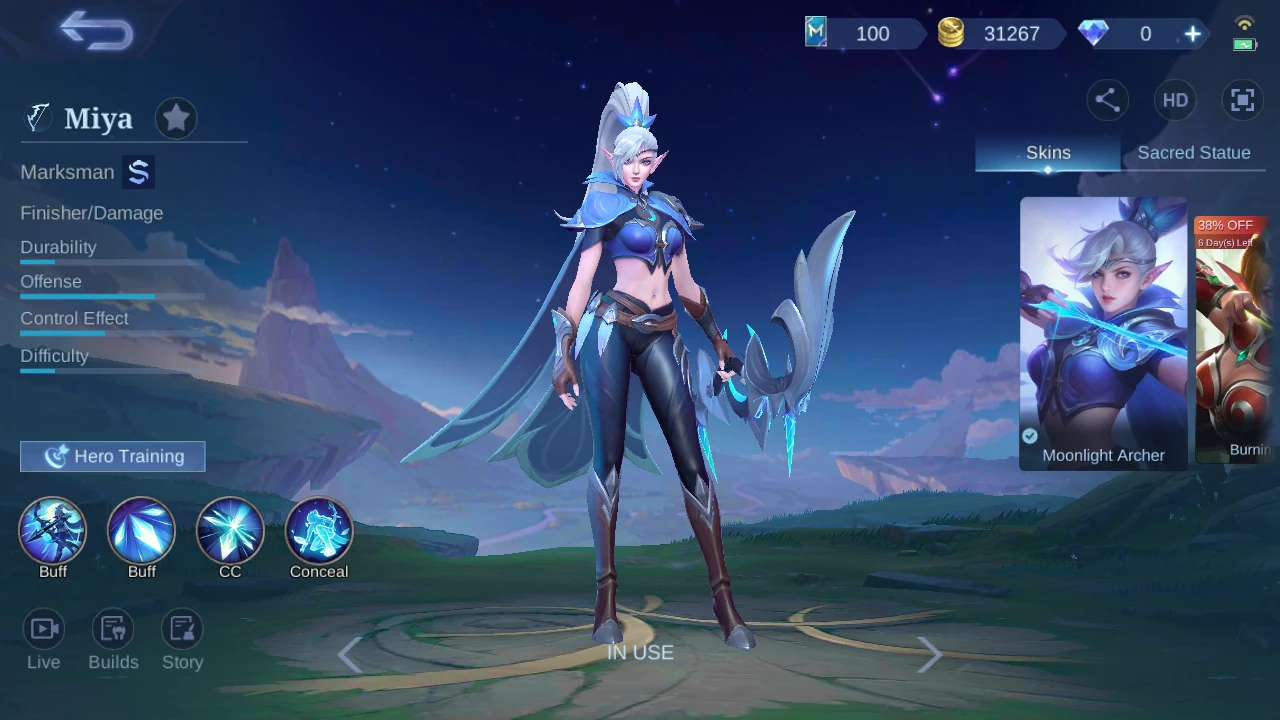
Miya Skills Explained
Miya's kit rewards uninterrupted Basic Attacks. Build passive stacks before a major exchange when possible, start the damage window with Moon Arrow, and use Arrow of Eclipse to stop a target from walking out of range. Hidden Moonlight is usually more valuable as a defensive reset than as a casual movement boost.
 Moon Blessing — Passive
Each Basic Attack hit grants 5% Attack Speed for 4 seconds, stacking up to five times. At full stacks, every Basic Attack calls a Moonlight Shadow that deals 30 (+25% Total Physical Attack) Physical Damage and inherits part of Miya's Attack Effects. This is why keeping contact with a safe target matters: dropped stacks delay her strongest sustained-damage state.
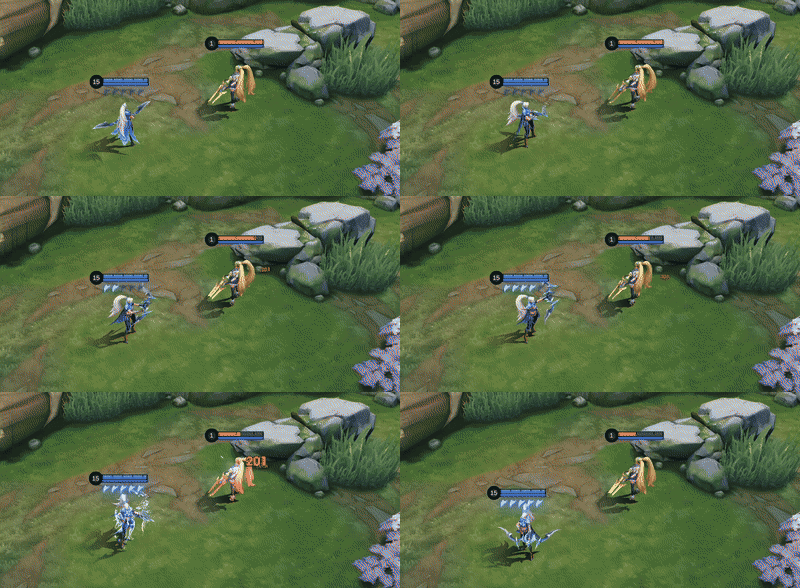
 Moon Arrow — Skill 1
Cooldown: 11s · Mana: 60. Miya fires two extra arrows with each Basic Attack. The main target takes 10 (+100% Total Physical Attack) Physical Damage, while nearby targets take 30% of that damage. The effect lasts 4 seconds at level 1 and scales to 9 seconds at maximum level. The extra arrows inherit part of her Attack Effects, but cannot critically strike or damage Turrets.
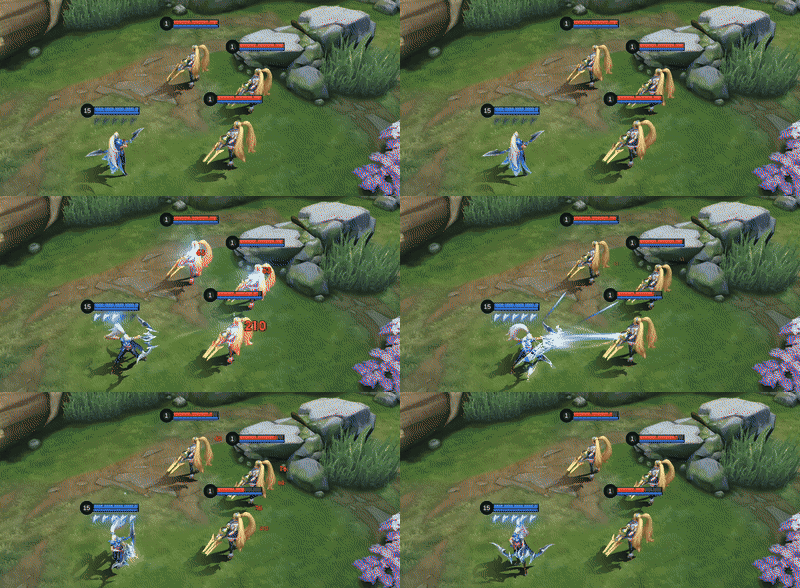
 Arrow of Eclipse — Skill 2
Cooldown: 8s · Mana: 90. Miya damages a target area for 270 (+45% Total Physical Attack) Physical Damage and immobilizes enemies for 1.2 seconds. Six minor arrows then spread outward; each deals 40 (+20% Total Physical Attack) Physical Damage to the first enemy hit and slows by 30% for 2 seconds. Immobilize stops movement, Blink, and Charge effects, but it does not interrupt every ongoing skill.
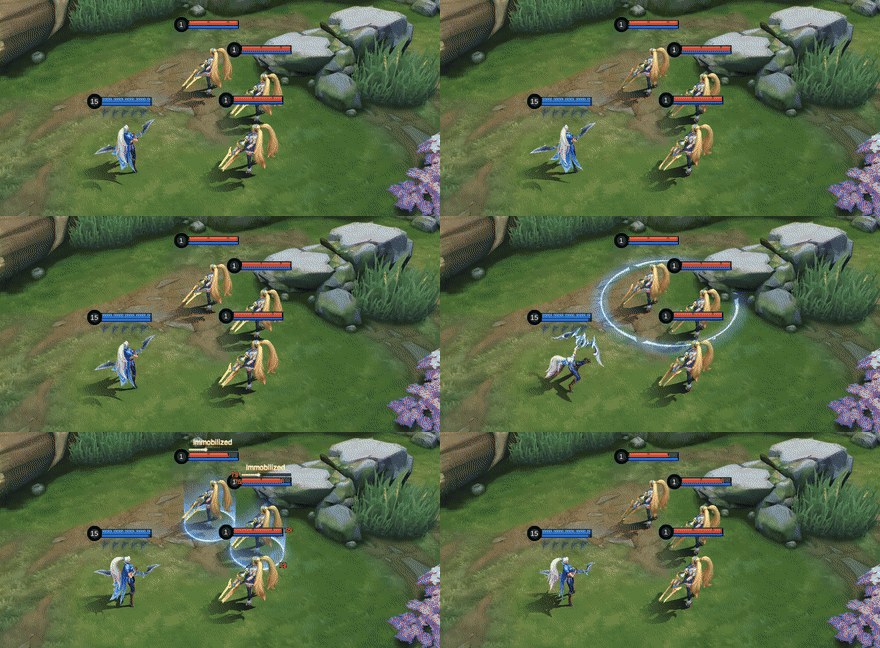
 Hidden Moonlight — Ultimate
Cooldown: 30s · Mana: 120. Miya removes all debuffs, enters concealment, and gains 65% Movement Speed. The state lasts 2 seconds or ends when she attacks. When she leaves concealment, she immediately gains full Moon Blessing stacks. Use it to cleanse dangerous control, break target lock, change angle, then re-enter the fight at full passive power.
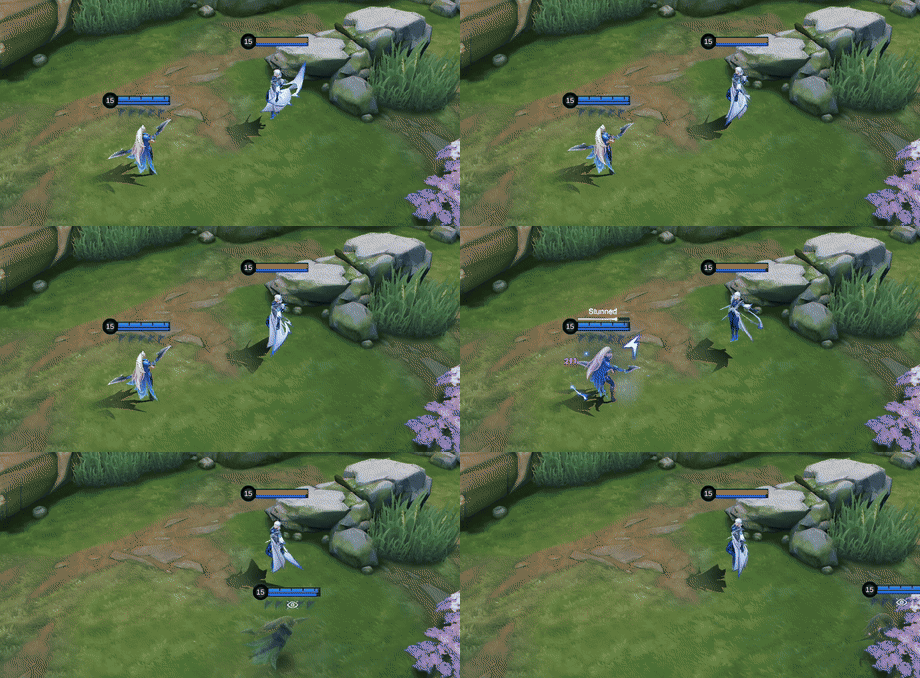
Skill Priority
Level 1: unlock Arrow of Eclipse for safer control and lane interaction.
Upgrade order: prioritize Moon Arrow, keep Arrow of Eclipse as the secondary skill, and upgrade Hidden Moonlight whenever it is available.
Miya Skill Combos and Why They Work
Laning Combo: Arrow of Eclipse → Moon Arrow → Basic Attacks



Why it works: Arrow of Eclipse holds the enemy in place for 1.2 seconds and leaves a 30% slow, making the opening Moon Arrow-enhanced Basic Attacks much harder to avoid. Moon Arrow also hits nearby units, so the same damage window can poke the opposing laner while helping clear Minions.
Execution note: do not activate Moon Arrow too early. Land or strongly threaten Arrow of Eclipse first; otherwise the opponent can disengage while the limited-duration enhancement is running.
Teamfight Combo: Hidden Moonlight → Arrow of Eclipse → Moon Arrow → Basic Attacks




Why it works: Hidden Moonlight cleanses debuffs, conceals Miya, and lets her choose a safer firing angle. Leaving concealment grants full Moon Blessing stacks, so she enters the damage window at maximum passive speed. Arrow of Eclipse then prevents the target from immediately escaping, while Moon Arrow spreads enhanced Basic Attacks across a clustered fight.
Execution note: the ultimate is not a requirement to start every fight. If Miya is already safe, preserve Hidden Moonlight for the enemy's key control or assassin dive. Repositioning safely is more valuable than following the icon order mechanically.
Source: Mobile Legends: Bang Bang official site Miya combo material and in-game skill descriptions, accessed July 22, 2026. See the Mobile Legends Wiki Miya reference for supplementary ability notes and history.
How to Play Miya by Game Phase
Early Game: Protect the Scaling Curve
Last-hit safely, avoid blind river angles, and use Arrow of Eclipse to punish enemies who step into a predictable path. Moon Arrow can clear and pressure multiple units, but activating it without a reason can expose a cooldown window. Miya's measured durability is the lowest part of her profile, so an even lane with steady gold is often better than a forced duel.
Mid Game: Fight Behind Information
Rotate after clearing the wave and stand behind the first line of control. Attack the nearest safe target instead of walking past a tank to reach a fragile backliner. Before an objective fight, stack Moon Blessing on a safe unit when the position allows it. Keep Hidden Moonlight ready if the enemy still has a key stun or targeted burst combo.
Late Game: One Clean Damage Window Can End the Match
At full build, Miya can shred frontlines and spread damage across clustered enemies. Do not reveal early from concealment unless the new position is genuinely safer. Track assassins, walls, and flank entrances; then activate Moon Arrow when you can maintain contact for several seconds. Her late-game ceiling depends less on flashy execution than on uninterrupted firing time.
Five Mistakes That Cost Miya Fights
- Walking past the frontline: hit the nearest safe target instead of chasing a fragile enemy through danger.
- Using Hidden Moonlight only for speed: preserve it for the control or dive that would end your damage window.
- Starting Moon Arrow before contact: its duration is valuable; activate it when you can keep attacking.
- Mixing Golden Staff into a crit plan without a reason: it converts Critical Chance and belongs to a different damage engine.
- Copying one Pro Setup blindly: change boots and the final slot for control, healing, shields, and burst.
Best Miya Emblem and Battle Spell
For the on-hit build recommended in this guide, use the Marksman Emblem with Swift, Weapon Master, and Weakness Finder, then take Inspire as the default Battle Spell. This setup strengthens the repeated Basic Attacks that activate Corrosion Scythe, Demon Hunter Sword, Golden Staff, and Miya's passive.
Default: On-Hit Emblem



When: use this with Corrosion Scythe, Demon Hunter Sword, and Golden Staff when Miya must damage the nearest frontline target.
Why: Swift accelerates her attack cycle, Weapon Master improves item-based damage, and Weakness Finder helps her keep a target inside Basic Attack range.
Do not use it as a crit template: if the build centers on Berserker's Fury and Haas's Claws, use the crit alternative instead.
Alternative: Crit Emblem


When: use this when the item plan commits to Windtalker, Berserker's Fury, and Haas's Claws and Miya has enough protection to scale.
Why: Fatal supports Critical Chance, Weapon Master improves the value of offensive items, and Quantum Charge adds sustain and movement after Basic Attacks.
Do not combine the routes blindly: Golden Staff converts Critical Chance, so it should not be added casually to this crit setup.
Inspire or Flicker?
 Inspire
 Flicker
Source: MLBBHub Miya curated builds, updated July 2026, cross-checked with the ONE Esports Miya guide, accessed July 23, 2026. Icons: MLBBHub. These recommendations were externally verified because Emblems and Battle Spells were not unlocked on the capture account; they are not presented as in-account client captures.
Best Miya Build: What to Buy and When
Start from the on-hit route unless the match clearly rewards crit. Corrosion Scythe, Demon Hunter Sword, Golden Staff, and Malefic Gun best match Miya's repeated Basic Attacks and inherited Attack Effects. The crit route is viable when a protected Miya can build for larger hit spikes without needing Golden Staff interactions.
Source: five MLBB Pro Setups and in-game equipment descriptions, observed July 22, 2026.
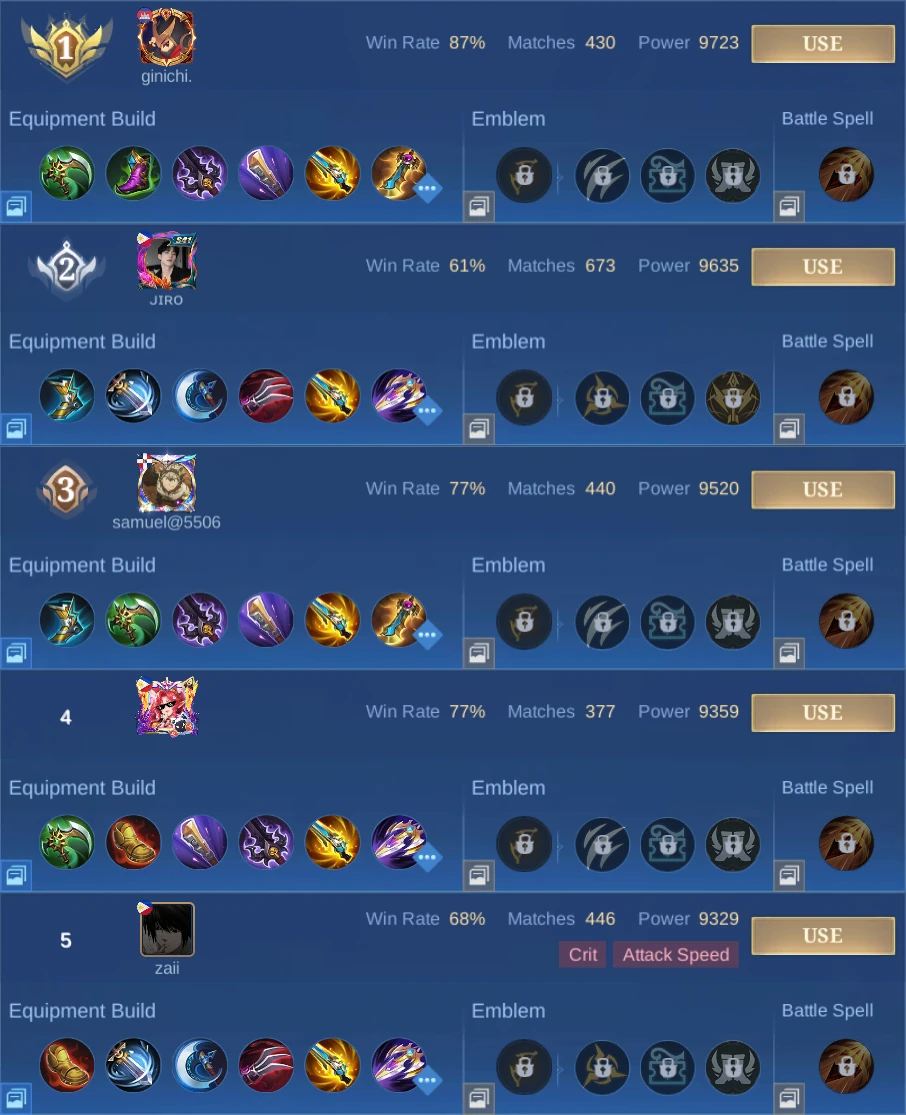
Five Captured Pro Setups Compared
These setups support the recommendation above; they are not five builds that should be copied in every match. Check the enemy damage, control, healing, and frontline before choosing boots and the final slot.
Snapshot captured July 22, 2026: rankings, player statistics, and recommended item orders may change.
Setup #1: ginichi.
87% WR · 430 matches · 9723 power · Default on-hit with anti-burst
 Corrosion Scythe
 Tough Boots
 Demon Hunter Sword
 Golden Staff
 Malefic Gun
 Rose Gold Meteor
Source: Pro Setup #1, captured July 22, 2026.
Setup #2: JIRO
61% WR · 673 matches · 9635 power · Crit with anti-heal
 Rapid Boots
 Windtalker
 Berserker's Fury
 Haas' Claws
 Sea Halberd
Source: Pro Setup #2, captured July 22, 2026.
Setup #3: samuel@5506
77% WR · 440 matches · 9520 power · Mobile on-hit with anti-burst
Source: Pro Setup #3, captured July 22, 2026.
Setup #4: Name not visible
77% WR · 377 matches · 9359 power · On-hit with anti-heal
 Swift Boots
Source: Pro Setup #4, captured July 22, 2026.
Setup #5: zaii
68% WR · 446 matches · 9329 power · Crit with anti-heal
Source: Pro Setup #5, captured July 22, 2026.
Item Effects and When to Buy Them
Use this table only when a match gives you a reason to change the default build. Keep the on-hit core together; do not mix Golden Staff into a critical-strike route without understanding its Critical Chance conversion.
Source: exact in-game long-press equipment tooltips, captured July 22, 2026. Malefic Gun appeared in 5/5 setups; Sea Halberd appeared in 3/5.
Best Teammates, Threats, and Favorable Matchups
Strong Partners


Their durable frontline and crowd control create the uninterrupted firing time Miya needs.
Serious Threats


Their large-area damage can still cover Miya's path while she is concealed.



Source: Mobile Legends: Bang Bang official site Miya profile, accessed July 22, 2026. The Mobile Legends Wiki Miya page is used only as supplementary context. Match outcomes still depend on timing, gold, and player execution.
Miya at a Glance
Miya is highly vulnerable to burst and dives, so safe firing distance is essential.
Her strongest dimension: uninterrupted Basic Attacks create high sustained damage.
Arrow of Eclipse supplies an immobilize and slow, but Miya is not a primary controller.
Her inputs are accessible; the deeper skill is choosing safe positioning and ultimate timing.
Source: in-game Miya hero page. Low, Moderate, and High are the primary player-facing ratings. The smaller percentages are measured from each colored fill against the same 185-pixel track in the captured UI; MLBB does not provide native numerical ratings for these bars.
Base Stats Without Skin, Equipment, or Emblem Bonuses
Source: in-game Story > Attributes panel, captured with no skin, equipment, or emblem bonuses.
All Miya Skins, Prices, and Availability
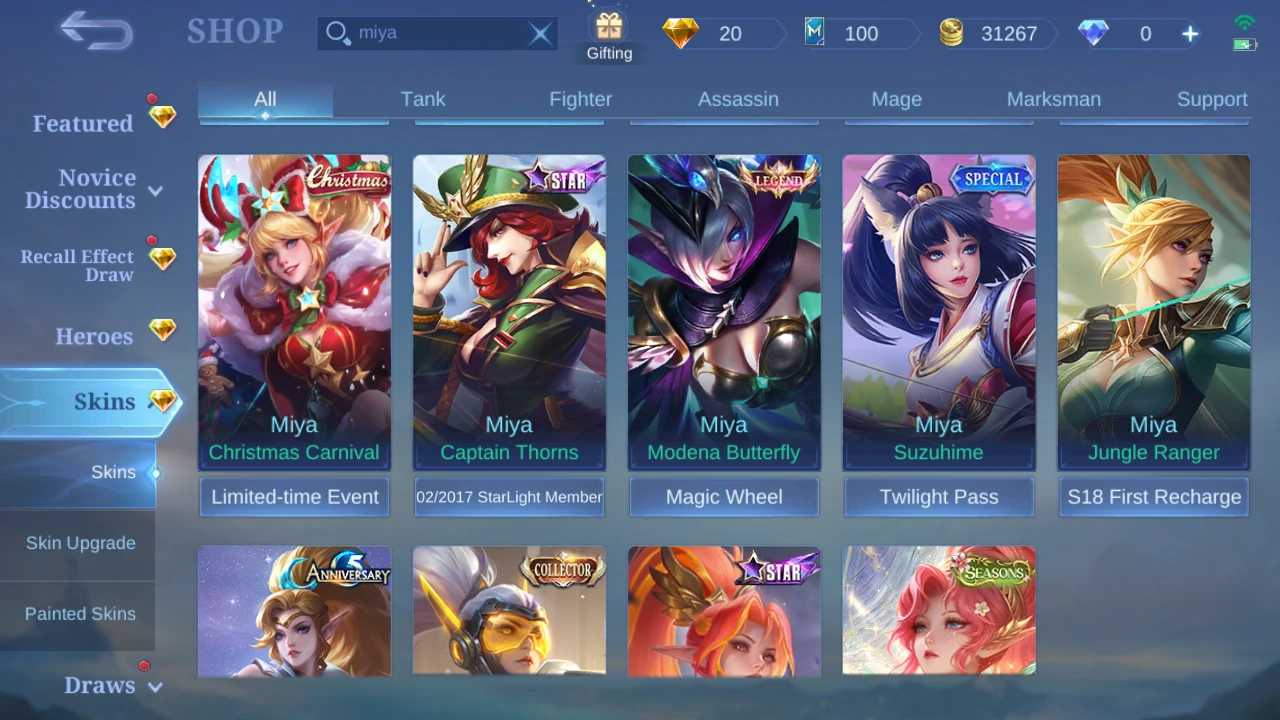
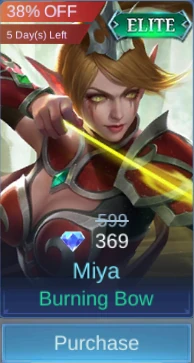
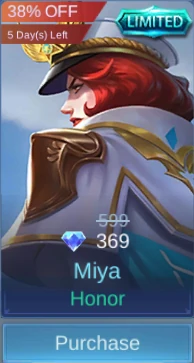






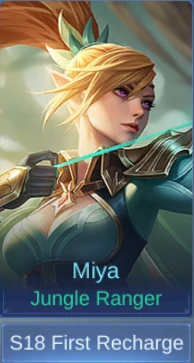


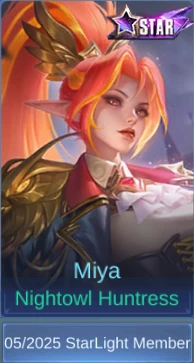

Source: individual in-game Miya skin cards from the shop search. Prices, discounts, timers, and acquisition methods are capture-time observations and may rotate.
Miya's Story
Miya is the Priestess of the Moon and a protector of the Moonlit Forest. While Estes sleeps, she carries the responsibility of defending their people. Her story centers on the tension between a peaceful ideal and the need to fight when the Abyss and orc forces threaten the forest. Miya ultimately rallies the Moon Elves and takes up her bow to protect their home.
Source: in-game Miya Story pages, English client, captured July 21, 2026. Story text is summarized here.
Related MLBB Guides
If you are still deciding where Miya fits in your ranked hero pool, start with the MLBB Hero and Meta Guide. For lane fundamentals, role selection, and early account progression, use the MLBB Beginner Guide.
Miya FAQ
Is Miya beginner-friendly?
Yes. Her in-game Difficulty bar measured only 18.9% of its displayed track. The real learning curve is positioning: she is easy to control but easy to punish when exposed.
What is Miya's best core build?
The clearest repeated on-hit core in the sampled Pro Setups is Corrosion Scythe, Demon Hunter Sword, Golden Staff, and Malefic Gun. Adjust boots and the last defensive or anti-heal slot for the enemy lineup.
Can Hidden Moonlight remove crowd control?
Its captured description says it removes all debuffs when activated. It also conceals Miya, grants Movement Speed, and gives full Moon Blessing stacks when concealment ends.
Which skill should Miya level first?
Unlock Arrow of Eclipse at level 1 for control, then prioritize Moon Arrow for the main damage window. Level Hidden Moonlight whenever it becomes available.
Does Moon Arrow critically strike?
The in-game Note states that the extra arrows cannot critically strike or damage Turrets, though they inherit part of Miya's Attack Effects.
How many Miya skins were found?
Thirteen Miya skin cards were found in the English-client shop search captured for this guide. Availability and prices can change with events and rotations.
Final Verdict
Miya is strongest when a player treats survival as part of the damage rotation. Farm patiently, attack the nearest safe target, use Arrow of Eclipse to create firing time, and preserve Hidden Moonlight for the moment that would otherwise end the fight. Her simple controls make her approachable; her fragile profile makes disciplined positioning the difference between a quiet early game and a decisive late-game carry.





Copyright © FUTURE OUTLOOK TECHNOLOGY LIMITED.Company Registration No.: 77374965 All rights reserved.UNIT 135,1/F.,143 WAI YIP STREET,KWUN TONG HK