
Badang MLBB Fighter Guide: Best Build, Emblem, Skills, Combos, and Counters

Badang wins by turning terrain into a damage amplifier. Fist Break creates the wall, Fist Crack pins grouped targets against it, and Fist Wind or his empowered Basic Attack extends the stun. The catch is simple: a missed dash leaves him beside the enemy without a barrier, so disciplined setup matters more than pressing every damage button at once.

Badang is shown as a Fighter with Charge and Burst specialties.
Badang at a Glance
Role and identity
Badang is a Fighter built around displacement, a temporary obstacle, and repeated attack effects. His offense bar is his clearest strength, while his control becomes reliable only when the enemy is trapped against terrain or the wall he creates.
Pick him when
Choose Badang when Tigreal, Luo Yi, or another ally can group targets before you enter. He is particularly dangerous to stationary or low-mobility damage dealers such as Layla and Odette.
Avoid him when
Bench him when priority targets can repeatedly dash through or around Fist Break. Wanwan and Ling can erase the geometry Badang needs, while Esmeralda can pressure his shield-heavy entry.
Win condition
Create an obstacle behind the target, keep them on the dangerous side of it, and use the control-immune ultimate before their escape route reopens. If the wall misses, reset instead of forcing a weak channel.
Badang Skills: When, Why, and What Not to Do

1. Chivalry Fist
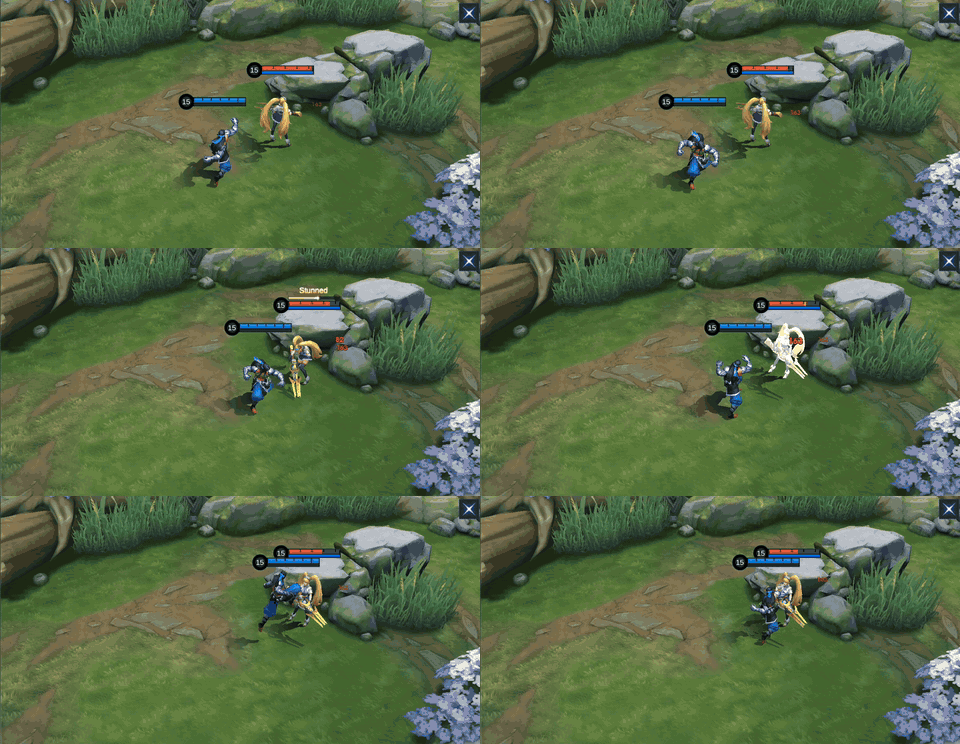
Every time Badang's Basic Attack hits a target, he gains a stack of Chivalry Fist. After gaining 4 stacks, his next Basic Attack deals 50 (+30% Total Physical Attack) extra Physical Damage to enemies hit and knocks them back. Enemies that are knocked into obstacles will be stunned for 0.6s (Minions and Creeps are stunned directly). Fist Wind generated by Badang's skills will trigger this effect directly, and Fist Wind from his Ultimate increases the stun duration to 1s.
When / why / do not: Build four stacks through safe Basic Attacks, then look for a wall stun. Fist Wind triggers the passive directly, and the ultimate's Fist Wind extends the obstacle stun to one second. Do not consume the empowered hit on a minion just before a fight.
Chivalry Fist demonstration.

2. Fist Wind
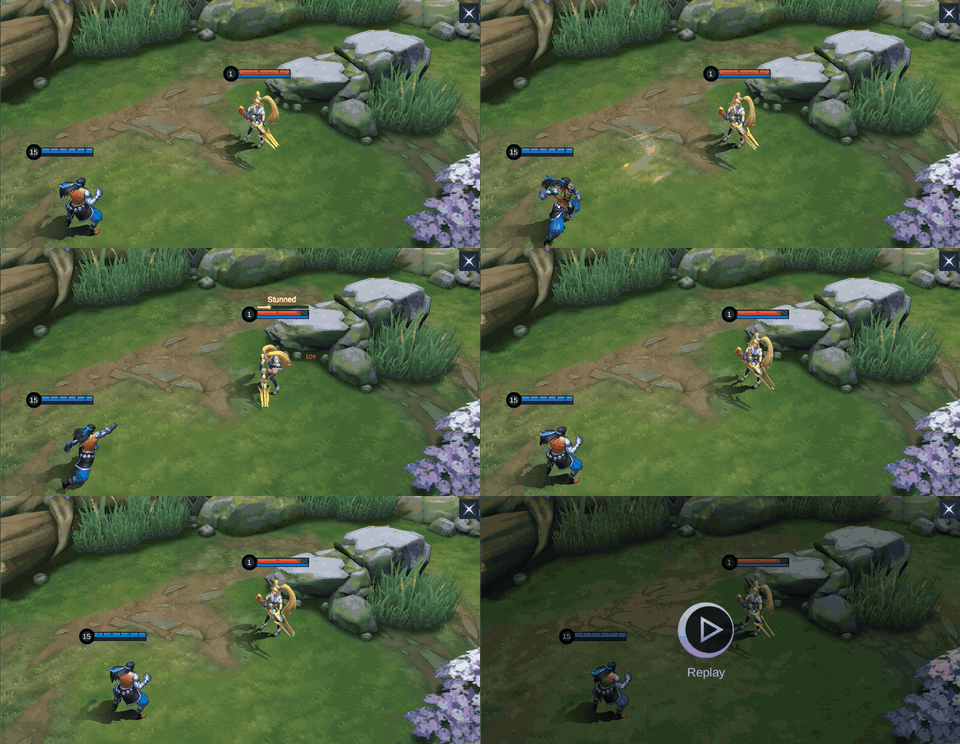
Badang unleashes a gust of Fist Wind in the target direction, dealing 125 (+90% Total Physical Attack) Physical Damage to enemies hit, slowing them by 30% for 1.5s, and knocking them back. The Fist Wind will explode upon hitting an obstacle, dealing 100 (+60% Total Physical Attack) Physical Damage to nearby enemies. Fist Wind can trigger attack effects and grants Badang 1 Chivalry Fist stack upon cast. Badang stores up to 2 Fist Wind charges and restores 1 charge every 10.4s.
When / why / do not: Use one charge to test spacing and keep the second for the wall confirm or disengage. The projectile slows, knocks back, and explodes on an obstacle. Do not fire both charges into open ground when Fist Break is about to create a better angle.
Fist Wind demonstration.

3. Fist Break
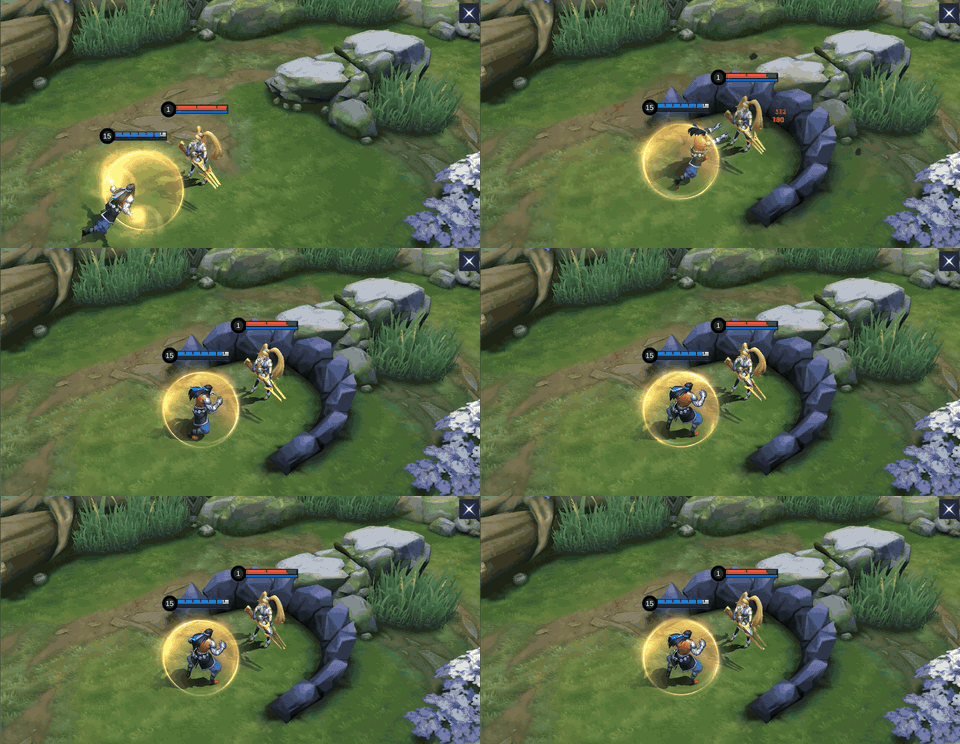
Badang dashes in the target direction, dealing 230 (+50% Total Physical Attack) Physical Damage to enemies in his path while gaining a 350 (+150% Total Physical Attack) shield that lasts 5s. He stops immediately upon hitting an enemy hero, slightly knocking them back while creating an obstacle that lasts 4s behind them. Enemies hit by the obstacle are dealt 130 (+30% Total Physical Attack) Physical Damage. Use Again: Badang removes the obstacle he created.
When / why / do not: Dash when the enemy's escape line is predictable. Hitting a hero stops Badang, grants a five-second shield, and builds a four-second obstacle behind the target. Use Again removes it. Do not remove the wall early unless it traps an ally or blocks your own retreat.
Fist Break demonstration.

4. Fist Crack
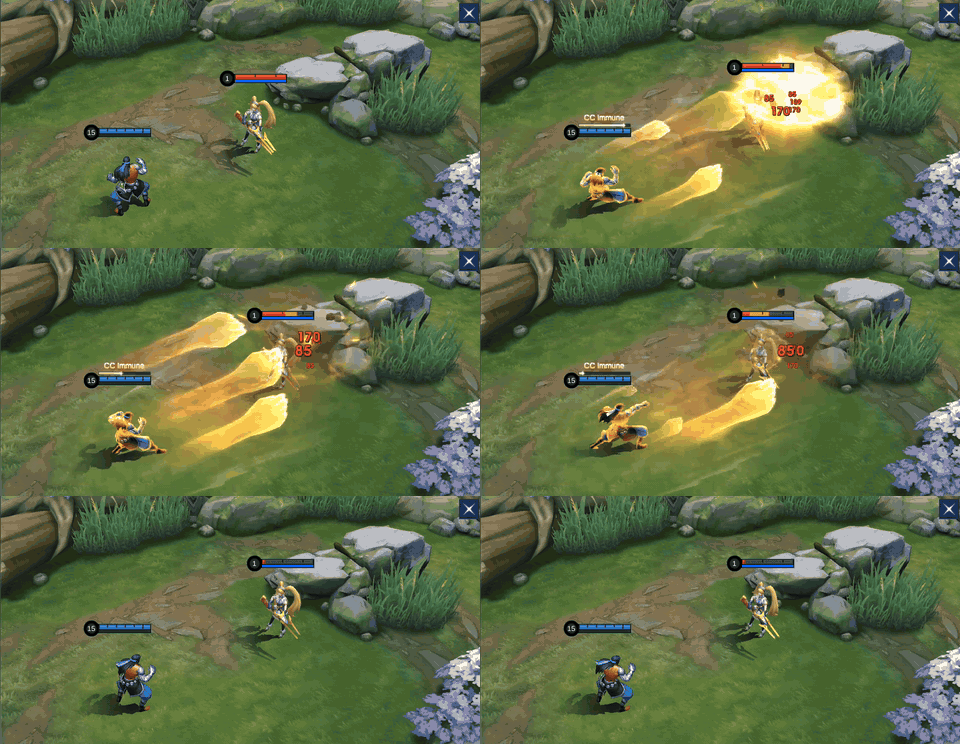
Badang throws a flurry of punches in the target direction, dealing 60 (+54% Total Physical Attack) Physical Damage to enemies hit multiple times (can trigger attack effects). The Fist Wind generated by the punches will explode upon hitting an obstacle, dealing 30 (+27% Total Physical Attack) Physical Damage to nearby enemies. Badang is immune to control effects for the duration.
When / why / do not: Channel after Fist Break pins the target or allied control groups several enemies. The punches repeatedly trigger attack effects, obstacle explosions add damage, and Badang is control immune during the cast. Do not open with the ultimate in open space where opponents can walk sideways.
Fist Crack demonstration.
Skill Priority and Badang Combos
Teamfight Combos
 Fist Break
 Fist Crack
 Fist Wind
 Basic Attack
Fist Break → Fist Crack → Fist Wind → Basic Attacks. In teamfights, use Badang's 2nd Skill when the enemy is grouped up to trap multiple targets in the barrier, and unleash his Ultimate to repeatedly knock them into it for massive damage. Then use his 1st Skill and Basic Attacks to continue the onslaught. Flicker can adjust the entry angle, but wait until the target commits before spending it.
Laning Combos
 Fist Wind
 Fist Break
 Fist Wind
 Basic Attack
Fist Wind → Fist Break → Fist Wind → Basic Attacks. In the laning phase, use Badang's 1st Skill to whittle down the enemy's HP. Use his 2nd Skill to trap the enemy, then use his 1st Skill to knock them into the barrier to stun them, and finish with Basic Attacks. Flicker can adjust the entry angle, but wait until the target commits before spending it.
How to Play Badang by Phase
Early game
Use Fist Wind to last-hit while clipping the enemy, and preserve one charge when the opposing jungler is missing. At level 2, threaten Fist Break only when the dash will place the wall behind the target. Freezing near your side gives more room for the knockback sequence.
Mid game
Work from fog beside Turtle, jungle entrances, and narrow side lanes. Let allied grouping control start the play, then lock the exit with Fist Break. A defensive roam build can hold the choke; a damage build should arrive after the first control is spent.
Late game
Do not front-dash through five heroes. Hold a flank, track the marksman's mobility, and commit only when one barrier can separate a carry from protection. If no angle appears, use Fist Wind to peel and save the wall for the enemy diver.
Five Badang Mistakes to Avoid
1. Dashing without a wall angle
Fist Break is not just movement. If the obstacle lands beside rather than behind the target, the knockback and ultimate lose most of their control.
2. Emptying both Fist Wind charges
One charge should remain available to trigger Chivalry Fist against the new obstacle or stop an enemy who survives the first burst.
3. Removing the obstacle by accident
The second cast deletes your wall. Keep the Use Again button untouched until the control sequence ends unless the barrier harms your team.
4. Channeling in open space
Control immunity does not force enemies to stay. Fist Crack needs a barrier, terrain, or allied crowd control to convert its repeated punches.
5. Copying a tank build into every draft
The observed leaderboard sample favored defense, but a team that already has reliable frontline may need Badang's Assassin Emblem burst instead. Build for your job, not the rank number.
Best Emblem and Battle Spell for Badang
Default: Assassin Emblem + Flicker
Use Rupture, Master Assassin, and Quantum Charge. Rupture helps physical penetration, Master Assassin rewards isolated pickoffs, and Quantum Charge adds movement and recovery after a Basic Attack. Flicker is the default because it repairs the entry angle or extends Fist Break toward a carry. Use it after the target reveals movement; do not spend it just to start a fight your team cannot follow.
Alternative: Support Emblem + Flicker
For roam control, use Agility, Pull Yourself Together, and Focusing Mark. Agility improves rotations, Pull Yourself Together shortens active cooldowns, and Focusing Mark helps allies punish the target you control. Choose this when your team needs initiation and utility. Do not choose it when Badang is the only source of back-line damage or when another tank already owns the engage role.
Default and roam Emblem routes for Badang.
Top 5 Badang Pro Setups
This current in-game build sample was observed on August 6, 2026. Every row used Rapid Boots with a roaming-blessing variant, Thunder Belt, and Dominance Ice, then stacked situational defense. The sample describes a durable roam style; it does not prove that every Badang draft should copy it.
Build 1
| Item 1 | Item 2 | Item 3 | Item 4 | Item 5 | Item 6 |
|---|---|---|---|---|---|
 Rapid Boots Rapid Boots |  Thunder Belt Thunder Belt |  Dominance Ice Dominance Ice |  Antique Cuirass Antique Cuirass |  Radiant Armor Radiant Armor |  Immortality Immortality |
Build 2
| Item 1 | Item 2 | Item 3 | Item 4 | Item 5 | Item 6 |
|---|---|---|---|---|---|
| Rapid Boots | Thunder Belt | Dominance Ice | Antique Cuirass | Radiant Armor | Immortality |
Build 3
| Item 1 | Item 2 | Item 3 | Item 4 | Item 5 | Item 6 |
|---|---|---|---|---|---|
| Rapid Boots | Thunder Belt | Dominance Ice | Antique Cuirass |  Guardian Helmet Guardian Helmet | Immortality |
Build 4
| Item 1 | Item 2 | Item 3 | Item 4 | Item 5 | Item 6 |
|---|---|---|---|---|---|
| Rapid Boots | Thunder Belt | Dominance Ice | Antique Cuirass | Guardian Helmet | Immortality |
Build 5
| Item 1 | Item 2 | Item 3 | Item 4 | Item 5 | Item 6 |
|---|---|---|---|---|---|
| Rapid Boots | Thunder Belt | Dominance Ice |  Chastise Pauldron Chastise Pauldron | Guardian Helmet | Radiant Armor |
Five ranked build snapshots in displayed order.
Badang Equipment Matrix
| Item | Why it appears | Buy when | Do not buy when |
|---|---|---|---|
| Rapid Boots | The observed roaming-blessing variant prioritizes fast movement between lanes and pickoff angles; the obscured blessing name is deliberately not guessed. | Badang is roaming and must reach side-lane walls first | Badang is farming EXP lane or needs immediate control resistance |
| Thunder Belt | HP, hybrid defense, movement, a periodic true-damage Basic Attack, and a heavy slow reward a controller who stays near the target. | the fight lasts long enough to repeat empowered Basic Attacks | a pure burst job ends before its four-second trigger matters |
| Dominance Ice | Hybrid defense, movement, nearby defense scaling, and Lifebane reduce enemy shield and HP regeneration in close range. | healing, shields, or attack-speed carries must fight near Badang | the priority target stays outside the aura |
| Antique Cuirass | HP and Physical Defense pair with Deter, which reduces Physical Damage from a skill attacker and can stack three times. | physical skill damage is the main return threat | magic or true damage decides the fight |
| Radiant Armor | HP and Magic Defense build repeated magic resistance through Holy Blessing stacks. | sustained multi-hit magic damage is the problem | the enemy mage deals one isolated burst or physical damage dominates |
| Immortality | The resurrection gives a late-fight second life after Badang commits into a wall combo. | one extra body can secure an objective or buy time | the passive is on cooldown or a stronger live defense is needed now |
| Guardian Helmet | Very high HP and out-of-combat recovery support repeated rotations, while its extra recovery responds to large single hits. | Badang can reset between catches without recalling | percentage-HP damage and anti-heal make raw HP inefficient |
| Chastise Pauldron | Physical Defense, an attack-speed suppression effect, and a low-HP recovery window target Basic Attack threats. | a fast physical marksman is the main danger | magic burst or ability damage is the actual failure point |
Effects were checked across 30 long-press tooltip captures.
Best Teammates, Threats, and Favorable Matchups
Grouping partners


Tigreal and Luo Yi group enemies so Fist Break can trap more than one target. Argus can remain in the close fight while Badang controls the exit. Enter after their setup; do not compete for the same first-contact timing.
Agile threats



Wanwan and Ling can dodge or escape the barrier, sharply reducing Badang's burst and crowd control. Esmeralda pressures his shielded entry. Wait for movement, attack from fog, and cancel the chase when the wall no longer controls space.
Low-mobility targets



Layla and Odette struggle when Fist Break seals the escape route. Fanny is listed as Badang's best counter target in the relationship data, but only when the wall catches her path; missing the entry leaves Badang unable to follow cables.
Draft caution

Diggie can undermine the value of layered control, making the pairing awkward when the team expects Badang's wall combo to be the main lockdown. Confirm there is another conversion plan before drafting both.
Badang Base Stats
| HP | 2530 | HP Regen | 8 | Physical ATK | 111 |
|---|---|---|---|---|---|
| Physical DEF | 23 | Attack Speed | 1.13 | Attack Speed Ratio | 100% |
| Mana | 0 | Mana Regen | 0 | Magic DEF | 15 |
| Magic Power | 0 | Movement SPD | 255 | Role | Fighter |
Level-one stats without equipment, Emblem, skin, or match modifiers.
Badang Skins and Availability
Seven exact Badang Shop cards were accepted. Diamond prices appear only where Purchase was visible. Zodiac Summon, collaboration, Collector, Special, and Limited-time Event labels describe the observed Shop state, not a permanent availability promise.
| Preview | Skin | Tag | Observed availability |
|---|---|---|---|
 | Susanoo | Special | 749 Diamonds; Purchase shown |
 | Ironfists | — | 269 Diamonds; Purchase shown |
 | Leo | Zodiac | Zodiac Summon |
 | Fist of Zen | Collector | Limited-time Event |
 | Pegasus Seiya | Saint Seiya | Limited-time Event |
 | Sagittarius Seiya | Saint Seiya | Limited-time Event |
 | Steel Arms | Special | Limited-time Event |
Seven Shop cards in displayed order.
Badang Story
Badang grew up in a fishing village whose livelihood was threatened when a strange water monster began stealing the catch. He set a trap, fought the creature, and hauled it ashore. The monster then revealed that it was a water elf corrupted by an evil force from the southern mountains. Badang chose mercy. After he released the elf, powerful energy restored and strengthened his arms. He helped the village recover, then left for the Land of Dawn to find the source of the corruption.
Badang FAQ
What is the best Badang build?
For roam control, the ranked builds repeatedly used Rapid Boots, Thunder Belt, Dominance Ice, Antique Cuirass, and situational defenses. For pickoff damage, use a damage-oriented route instead of copying the defensive sample blindly.
What is the best Badang Emblem?
Assassin Emblem with Rupture, Master Assassin, and Quantum Charge is the default pickoff route. Support Emblem with Agility, Pull Yourself Together, and Focusing Mark is the roam alternative.
Which Battle Spell should Badang use?
Flicker is the general choice because it extends or corrects the Fist Break angle and can also rescue a failed entry. Spend it after the enemy reveals movement, not before your team is ready.
What is Badang's skill priority?
Take Fist Wind at level 1, prioritize it, keep Fist Break as the backup upgrade, and level Fist Crack whenever it becomes available.
Who counters Badang?
Wanwan and Ling can dodge or escape his barrier, while Esmeralda pressures his shield-based entry. Any hero that resets the fight before Fist Crack finishes reduces his impact.
When should I pick Badang?
Pick him with grouping control and into low-mobility carries. Avoid him when the enemy lineup has several dashes and your team lacks a reliable way to begin the fight.
Final Verdict
Badang is a geometry hero: the wall is the build, and every other choice exists to make that wall matter. Damage Badang punishes an isolated carry; defensive roam Badang turns a choke into a long control zone. Keep one Fist Wind charge, wait for movement, and refuse the engage when Fist Break cannot place an obstacle behind the target. For nearby Fighter decisions, compare the Terizla guide, Thamuz guide, and Martis guide.
Top up Mobile Legends: Bang Bang safely on ManaBuy




Copyright © FUTURE OUTLOOK TECHNOLOGY LIMITED.Company Registration No.: 77374965 All rights reserved.UNIT 135,1/F.,143 WAI YIP STREET,KWUN TONG HK