
EN / $ USD
Esmeralda MLBB Guide: Best Build, Emblem, Combos, and Counters

by Hannah Price
Published Aug 15 2026 · Updated Aug 18 2026
Share:
Table of Contents
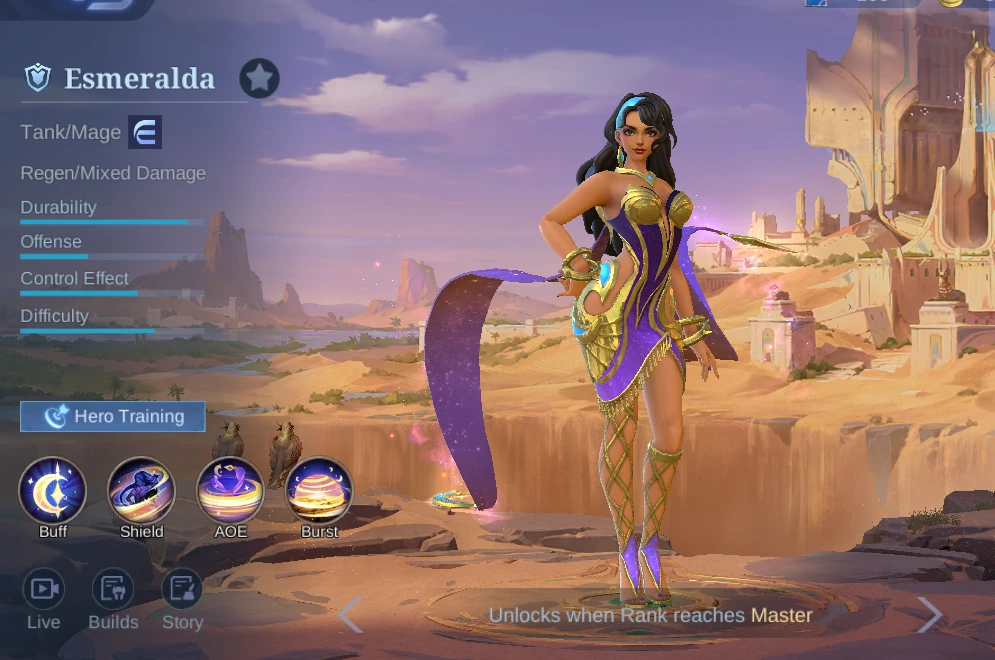
Esmeralda is a sustained EXP-lane Tank/Mage who turns frequent shields, mixed damage, and close-range cooldown resets into long winning trades. This guide reflects verified English in-game data from MLBB version 2.1.88.12027, observed on August 14, 2026.
Esmeralda at a Glance
Core pattern
Cast Frostmoon Shield, enter melee range, hit several targets with Stardust Dance, then repeat the shield as its cooldown falls.Recommended emblem
Custom Support Emblem with Agility, Tenacity, and Impure Rage balances movement, durability, and repeated skill pressure.Battle spells
Vengeance for brawls, Purify against heavy control, Flicker for access, or Retribution only when jungling.Role, Specialty, and Level-One Stats
Esmeralda is listed in-game as a Tank/Mage with Regen/Mixed Damage. Her damage is split across Physical and Magic components, but her real advantage is time: each successful rotation creates another shield window and more chances to stay attached to a target.
| HP | 2660 |
|---|---|
| HP Regen | 7.2 |
| Physical Attack | 114 |
| Physical Defense | 25 |
| Attack Speed | 1 |
| Attack Speed Ratio | 100% |
| Mana | 500 |
| Mana Regen | 4 |
| Magic Power | 0 |
| Magic Defense | 15 |
| Movement Speed | 240 |
Skills and Practical Use

Starmoon Casket
Passive / Buff / Shield
Stardust deals Physical Damage while Frostmoon deals Magic Damage and gives the target a shield equal to 135% of Frostmoon damage dealt. Each Basic Attack deals both Physical and Magic Damage. Esmeralda's damage ignores shields, and her own shield is gradually converted into HP.
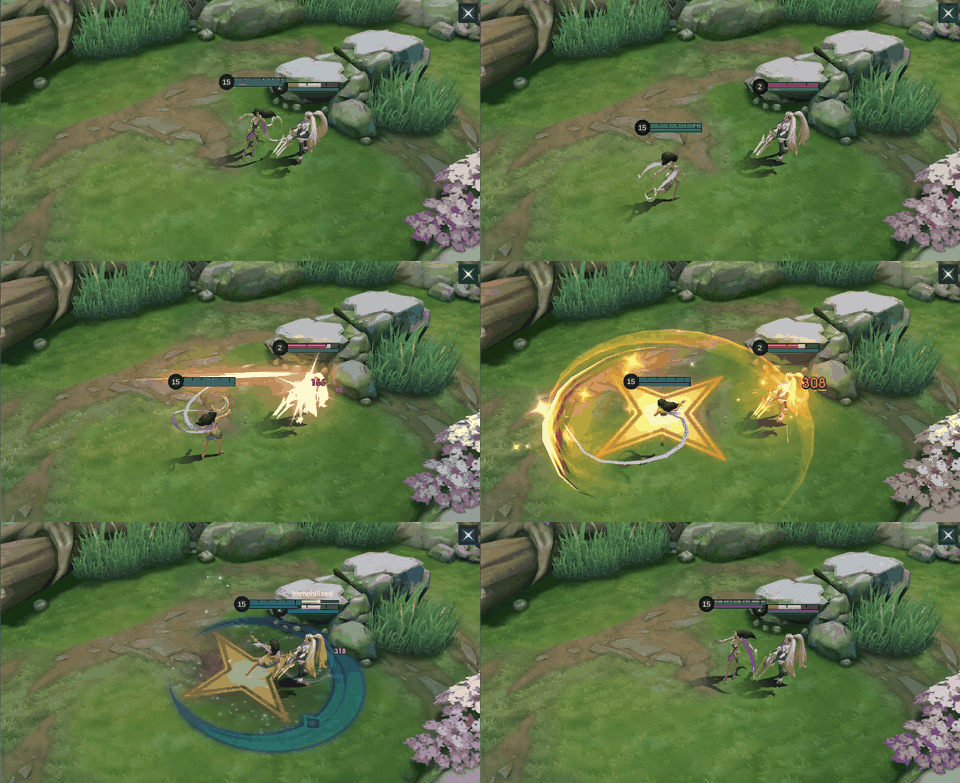
Use it well: Keep attacking while shielded so the passive turns that temporary protection into real HP. Enemy shield users are especially favorable because your damage does not have to break their shield first.
Avoid: Do not treat the white shield segment as permanent health. Back away before it expires when Frostmoon Shield is not ready.

Frostmoon Shield
Skill 1 / Shield / Buff
Esmeralda gains a 500 (+150% Total Magic Power) shield and 40% Movement Speed that rapidly decays over four seconds. Nearby enemy shields are gradually transformed into her own shield, capped at 50% of her Max HP.
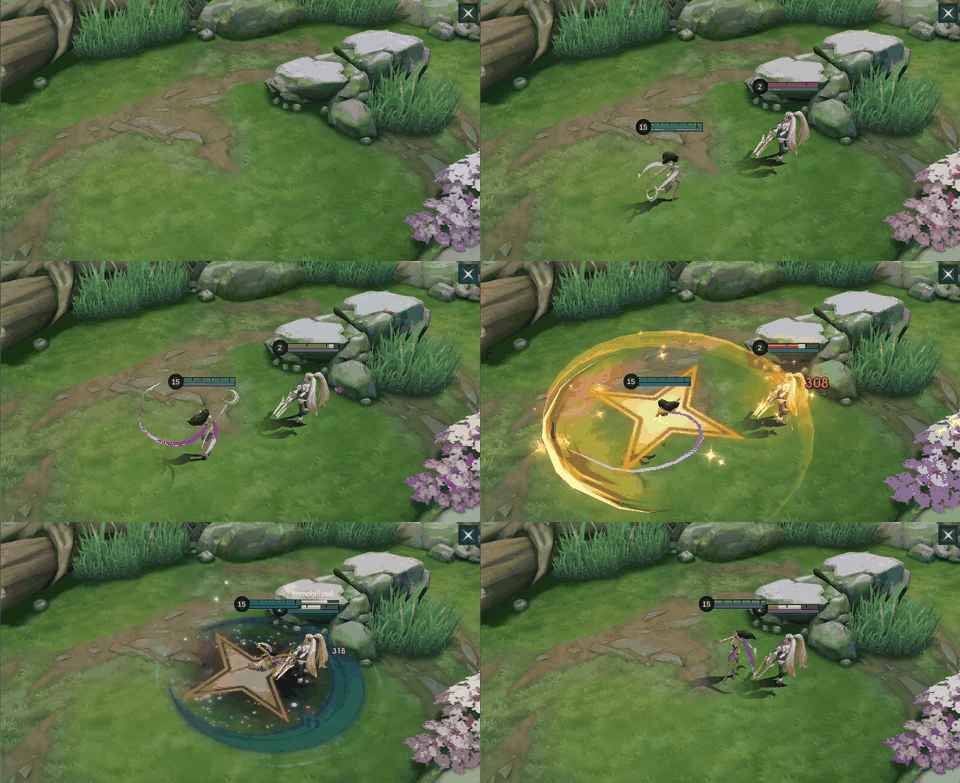
Use it well: Cast before entering melee range, then use the burst of speed to circle a target while stealing nearby shields. Recast as soon as Stardust Dance refunds enough cooldown.
Avoid: Do not spend it only for travel when a fight may start immediately; it is both your entry tool and your safest way to stay in range.

Stardust Dance
Skill 2 / AOE / Buff
Deals 240 (+60% Total Physical Attack) Physical Damage and 300 (+120% Total Magic Power) Magic Damage nearby. Each hero hit cuts Frostmoon Shield's cooldown by 1.5 seconds, non-hero hits cut it by 0.5 seconds, and targets are slowed by 20% for 1.5 seconds.
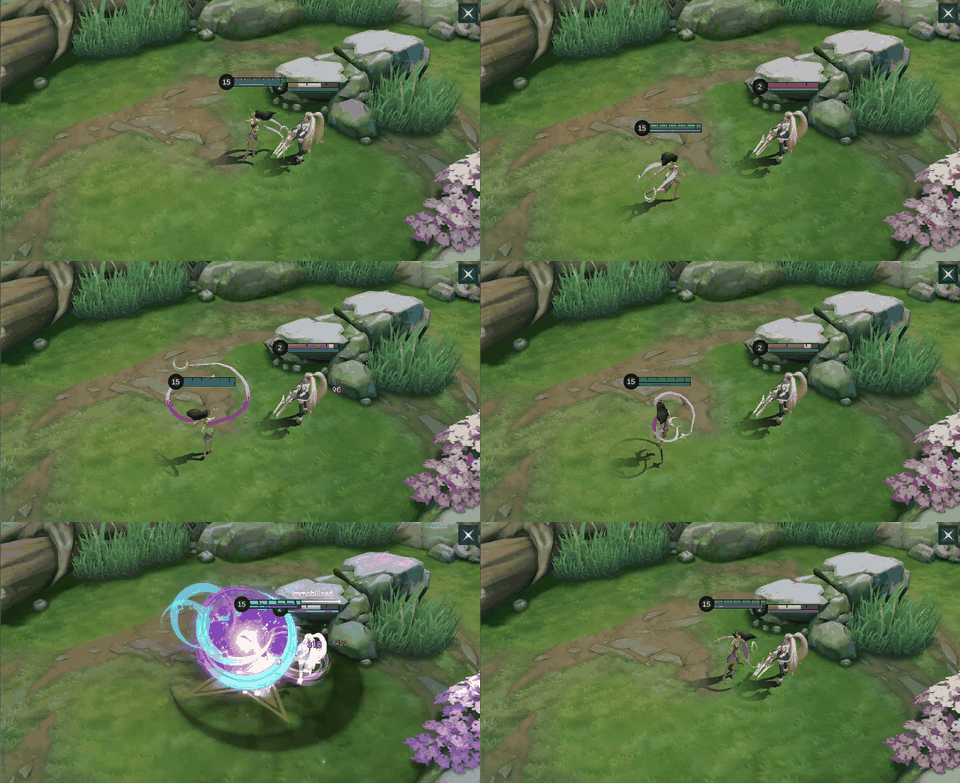
Use it well: Stand close enough to hit several heroes when possible. Every hero hit accelerates the next shield, so a well-placed spin is a defensive reset as well as damage.
Avoid: Do not cast at maximum edge range if one short step would hit another hero and earn a larger cooldown refund.

Falling Starmoon
Ultimate / Burst / Mobility
Channeling increases the cast range. On the second cast, Stardust deals 350 (+90% Total Physical Attack) Physical Damage; Esmeralda then blinks to the area, Frostmoon deals 350 (+140% Total Magic Power) Magic Damage, and enemies are immobilized for one second.
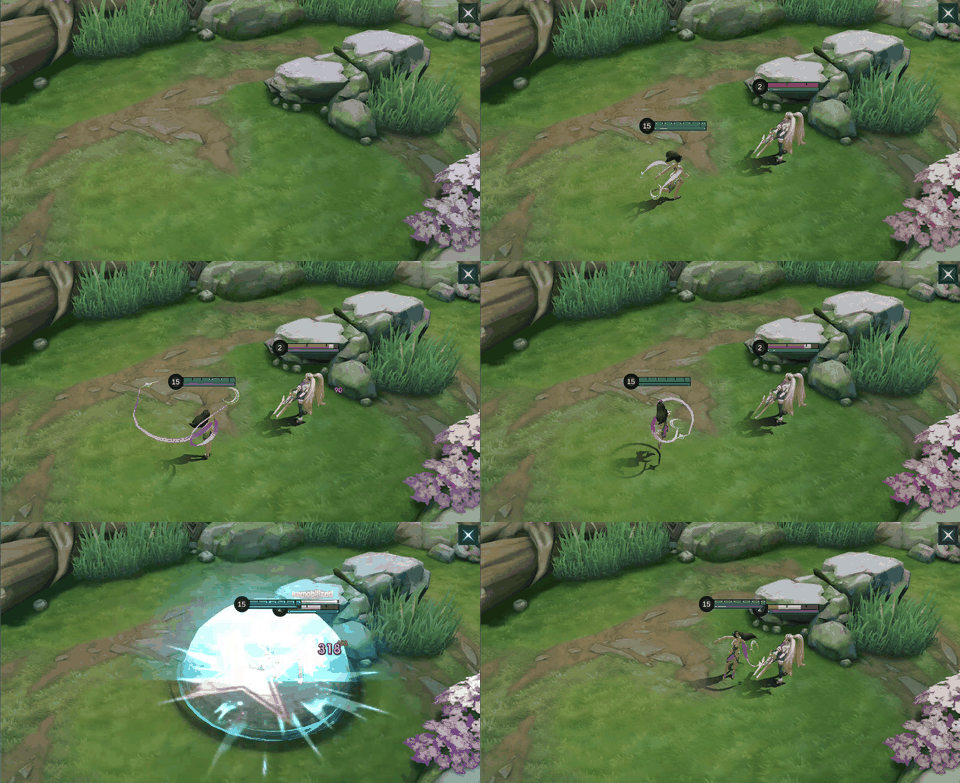
Use it well: Charge from outside vision or behind your front line, land on a carry, and cast Frostmoon Shield immediately after arriving. A shorter charge is often better when the target is already close.
Avoid: Do not hold the channel in plain sight against mobile enemies. They can leave the landing area or interrupt your plan before you commit.
Skill Upgrade Priority
Learn Stardust Dance at level 1 and prioritize it. Keep Frostmoon Shield as the secondary upgrade, and level Falling Starmoon whenever available. More Stardust Dance damage also means more reliable cooldown refunds in lane and team fights.
Best Emblem and Battle Spell
For standard EXP Lane games, use the Custom Support Emblem. Agility improves access and rotation speed, Tenacity helps when your HP drops in the middle of a brawl, and Impure Rage adds skill damage while returning Mana. A damage-heavy alternative can use the observed Thrill, Weapons Master, and Impure Rage talent trio when the draft already supplies a durable front line.
Vengeance is the safest brawling spell. Use Purify when one control chain would prevent your second shield, or Flicker when reaching the back line matters more than damage reduction. Retribution is mandatory for jungle play and should not be carried into a normal EXP build.
Current In-Game Builds
These five current in-game builds were observed on August 14, 2026. Compare the six-item order and adjust utility or defensive slots for the match.
Build 1
| Item 1 | Item 2 | Item 3 | Item 4 | Item 5 | Item 6 |
|---|---|---|---|---|---|
 Magic Boots Magic Boots |  Feather of Heaven Feather of Heaven |  Sky Piercer Sky Piercer |  Holy Crystal Holy Crystal |  Starlium Scythe Starlium Scythe |  Blood Wings Blood Wings |
Build 2
| Item 1 | Item 2 | Item 3 | Item 4 | Item 5 | Item 6 |
|---|---|---|---|---|---|
 Tough Boots Tough Boots |  Enchanted Talisman Enchanted Talisman |  Oracle Oracle |  Dominance Ice Dominance Ice |  Chastise Pauldron Chastise Pauldron |  Radiant Armor Radiant Armor |
Build 3
| Item 1 | Item 2 | Item 3 | Item 4 | Item 5 | Item 6 |
|---|---|---|---|---|---|
| Enchanted Talisman | Tough Boots | Oracle | Chastise Pauldron | Dominance Ice | Radiant Armor |
Build 4
| Item 1 | Item 2 | Item 3 | Item 4 | Item 5 | Item 6 |
|---|---|---|---|---|---|
 Ice Hunter's Rapid Boots Ice Hunter's Rapid Boots | Feather of Heaven | Sky Piercer | Starlium Scythe | Holy Crystal | Blood Wings |
Build 5
| Item 1 | Item 2 | Item 3 | Item 4 | Item 5 | Item 6 |
|---|---|---|---|---|---|
| Ice Hunter's Rapid Boots | Feather of Heaven | Sky Piercer | Starlium Scythe | Holy Crystal | Blood Wings |
Equipment Guide
Use the item notes below to decide what each slot contributes. The table describes each item independently of the numbered builds.
| Item | What it adds | When to consider it |
|---|---|---|
| Magic Boots | Movement Speed, cooldown reduction, and HP for quicker shield-and-spin cycles with a little extra durability. | Choose when more frequent Frostmoon Shield casts matter more than defensive footwear. Replace them when crowd control or lane damage is the larger threat. |
| Feather of Heaven | Magic Power, Attack Speed, lifesteal, and cooldown reduction; Basic Attacks gain extra magic damage and stack more Attack Speed. | Buy when you can stay in Basic Attack range between skills. Delay it if the draft forces short entries rather than long trades. |
| Sky Piercer | Adaptive Attack and Movement Speed, with a low-HP execute whose threshold grows through kills and falls after deaths. | Consider it when your team needs help finishing low-HP targets and you can protect its stacks. Avoid rushing it in a losing, death-heavy game. |
| Holy Crystal | A large Magic Power increase plus a level-scaling percentage bonus to total Magic Power. | Add after enough survival and cooldown access are secured; it sharply improves shields and mixed-damage scaling. |
| Starlium Scythe | Magic Power, cooldown reduction, hybrid lifesteal, and Mana Regen, followed by a slowing true-damage Basic Attack after a skill. | Use when you can weave one Basic Attack after each skill. Replace it if hard control prevents reliable follow-up hits. |
| Blood Wings | Magic Power and a regenerating shield, with extra Movement Speed while the shield is active and briefly after it breaks. | Take late for a high-power shield and extra chase speed, especially when one more protective layer lets you remain in melee range. |
| Tough Boots | Movement Speed and Magic Defense while reducing the duration of crowd control and slows. | Choose against magic lane pressure or long control chains. Swap to another boot only when those threats are limited. |
| Enchanted Talisman | Magic Power, HP, cooldown reduction, recurring Max Mana regeneration, and a higher cooldown-reduction limit. | Buy early for uninterrupted Mana and cooldown cycles in EXP Lane. It is less urgent in jungle routes with reliable blue-buff access. |
| Oracle | HP, both defenses, cooldown reduction, and stronger shields and HP regeneration. | Move it earlier when shield amplification and mixed defenses can stabilize repeated trades. Delay it when anti-heal and physical defense are more urgent. |
| Dominance Ice | Both defenses and Movement Speed, with growing defenses near enemy heroes and an aura that reduces nearby Shield and HP Regen. | Buy early against healing, shields, and fast Basic Attacks, provided you can stay close enough to keep its aura active. |
| Chastise Pauldron | HP and Physical Defense, plus reduced enemy Attack Speed after taking damage and a low-HP recovery effect. | Choose into sustained physical Basic Attack pressure and time your re-entry around its low-HP recovery cooldown. |
| Radiant Armor | HP, Magic Defense, and HP Regen, with stacking Magic Defense after taking magic damage. | Choose against repeated magic hits that let its defense stack. Prefer burst-focused magic defense when damage lands in one short window. |
| Ice Hunter's Rapid Boots | High Movement Speed, slow reduction, HP Regen, and the Ice Retribution jungle effect for controlling a target after smiting it. | Use only for the jungle route with Retribution; a lane build should replace the jungle blessing with role-appropriate boots. |
Combos
Teamfight entry




Falling Starmoon → Frostmoon Shield → Stardust Dance → Basic Attacks. Charge from a safe angle, land on the priority area, and shield immediately. Keep circling while weaving attacks until Stardust Dance earns the next shield.
Laning trade






Frostmoon Shield → Stardust Dance → Basic Attack → Frostmoon Shield → Stardust Dance → Basic Attack. This sequence converts the first shield into lane control and uses the cooldown refund to extend the trade.
How to Play Esmeralda
Early game
Use Frostmoon Shield before stepping forward, hit the wave and enemy hero with Stardust Dance when possible, and avoid trading after both skills are unavailable. Freeze near your side if the enemy has strong early control.Mid game
Push the side lane, then approach objectives through fog. Falling Starmoon is stronger as a threat from an unseen angle than as a long channel in front of five enemies.Late game
Track anti-shield effects and hard control before diving. You can front-line against shield-heavy teams, but percentage damage and repeated kiting can still remove you before a second rotation.Team fights
Aim Stardust Dance through multiple heroes, not merely the nearest target. Each extra hero hit brings Frostmoon Shield back faster and changes how long you can occupy the enemy back line.Counters and Team Synergy
Favorable targets


Akai and Lolita rely on shields that Esmeralda can ignore and convert. Lolita is the clearest favorable matchup.
Hard matchups


Karrie and Lesley combine range or mobility with damage that punishes long, predictable chases. Do not dive without a clean flank.
Best partners



Nolan can capitalize on the space Esmeralda creates. Atlas and Tigreal group enemies for Falling Starmoon and multi-target Stardust Dance hits.
Awkward partner

Sora offers less natural interaction with Esmeralda than reliable grouping or follow-up damage. Draft clearer engage support when possible.
Esmeralda Skins and Availability
Availability below reflects the English in-game Shop on August 14, 2026. Event and membership skins may return under different schedules.

Blazing Shadow
899 Diamonds shown in-game

Lady Thief
749 Diamonds shown in-game

Ruddy Dusk
269 Diamonds shown in-game

Poison Vine
Limited-time Event

Cleopatra
09/2020 StarLight Member

The Foreseer
Limited-time Event

Light Envoy
Limited-time Event

Astral Muse
Limited-time Event

Petal's Razor
S40 First Recharge
Esmeralda Story
Chosen by the astrologers to inherit the Starmoon Casket, Esmeralda traveled toward the Minoan Labyrinth after a black sandstorm awakened the casket's ancient memories. She learned that Khufra had returned and followed the relic to a ruined desert city, where Frostmoon and Stardust answered her call. The casket also revealed an old bond between Khufra and an astrologer, but Esmeralda still resolved to seal the tyrant and restore peace to the Western Desert.
Related MLBB Guides
Esmeralda FAQ
What is the best Esmeralda build?
For a stable EXP game, start from Tough Boots, Enchanted Talisman, Oracle, Dominance Ice, Chastise Pauldron, and Radiant Armor, then change defenses for the enemy damage profile. Damage builds with Feather of Heaven and Starlium Scythe need longer Basic Attack windows.
What is Esmeralda's best emblem?
The Custom Support Emblem with Agility, Tenacity, and Impure Rage is the balanced default. Use a more offensive talent mix only when your team already has reliable front-line control.
Does Esmeralda counter shields?
Yes. Her damage ignores shield effects, and Frostmoon Shield transforms nearby enemy shields into her own, which makes shield-dependent front liners favorable targets.
Can Esmeralda jungle?
Yes, but only take the jungle boot blessing with Retribution. EXP Lane remains the simpler default because it does not depend on blue-buff control or jungle tempo.
Hannah Price
Events Editor
Hannah Price is an events writer who turns schedules into priorities. She publishes weekly roundups, reward notes, and code updates for major live-service titles, linking key dates to official announcements and refreshing posts quickly when requirements or timelines change.

Table of Contents

Mobile Legends: Bang Bang
Up to 54% OFF
About ManaBuy


Copyright © FUTURE OUTLOOK TECHNOLOGY LIMITED.Company Registration No.: 77374965 All rights reserved.UNIT 135,1/F.,143 WAI YIP STREET,KWUN TONG HK