
Freya Guide: Best Build, Skills, Emblem, Combos, Counters and Skins

Freya is a Fighter who wins by entering with a shield, converting Sacred Orbs into repeated Valkyrie Slash and Basic Attack cycles, and staying in contact through her Ultimate. Her ceiling is not one button: it is deciding when to spend Orbs, when to hold Leap of Faith, and whether the draft gives her enough time to brawl.
Quick Answer: What Is the Best Freya Build?
Prioritize Valkyrie Slash, weave a Basic Attack after every Slash, and use Inspire in EXP lane. A reliable core is Tough Boots, Golden Staff, War Axe, Endless Battle, then a defensive or penetration slot for the match. The official teamfight order is Valkyrie Descent → Leap of Faith → Valkyrie Slash → Basic Attack → Valkyrie Slash → Basic Attack.
- Pick Freya when: your team can start a committed fight and the enemy cannot easily kite ten seconds of Valkyrie State.
- Avoid or adapt when: Phoveus, Obsidia, repeated disengage, or anti-heal can deny sustained contact.
- Core discipline: never empty your Sacred Orbs on the wave just before a fight.
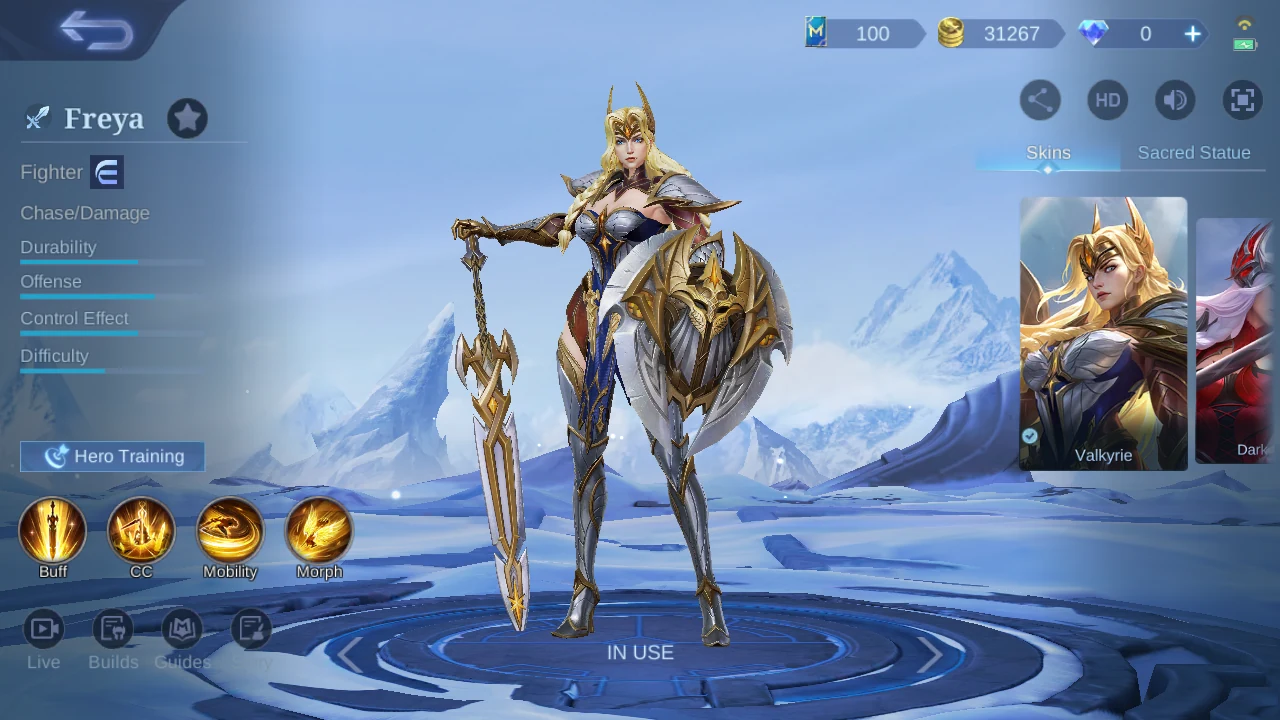
Freya at a Glance
| Role | Specialty | Best job | Main risk |
|---|---|---|---|
| Fighter | Chase | Damage and sustained melee pressure | Kiting and denied uptime |
| Durability | Offense | Control | Difficulty |
| 64% | 73% | 64% | 46% |
Freya Skills: Mechanics and Decisions
 Power of Einherjar
Each Basic Attack grants one Sacred Orb, up to six. Consuming one Orb gives 100% Attack Speed for the next Basic Attack and can stack six times; Orbs regenerate out of combat.

you can stay in contact long enough to cycle enhanced Basic Attacks.
The passive turns repeated skill-to-attack weaving into Freya's main damage engine.
Do not enter a fight at zero Orbs if you can safely prepare them first.
 Leap of Faith
6.0-8.0s cooldown. Freya gains a 500-900 (+100% Total Physical Attack) shield, then leaps to deal 200-300 (+80% Extra Physical Attack) Physical Damage and knock enemies airborne for 0.4s.

you need to start contact, cross a short gap, or interrupt a target.
The shield absorbs the first return hit while the airborne effect creates the opening for Valkyrie Slash.
Do not leap into several unseen enemies without a route out or allied follow-up.
 Valkyrie Slash
Deals 150-300 (+50% Total Physical Attack) Physical Damage and slows by 30% for 0.5s. It has no base cooldown but consumes two Sacred Orbs and deals 50% damage to creeps.

you have two Orbs and can immediately follow with a Basic Attack.
The no-cooldown design lets Orb management, not a timer, determine how long Freya can pressure.
Do not spam it into creeps before a hero fight if that leaves you without Orbs.
 Valkyrie Descent
44-28s cooldown. The dive deals 300-550 (+75% Total Physical Attack), slows by 40% for 2s, and grants control immunity during the dive. Valkyrie State lasts 10s; Basic Attacks gain extra non-Crit damage, healing, and splash.

a teamfight is committed and you can exploit the full 10-second state.
The opening slow keeps targets near Freya while splash and healing reward sustained melee uptime.
Do not cast only for a distant poke target; save it for a fight where the empowered window matters.
Freya Skill Priority and Combos
Skill upgrade priority
Take Valkyrie Slash at level 1 and prioritize Valkyrie Slash, with Leap of Faith as the backup upgrade. Upgrade Valkyrie Descent whenever available. Why: Slash is Freya's repeatable Orb spender and main contact tool. Do not: split early points evenly.
Teamfight combo
 Valkyrie Descent→
 Leap of Faith→
 Valkyrie Slash→
 Basic Attack→
 Valkyrie Slash→Basic Attack
When: both teams are committed and your allies can follow the dive. Why: the Ultimate opens with control immunity and a slow, Leap adds shield and airborne control, then each Slash is followed by a Basic Attack to use passive Attack Speed. Do not: start with Valkyrie Descent if the enemy can simply walk away.
Laning combo
 Leap of Faith→
 Valkyrie Slash→Basic Attack→
 Valkyrie Slash→Basic Attack
Order: Leap of Faith → Valkyrie Slash → Basic Attack → Valkyrie Slash → Basic Attack. When: the opponent has used a mobility or control skill. Why: the shield covers the entry and the attack weave spends passive buffs efficiently. Do not: leap through the wave when the river is dark.
How to Play Freya by Game Phase
Early game
Prepare Orbs safely and contest short trades after the enemy spends a key skill. When you jump, stop after a winning exchange instead of following under a tower. Why: Freya's shield is strong, but early cooldowns still create a punish window.
Mid game
Move first to Turtle and force fights in tight spaces where the Ultimate slow matters. Do not show alone in a long side lane when the enemy has several disengage tools.
Late game
Wait for important control, then enter a target group you can actually reach. Why: full Valkyrie State has more value than a fast but isolated dive. Do not spend Leap of Faith only to approach the fight if walking preserves it for the carry.
Five Freya Mistakes That Lose Winnable Fights
- Starting with no Sacred Orbs. Prepare them before an objective whenever it is safe.
- Spamming Slash without Basic Attacks. Weave attacks so the passive Attack Speed and on-hit build deliver value.
- Using Leap only for distance. Its shield and airborne control are part of Freya's survival; do not waste both before contact.
- Copying jungle boots in EXP lane. Flame Hunter's Tough Boots belong to a Retribution route, not a normal side-lane build.
- Ignoring anti-kite and anti-heal. Raw damage does not help when Freya cannot stay on a target or recover during Valkyrie State.
Best Freya Emblem and Battle Spell
Default EXP route: Assassin Emblem + Inspire
Talents: Fatal, Weapons Master, War Cry. When: use it when you can stay in Basic Attack range. Why: Attack Speed and repeated-hit amplification support the Slash-to-attack loop. Do not: take Inspire as permission to dive through unused control.
Observed sustain alternative
Talents: Thrill (+16 Adaptive Attack), Festival of Blood (6% Spell Vamp plus takedown scaling), and War Cry (8% damage after three separate hits for 6s, 6s cooldown). When: longer brawls need recovery. Why: it converts repeated contact into sustain and damage. Do not: treat the visible talent trio as proof of one mandatory Role Emblem type.
Jungle route: Retribution
When: only when Freya is assigned to jungle. Why: it enables the Hunter boot blessing and objective control. Do not: use Retribution or Flame Hunter's boots in a normal EXP-lane setup.
Sources: Freya build and Emblem guide and supplemental spell options; accessed July 30, 2026.
Five Pro Setups and the Item Decisions Behind Them
The top-five in-game sample converged most clearly on Golden Staff, War Axe, Endless Battle, and Tough Boots or its jungle blessing. The shared core supports passive cycling, sustained fighting, skill-to-attack True Damage, and control resistance. These are dated examples, not one-click prescriptions; adapt the last slots to the actual lane, damage type, healing, armor, and control threats.
Build 1
| Item 1 | Item 2 | Item 3 | Item 4 | Item 5 | Item 6 |
|---|---|---|---|---|---|
 Golden Staff Golden Staff |  Tough Boots Tough Boots |  War Axe War Axe |  Brute Force Breastplate Brute Force Breastplate |  Endless Battle Endless Battle |  Queen's Wings Queen's Wings |
Build 2
| Item 1 | Item 2 | Item 3 | Item 4 | Item 5 | Item 6 |
|---|---|---|---|---|---|
| Golden Staff | Tough Boots | War Axe | Endless Battle |  Oracle Oracle |  Rose Gold Meteor Rose Gold Meteor |
Build 3
| Item 1 | Item 2 | Item 3 | Item 4 | Item 5 | Item 6 |
|---|---|---|---|---|---|
| Tough Boots | Golden Staff | War Axe | Rose Gold Meteor | Endless Battle |  Malefic Roar Malefic Roar |
Build 4
| Item 1 | Item 2 | Item 3 | Item 4 | Item 5 | Item 6 |
|---|---|---|---|---|---|
| Flame Hunter's Tough Boots |  Corrosion Scythe Corrosion Scythe | Golden Staff |  Blade of Despair Blade of Despair | Endless Battle | Malefic Roar |
Build 5
| Item 1 | Item 2 | Item 3 | Item 4 | Item 5 | Item 6 |
|---|---|---|---|---|---|
| Corrosion Scythe | Flame Hunter's Tough Boots | War Axe | Endless Battle |  Malefic Gun Malefic Gun | Blade of Despair |
Current in-game Pro Setup snapshot.
Freya Equipment Matrix
| Item | Current tooltip role | Buy when | Do not buy when |
|---|---|---|---|
| Golden Staff | 55 Physical Attack; 15% Attack Speed. Crit becomes extra Attack Speed; every two non-Crit Basic Attacks empowers the next and repeats Attack Effects. | you want fast on-hit and passive cycling | Do not buy when you are committing to a true Crit path instead. |
| Tough Boots / Flame Hunter's Tough Boots | 40 Movement Speed and 18 Magic Defense with 25% control/slow reduction; the Flame Hunter's variant adds the Retribution jungle blessing. | Magic damage or removable control threatens your uptime; use the Flame Hunter's variant only when assigned jungle with Retribution | Do not buy the Flame Hunter's variant in EXP lane; choose armor boots when Physical Basic Attacks are the only early threat. |
| War Axe | 35 Physical Attack; 400 HP; 10% Cooldown Reduction; 8% Hybrid Lifesteal. Fighting Spirit stacks Attack and grants 10% True Damage at full stacks. | you expect a long brawl | Do not buy when you cannot remain in combat long enough to stack it. |
| Brute Force Breastplate | 800 HP; 20 Physical Defense; 10% Cooldown Reduction. Damage dealt builds Adaptive Attack and Movement Speed; full stacks add control-duration reduction. | you need durability without giving up chase pressure | Do not buy when Magic burst is the sole reason you are dying. |
| Endless Battle | 60 Physical Attack; 250 HP; 10% Cooldown Reduction; 5% Movement Speed; 5 Mana Regen. After a skill, the next Basic Attack deals extra True Damage and heals. | you can consistently weave a Basic Attack after each skill | Do not buy when you cannot safely reach Basic Attack range. |
| Queen's Wings | 750 HP; 30 Adaptive Attack; 10% Cooldown Reduction; 10% Spell Vamp. Low HP triggers damage reduction and cooldown relief. | you need to survive and reverse an all-in | Do not buy when the enemy can disengage until the low-HP window expires. |
| Oracle | 850 HP; 20 Physical Defense; 20 Magic Defense; 10% Cooldown Reduction; increases received shields and HP regeneration by 25%. | mixed damage meets a shield-and-heal build | Do not buy when you need direct damage or armor penetration first. |
| Rose Gold Meteor | 30 Physical Attack; 20% Attack Speed; 10% Lifesteal. Physical Attack adds Hybrid Defense; low HP triggers a level-scaled shield and Movement Speed. | Magic burst threatens to end your attack window | Do not buy when the enemy has no meaningful burst and you need damage conversion. |
| Malefic Roar | 60 Physical Attack; 30% Physical Penetration, plus more penetration into enemy Physical Defense. | front liners stack Physical Defense | Do not buy when targets have little armor and a survivability slot decides fights. |
| Corrosion Scythe | 30 Physical Attack; 5% Movement Speed; 30% Attack Speed. Basic Attacks add damage and stacking slow; repeated attacks stack more Attack Speed. | you need to stick to mobile targets | Do not buy when the fight is decided by one burst before stacks build. |
| Blade of Despair | 160 Physical Attack; 5% Movement Speed; damaging non-minions below 50% HP grants 25% Physical Attack for 2s. | you are ahead and can reliably reach low-health targets | Do not buy when armor, control, or burst kills you before raw Attack matters. |
| Malefic Gun | 40 Physical Attack; 20% Attack Speed; 30% Physical Penetration; 12% Basic Attack range and brief Movement Speed on hero hits. | range and armor penetration let you maintain contact | Do not buy when you need defense or sustained healing more urgently. |
Freya Counters and Team Synergy
The relationship names and hero pairings below follow the official Freya profile dataset. Read the mechanism first, then choose the action that preserves contact time.
| Official relationship | Heroes | Mechanism | Play action |
|---|---|---|---|
| Counters |  Lesley Lesley Ixia Ixia | Freya's mobility and prolonged damage are effective against fragile, low-HP Marksmen. | Enter after their peel skill is spent, then stay in Basic Attack range instead of switching targets. |
| Countered by |  Phoveus Phoveus Obsidia Obsidia | Freya's movement-heavy skills feed Phoveus's punish pattern, while movement-disabling control can lock her down. | Delay Leap until the punish window is unavailable; do not open an isolated fight into ready control. |
| Compatibility |  Belerick Belerick Gatotkaca Gatotkaca | Their crowd control holds enemies in place long enough for Freya to maximize repeated damage. | Enter after the control lands and focus the trapped target; do not race ahead of the engage. |
| Best teammates |  Baxia Baxia | Baxia brings mobile front-line contact and healing reduction while Freya follows through. | Let Baxia establish contact first, then use Leap to extend the same fight. |
| Best counters |  Aulus Aulus | Freya can force a prolonged duel before Aulus reaches his strongest late scaling. | Pressure his early farm and objectives, but disengage if the late fight no longer favors extended contact. |
| Most countered by |  Phoveus Phoveus | Repeated movement components let Phoveus gain energy for enhanced Basic Attacks. | Space skills instead of chaining every dash near him; save Leap for a confirmed finish or escape. |
| Not compatible |  Edith Edith | Overlapping front-line initiation can split targets and leave no clean follow-up window. | Stagger engage timing and call one target before Freya commits her Sacred Orb stacks. |
Freya Base Stats
| HP | 2,550 | Physical Attack | 120 |
|---|---|---|---|
| HP Regen | 9.8 | Movement Speed | 260 |
| Physical Defense | 22 | Magic Defense | 15 |
| Attack Speed | 1.00 | Attack Speed Ratio | 100% |
| Mana | 0 | Mana Regen | 0 |
| Magic Power | 0 | Resource | Sacred Orbs |
Level-one stats as of July 30, 2026.
Freya Skins and Availability
The in-game Shop returned ten Freya cards. Prices and event labels are dated observations; always check the current Shop before spending.
| Preview | Skin | Series | Observed price or availability |
|---|---|---|---|
 | S.A.B.E.R. Manhunter | S.A.B.E.R. | 899 Diamonds |
 | Raven Shogun | EPIC | 899 Diamonds |
 | Beach Sweetheart | Summer | 749 Diamonds |
 | Gladiator | ELITE | 599 Diamonds |
 | Dark Rose | Standard | 299 Diamonds |
 | Christmas Carnival | Christmas | Limited-time Event |
 | Dragon Hunter | STAR | 03/2017 StarLight Member |
 | War Angel | LUCKYBOX | Limited-time Event |
 | Galactic Vanquisher | LEGEND | Magic Wheel |
 | Starborn Resolve | STAR | 03/2026 StarLight Member |
Skin availability as of July 30, 2026.
Freya Story
Freya is a Valkyrie of the Northern Vale, bound to the duty of guiding worthy fallen warriors. Her story frames strength as a promise rather than spectacle: she answers the call of battle, protects those placed in her care, and carries the cost of duty even when victory demands sacrifice.
Freya FAQ
What is Freya's best combo?
In a teamfight, use Valkyrie Descent → Leap of Faith → Valkyrie Slash → Basic Attack → Valkyrie Slash → Basic Attack. In lane, omit the Ultimate and start with Leap after the opponent spends a key skill.
Which Freya skill should I level first?
Take Valkyrie Slash at level 1 and prioritize it, with Leap of Faith second; upgrade Valkyrie Descent whenever available.
What is the best Emblem for Freya?
Assassin Emblem with Fatal, Weapons Master, and War Cry is the external burst default. Thrill, Festival of Blood, and War Cry is a observed in-game sustain alternative.
Is Inspire or Retribution better for Freya?
Inspire is the EXP-lane default. Retribution is only for jungle and is the condition for Flame Hunter's Tough Boots.
Why does Freya use Golden Staff?
It accelerates non-Crit Basic Attack and Attack Effect cycles, matching her repeated Slash-to-attack pattern. Do not pair it with a build whose main goal is true Crit damage.
Are the listed Freya skin prices permanent?
No. The table records the in-game on July 30, 2026; prices, events, and rotations can change.
Verdict: Is Freya Worth Learning?
Yes, if you enjoy committed Fighter play and can manage a combat resource. Freya rewards deliberate entry timing more than blind aggression: prepare Orbs, use the shield to begin a favorable contact, weave every Slash with a Basic Attack, and save Valkyrie Descent for a fight that lasts.
Related MLBB Guides
Compare lanes and draft pressure in the Zilong Guide, study front-line engage in the Franco Roam Guide, or review ranged positioning in the Layla Guide.





Copyright © FUTURE OUTLOOK TECHNOLOGY LIMITED.Company Registration No.: 77374965 All rights reserved.UNIT 135,1/F.,143 WAI YIP STREET,KWUN TONG HK