
Genshin Impact Sandrone Build Guide: Stellar-Conduct Teams, Weapons, And Artifacts

Sandrone is a 5-star Cryo Claymore DPS and Stellar-Conduct carry. Sandrone is not just a normal Cryo claymore attacker. Her value comes from setting up Fagio, using Decoding mode cleanly, and turning Superconduct into Stellar-Conduct damage. For official profile, skill, constellation, material, artwork, and combat preview details, see Sandrone on HoYoLAB Wiki. The artifact and weapon sections are practical build advice and should be refreshed if release testing changes the ranking.
Quick answer: Build Sandrone around ATK, CRIT Rate, CRIT DMG, and enough Energy Recharge. Her official kit points to Cryo field time, Fagio's Decoding mode, and Stellar-Conduct scaling, so start with a carry set, an ATK or CRIT Claymore, and teammates who can trigger Superconduct or support Cryo damage without stealing her window.

Cryo Claymore - 5-star Cryo Claymore DPS and Stellar-Conduct carry. Check these basics before choosing artifacts, weapons, and teams.

Sandrone character artwork from the HoYoLAB Wiki profile.
Sandrone Character Profile
Use this profile check before choosing artifacts or weapons. The build changes sharply if the character is acting as a field carry, off-field support, healer, or reaction enabler.

Cryo

Claymore
5-Star
5-star Cryo Claymore DPS and Stellar-Conduct carry
Snezhnaya
CRIT Rate
Sandrone Best Build Snapshot
The snapshot below is the current recommended build path. Use it as a starting point, then adjust around Energy needs, team role, and artifact substats.
| Slot | Recommended Build | Why It Matters |
|---|---|---|
| Artifact set | 4-piece Disenchantment in Deep Shadow | The safest starting direction before exact release-week substat comparisons. |
| Main stats | ATK% Sands / ATK% Goblet / CRIT Circlet | Matches the role and scaling shown by the kit. |
| Substats | ER until comfort, CRIT, ATK%, then EM | Solve uptime first, then push damage or support value. |
| Weapons | A Teaspoon of Transcendence, A Thousand Blazing Suns, Wolf's Gravestone, Tidal Shadow | Use premium weapons only when the team shell is already solved. |
| Talent priority | Elemental Skill > Elemental Burst > Normal Attack | Follow the part of the kit that actually drives the rotation. |
| Team core | Sandrone + Electro enabler + Cryo or Anemo support + sustain | The build only works when the team feeds the character's intended window. |
How Sandrone's Kit Works
Sandrone is not just a normal Cryo claymore attacker. Her value comes from setting up Fagio, using Decoding mode cleanly, and turning Superconduct into Stellar-Conduct damage. The most important habit is to make the team support that pattern instead of forcing a generic stat build onto the character.
- Formule Phenomenale: Self-Evident Proposition: Normal Attack Generates threads that control her weapon using formulae, performing up to 3 consecutive strikes. Charged Attack Summons the Facilitatrice Automatisee Generaliste Interactive et Omnitache, or " Fagio ," and switches it to Decoding mode: Unleashes a sweeping fire attack on enemies in front, as well as periodically fires condensed beams, dealing AoE Cryo DMG . Radiance: Stellar-Conduct : The condensed bea
- Formule Phenomenale: Differential Analysis: With her impeccable, ladylike poise, Sandrone boards the Tea Party Tactical Assault Hovermech and hovers forward for 6s. During this time, Sandrone can control the travel direction of the craft. Pressing Sprint consumes 10 Stamina and launches her into an elegant high-speed hover mode, in which she will move even faster at the cost of 15 Stamina per second. When Sandrone starts hovering, if there are opponents nearby
- Formule Phenomenale: Q.E.D.: In line with established ladylike behavior, Sandrone summons a large number of Prismatic Resonance Cannons for a frontal bombardment before firing on her foes with a Convective Inhibition Ray, dealing AoE Cryo DMG . Radiance: Stellar-Conduct : The Convective Inhibition Ray instead deals AoE Cryo DMG that is considered Stellar-Conduct DMG. "I can believe in something so long as solid evidence can be produced for it. I
- Eternal Speculation Engine: Radiance: Stellar-Conduct : When using the Elemental Skill Formule Phenomenale: Differential Analysis , if Fagio's Decoding Power is greater than 50, the second Prism Shot fired by Fagio at nearby opponents will deal 400% of its original DMG as Fagio's Decoding Power is decreased. Additionally, for every 10 points of Decoding Power Fagio loses, it gains 1 stack of Refined Tactics for 60s (max 10 stacks). When Sandron
- A Lady's Code of Conduct: Increases Sandrone's Elemental Mastery based on her ATK. Every 100 ATK will increase her Elemental Mastery by 8. The maximum increase she can gain this way is 160.
- Light of Rationalisme: When party members trigger Superconduct, it will be changed to Stellar-Conduct, and party members' Base Stellar-Conduct DMG will be increased based on Sandrone's ATK: Every 100 ATK she has increases the Base Stellar-Conduct DMG by 0.7%. The maximum increase that can be gained this way is 14%. Additionally, when Sandrone is within a Polestar Field , she will enter the Radiance: Stellar-Conduct state.
Sandrone Skill Animation Preview
Use these previews to check timing, field movement, and the kind of window the rotation has to protect.
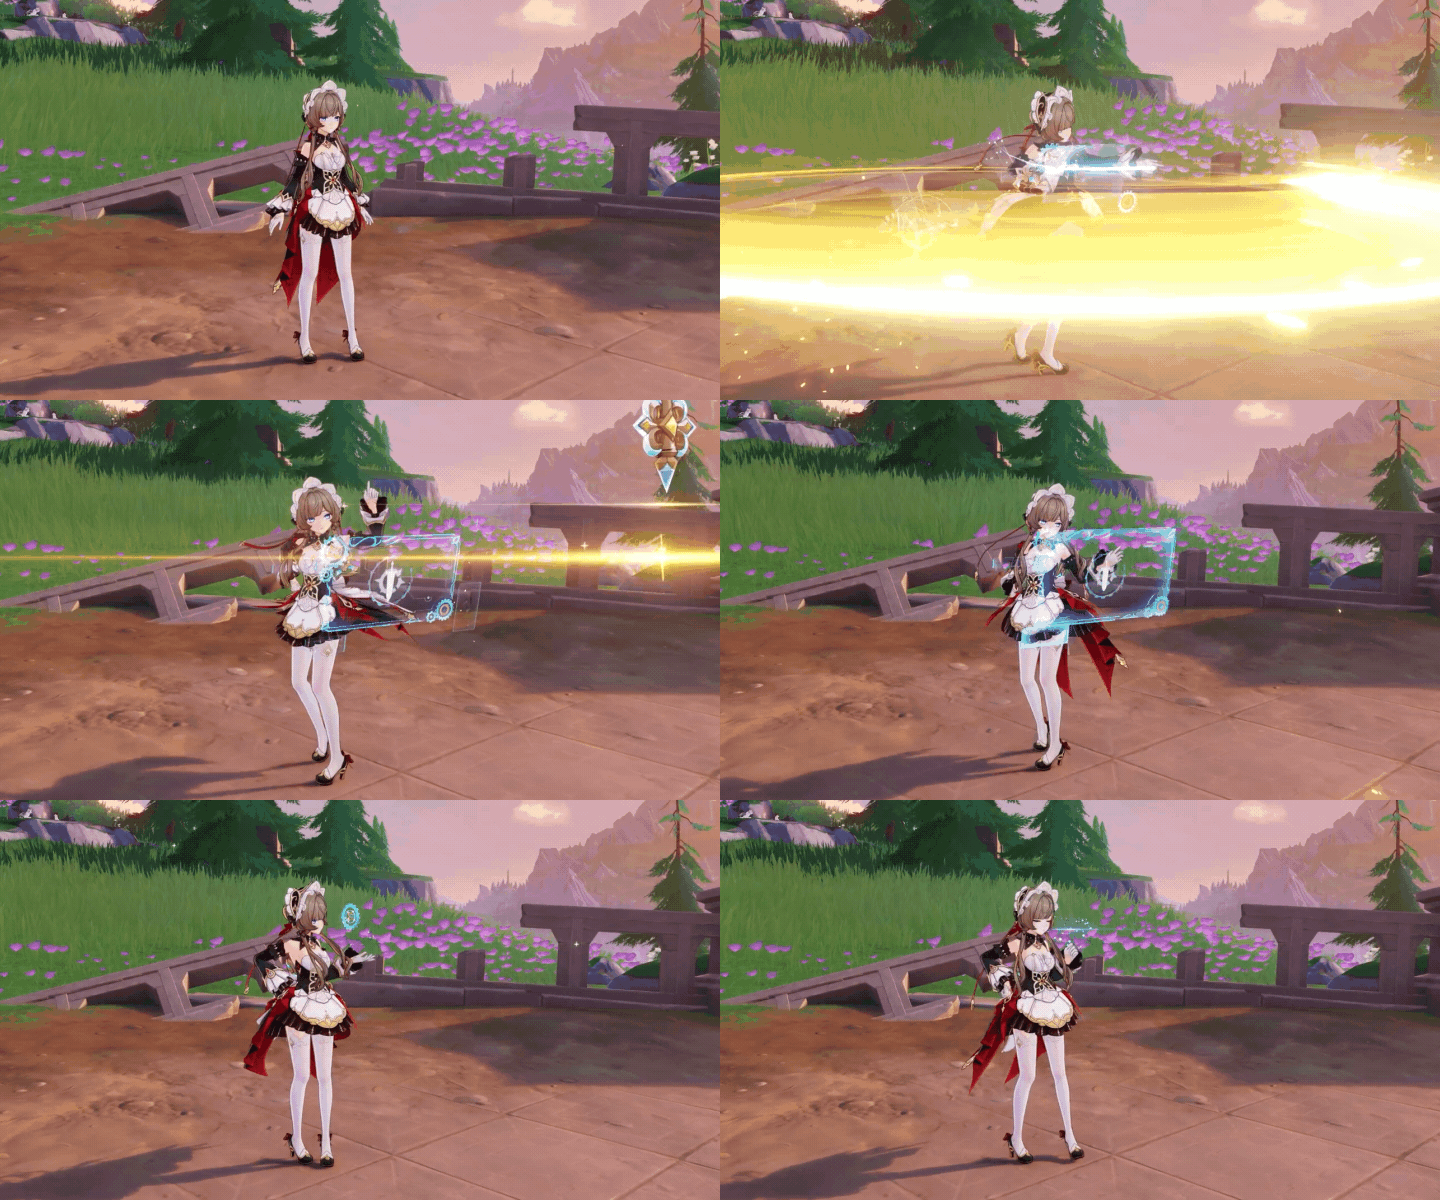
Formule Phenomenale: Self-Evident Proposition combat preview shown on Sandrone HoYoLAB Wiki profile.

Formule Phenomenale: Differential Analysis combat preview shown on Sandrone HoYoLAB Wiki profile.
Sandrone Talent Priority
Talent investment should follow the role. If your account is still testing teams, level the main combat or support talent first and delay expensive crowns until the rotation feels stable.
| Icon | Talent | Build Note |
|---|---|---|
 | Formule Phenomenale: Self-Evident Proposition | Core combat talent for the build. |
 | Formule Phenomenale: Differential Analysis | Usually the most important talent when the build revolves around Skill state or support setup. |
 | Formule Phenomenale: Q.E.D. | Burst investment matters when the rotation uses it every cycle. |
Best Artifacts For Sandrone
Start with the set that matches Sandrone's actual scaling and team role. Do not force a weak 4-piece set just because it appears first; a transition set with stronger substats can be better while you farm.
| Artifact Set | Use Case |
|---|---|
 Disenchantment in Deep Shadow Disenchantment in Deep Shadow | Best-in-slot for on-field Stellar-Conduct Sandrone. Farm this first once the domain is available. |
 Gilded Dreams Gilded Dreams | Strong backup because Stellar-Conduct benefits from both ATK and EM. |
 A Day Carved From Rising Winds A Day Carved From Rising Winds | Only use if the pieces are already strong; do not force it over better Stellar-Conduct substats. |
Sandrone Main Stats And Substats
| Slot | Best Stat | Notes |
|---|---|---|
| Sands | ATK% Sands | Choose the stat that supports the main rotation before chasing sheet damage. |
| Goblet | ATK% Goblet | Elemental damage, DEF, or utility depends on the character's role. |
| Circlet | CRIT Circlet | CRIT is for damage roles; support builds may prefer utility or Favonius consistency. |
| Substats | ER until comfort, CRIT, ATK%, then EM | Uptime and team value are more important than a prettier stat page. |
Best Weapons For Sandrone
The first premium weapon listed is the character's signature or closest verified build anchor when current guide data supports one. Weapon icons are placed beside the names for quick recognition.
| Weapon | Priority | Best Use Case |
|---|---|---|
 A Teaspoon of Transcendence A Teaspoon of Transcendence | Signature / best-in-slot | Sandrone's signature Claymore; high Base ATK and its passive are built around her damage profile. |
 A Thousand Blazing Suns A Thousand Blazing Suns | Runner-up 5-star | Strong stat package for players who already own it. |
 Wolf's Gravestone Wolf's Gravestone | Other 5-star option | A practical ATK Claymore when you do not have her signature. |
 Tidal Shadow Tidal Shadow | Accessible 4-star | Excellent R5 option with a healer and still usable as a free baseline. |
 Mailed Flower Mailed Flower | Event 4-star | Competitive with Tidal Shadow in some healer/no-healer setups if you own the event weapon. |
Sandrone Rotation And Gameplay Loop
- Start with Cryo or Anemo support buffs, then apply Electro before Sandrone enters.
- Use Sandrone's Elemental Skill to enter Differential Analysis and position Fagio.
- Spend her Decoding window on Charged Attacks and Fagio shots rather than swapping too early.
- Use Burst when the target is grouped or when Stellar-Conduct buffs are active.
- Refresh support skills before the next Decoding window so Fagio does not fire into a weak setup.
Best Sandrone Teams
The team examples below focus on roles and support logic. Swap units within the same job when your account has better builds, constellations, or weapons.
Stellar-Conduct Core




Sandrone + Fischl + Rosaria + Jean + Mika Use Electro plus Cryo support to trigger the reaction Sandrone's passive rewrites into Stellar-Conduct. Jean or Mika covers healing and comfort.
Freeze Control



Sandrone + Furina + Shenhe + Kazuha + Charlotte Hydro and Anemo control make her field window cleaner. Shenhe improves Cryo damage if you own her.
Physical-Cryo Hybrid

Sandrone + Fischl + Mika + Zhongli + Rosaria Use only if her Normal and Charged Attack share becomes meaningful on your account. It trades reaction ceiling for easier play.
Budget Setup



Sandrone + Lisa + Rosaria + Lynette + Barbara A cheap entry shell that supplies Electro, Cryo particles, VV shred, and healing while you farm better options.
Sandrone Material Planning Notes
Farm ascension and talent gates before chasing perfect artifacts. A level-gated character with a perfect feather still feels unfinished.
| Icon | Material | Planning Note |
|---|---|---|
 | Mora | Plan this before heavy artifact farming if it gates ascension or talents. |
 | Shivada Jade Sliver | Plan this before heavy artifact farming if it gates ascension or talents. |
 | Subdetection Unit | Plan this before heavy artifact farming if it gates ascension or talents. |
 | Broken Drive Shaft | Plan this before heavy artifact farming if it gates ascension or talents. |
 | Shivada Jade Fragment | Plan this before heavy artifact farming if it gates ascension or talents. |
Is Sandrone Worth Building Or Pulling?
Sandrone is worth pulling if you want a dedicated Cryo carry with a unique Superconduct/Stellar-Conduct team. She is less urgent if your account already has several Cryo carries but lacks universal supports, Hydro application, or Anemo grouping.
If you are spending wishes for this character, decide the team first, then the weapon or constellation plan. A strong signature weapon cannot fix a team that is missing reaction uptime, Energy, healing, shielding, or the right support slot.

Plan Genesis Crystals safely
Before pulling for Sandrone, check pity, guarantee, UID, server, and package budget so the top-up step matches the account you actually play.
Sandrone Constellation Value
Constellations should be treated as luxury upgrades until C0, the main weapon choice, and the team shell are settled. Early constellations are usually easier to justify for dedicated mains; C6 should not define the standard build.
| Constellation | Value | Recommendation |
|---|---|---|
| C0 | Complete baseline | Build the character here first and test the team before spending further. |
| C1-C2 | Early premium upgrades | Consider only if you already like the playstyle and the account has the right supports. |
| C3-C5 | Talent scaling | Useful for mains, but usually less important than fixing artifacts, Energy, and team uptime. |
| C6 | Whale investment | Powerful but unnecessary for the guide's baseline recommendations. |
Common Sandrone Build Mistakes
- Building only physical damage before testing how much of her output is Cryo and Stellar-Conduct.
- Ignoring Electro teammates even though Stellar-Conduct is one of the kit's defining hooks.
- Using a weapon banner plan before you know whether your account needs a better Claymore or better supports.
- Forcing Freeze into bosses that cannot be frozen.
- Letting Fagio's Decoding window expire before the team buffs are active.
Related ManaBuy Genshin Guides
- Genshin Impact Characters List And Build Guide
- Genshin Impact Fischl Build Guide
- Genshin Impact Furina Build Guide
- Are Genshin Top-Up Sites Legit And Safe?
Sandrone Build Guide FAQ
Is Sandrone a main DPS?
Yes. Treat Sandrone as a field-time Cryo Claymore DPS unless future testing proves a stronger off-field Fagio variant.
Does Sandrone need Electro teammates?
Electro is strongly recommended because her kit converts Superconduct into Stellar-Conduct value.
What is Sandrone's best weapon?
A CRIT or high-ATK Claymore is the safest starting point. Beacon, Redhorn, Serpent Spine, Wolf's Gravestone, and Tidal Shadow all have practical use cases.
Should I farm Blizzard Strayer for Sandrone?
Farm it if you plan to play Freeze. For general Stellar-Conduct teams, use a carry set or strong mixed pieces until release testing settles the exact ranking.
Is Sandrone beginner friendly?
She is playable, but her best teams ask for reaction planning. New accounts may get broader value from flexible supports first.
Sandrone Build Conclusion
Sandrone should be built as a planned reaction carry, not as a generic Claymore unit. Start with CRIT, ATK, a clean Skill window, and an Electro-enabled team; then decide whether your best account path is Freeze control, Stellar-Conduct pressure, or a lower-cost transition shell.


Copyright © FUTURE OUTLOOK TECHNOLOGY LIMITED.Company Registration No.: 77374965 All rights reserved.UNIT 135,1/F.,143 WAI YIP STREET,KWUN TONG HK