
Free Fire One Tap Headshot and Sensitivity Guide: Settings, HUD and Practice

One tap headshots in Free Fire are not magic settings. Sensitivity helps, but the real result comes from a HUD you can control, a crosshair that starts near the neck or upper chest, a short drag motion and weapons that match the distance. Copying another player's sensitivity can give you a starting point, but it will not fix a thumb path that is too long or a fire button that is hard to reach.
This Free Fire one tap headshot and sensitivity guide is prepared for players who want a practical setup path. Use it as a tuning framework, then adjust inside Training, Clash Squad and ranked BR until your aim feels repeatable on your own phone.
Best Sensitivity Starting Ranges
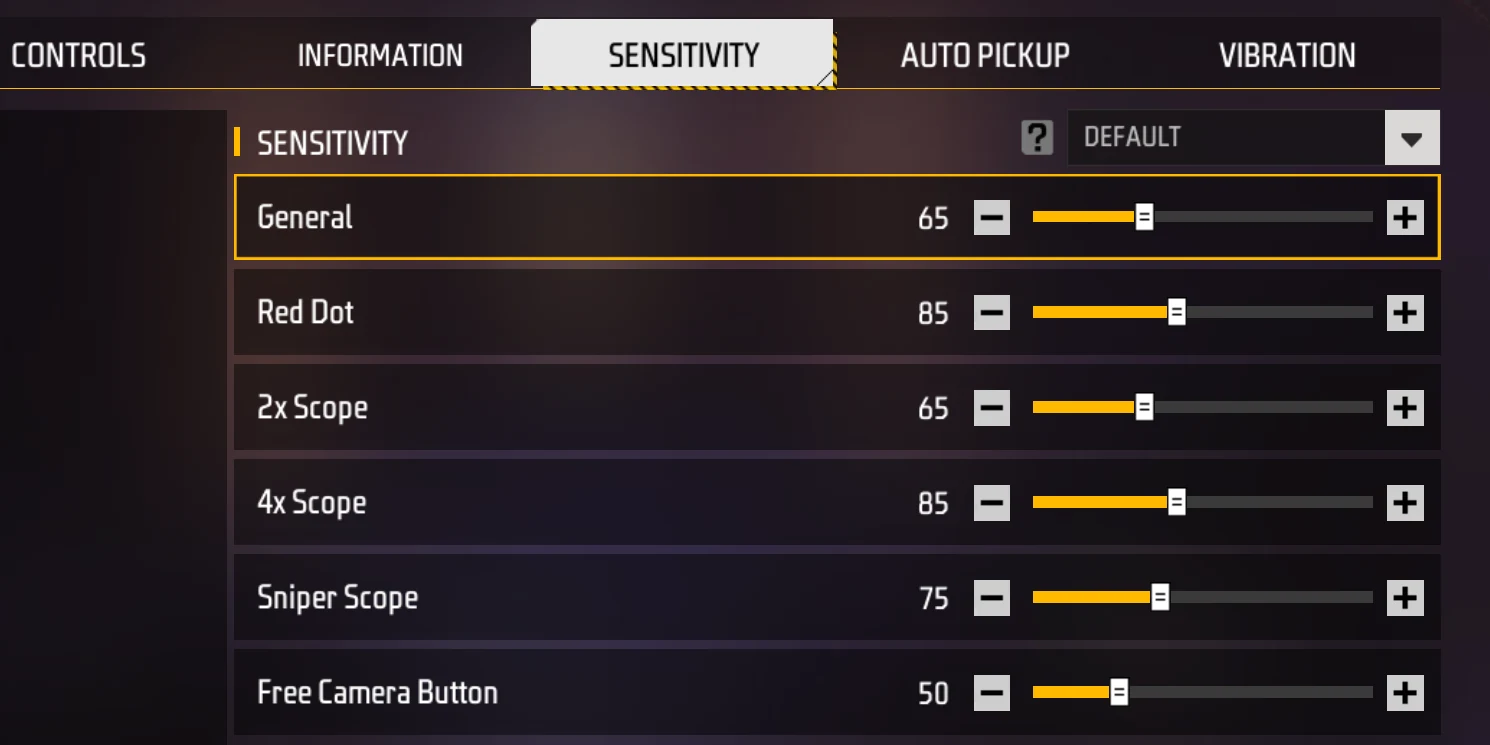
There is no universal best Free Fire sensitivity. Screen size, frame rate, touch response, fire button size and grip style all change the answer. The safest way is to start inside a reasonable range, test for ten minutes, then adjust only one setting at a time.
| Setting | Starting range | Raise it if... | Lower it if... |
|---|---|---|---|
| General | 85-100 | Your camera turns too slowly in close fights. | Your crosshair jumps past targets. |
| Red Dot | 80-100 | One tap drags stop at the body. | Your drag often skips over the head. |
| 2x Scope | 70-90 | You cannot track strafing targets. | Your sight shakes after the first burst. |
| 4x Scope | 55-80 | Long-range tracking feels heavy. | You overcorrect with AR or marksman rifles. |
| Sniper Scope | 45-70 | Flicks feel late. | Small aim corrections become unstable. |
| Free Look | 50-80 | Scanning while running feels slow. | You accidentally swing the camera too far. |
HUD Layout for One Tap Control
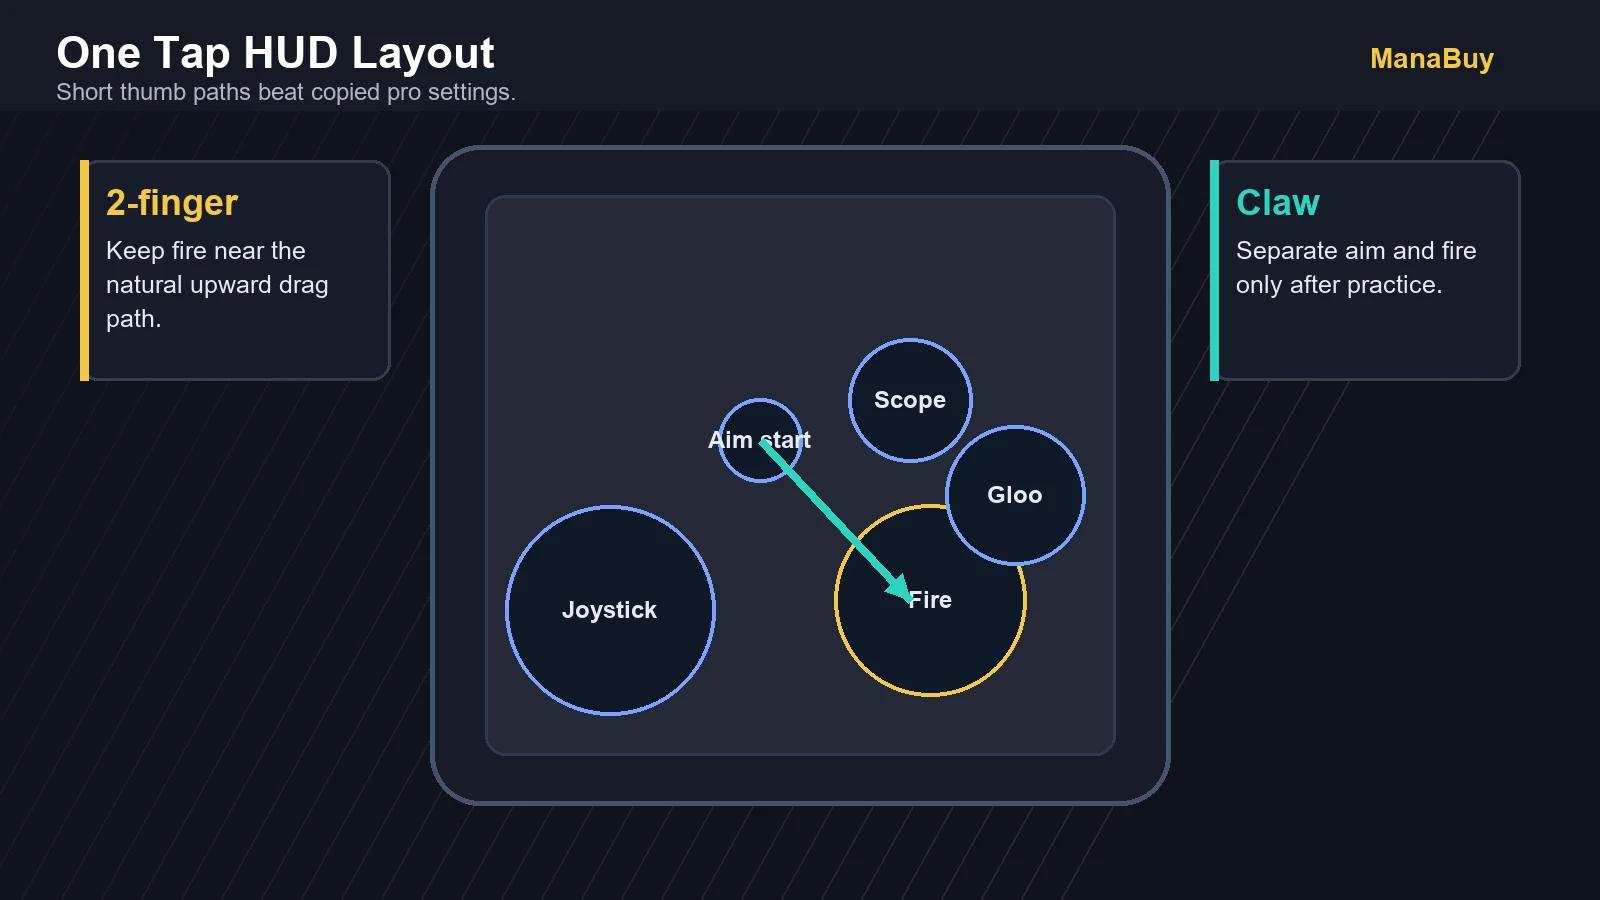
A good HUD shortens the distance between aim, fire, Gloo Wall and movement. If your fire button sits too low or too far from your natural thumb path, every headshot drag becomes harder. Keep the fire button large enough to hit under pressure, but not so large that it blocks vision or causes accidental shots.
Two-finger players
Keep the fire button close to the right thumb's natural upward drag. Put Gloo Wall where you can tap it without losing aim control.
Three or four-finger players
Move fire to a top corner if your index finger is reliable. This separates aiming and firing, but only helps after practice.
Shotgun focus
Use a setup that lets you wall and fire quickly. Shotgun one taps need short movements and fast resets.
AR and SMG focus
Keep enough space to track. Your HUD should help you drag up, then stabilize for the second burst.
How To Practice One Tap Headshots
Practice should be boring enough to repeat. Do not start with ranked pressure. Start in Training or low-risk modes, then move to Clash Squad once the motion feels automatic.
Stand at close range with an SMG or shotgun. Put the crosshair on the upper chest, drag to the head and release.
Repeat from left and right movement. The goal is not speed first. It is the same upward line every time.
Add Gloo Wall resets. Shoot, wall, sidestep and re-peek from the edge instead of standing still.
Test in Clash Squad. Track how many misses are caused by sensitivity, bad crosshair height or panic movement.
Weapon Fit: Not Every Gun Wants One Tap
Shotguns reward one clean hit but punish missed timing. SMGs reward fast tracking and short upward drags. ARs need a mix: drag up for the first bullets, then control the spray. Marksman rifles and snipers need calmer scope sensitivity because small overcorrections are costly.
| Weapon type | Best headshot habit | Useful ManaBuy guide |
|---|---|---|
| Shotgun | Pre-aim high, peek short, fire once, wall or retreat. | Weapon tier list |
| SMG | Track while dragging slightly upward; avoid giant flicks. | Gloo Wall movement guide |
| AR | Use two to four bullet bursts and reset between peeks. | Best ranked characters |
| Marksman/Sniper | Lower scope sensitivity and use cover before re-aiming. | Weapon tier list |
Ranked Mistakes With Sensitivity
The biggest mistake is changing every setting after one bad match. Another is making sensitivity so high that close fights feel exciting but mid-range aim disappears. Treat settings like a training plan: change one number, test one weapon class, then decide.
Device-Based Sensitivity Profiles
Competitor guides often give one fixed sensitivity list, but the better approach is to tune by device class and miss pattern. Use these as starting profiles, then change one slider at a time after testing.
| Device / grip | General | Red Dot | 2x / 4x | Sniper | Why this works |
|---|---|---|---|---|---|
| Budget phone, 2-finger | 90-100 | 75-95 | 65-85 / 50-70 | 30-55 | Higher camera speed helps close fights, but scope values stay controlled. |
| Mid-range phone, 3-finger | 85-95 | 70-90 | 60-80 / 45-65 | 25-50 | Fire and aim are partly separated, so you need less panic sensitivity. |
| High refresh device, claw | 75-90 | 55-80 | 55-75 / 40-60 | 20-45 | More stable frames let you lower sensitivity for cleaner stops. |
| Shotgun-only warmup | 90-100 | 80-100 | Not priority | Not priority | Short upward drag and fast wall reset matter more than scoped tracking. |
Miss Pattern Diagnosis
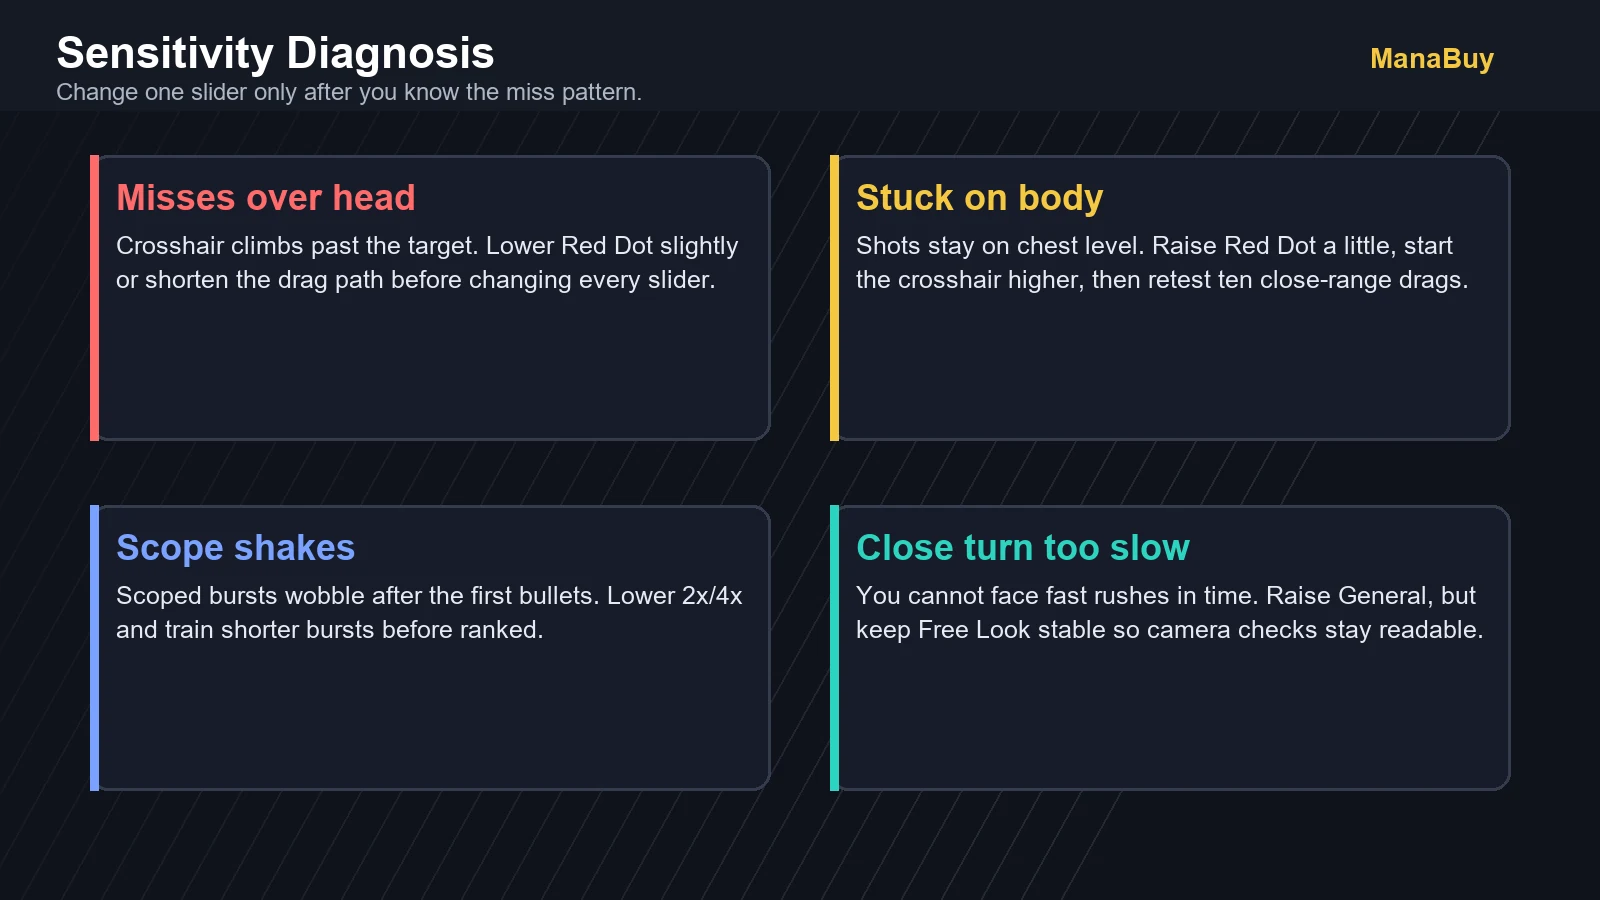
Do not judge settings by one lucky headshot. Judge them by repeated misses. If the crosshair jumps above heads, lower Red Dot or reduce fire-button size. If every drag stays on the chest, raise Red Dot slightly or start the crosshair higher. If 2x and 4x fights shake after the first burst, lower scoped sensitivity and train shorter bursts.
Fire button size
Too small causes missed inputs. Too large causes accidental shots and messy drag paths. Increase until you can hit it under pressure, then stop.
Button opacity
Lower opacity can help visibility, but do not make key controls hard to locate in dark scenes.
DPI caution
Changing phone DPI can affect the whole device, not only Free Fire. Treat it as optional and risky compared with in-game sensitivity and HUD changes.
Frame stability
If frames drop, very high sensitivity feels inconsistent. Lower scope values and use weapons that need less long tracking.
Seven-Day One Tap Practice Plan
Day 1 and 2: only close-range drag headshots with one SMG and one shotgun. Day 3: add Gloo Wall reset after every shot. Day 4: add sideways strafing. Day 5: test Clash Squad casual and record the main miss pattern. Day 6: tune one slider only. Day 7: take the final setup into ranked and stop changing it after every death.
Best Training Room Test Before Ranked
After changing sensitivity, run one repeatable test instead of judging the setup by a random match. Stand at close range, drag from chest to head ten times with an SMG, then repeat with a shotgun. Next, move one step sideways before each drag. Finally, place a Gloo Wall after the shot and re-peek from the opposite edge. A good setup should feel stable across all three actions: drag, strafe and reset.
Keep a simple score. If fewer than six out of ten close-range attempts hit clean head level, do not touch scoped sensitivity yet. Fix Red Dot, fire button size and thumb path first. If close range is stable but scoped sprays shake, then tune 2x and 4x. This order prevents the common mistake of changing every slider when only one fight distance is actually failing.
Save the setup only after two ranked games in a row feel predictable. Predictable does not mean every duel is a headshot; it means misses have the same cause, recoil recovery feels repeatable and the fire button lands under your thumb when a Gloo Wall reset is needed. That stability is more valuable than copying a higher sensitivity number from a highlight clip.
Top Up Free Fire Diamonds After Your Aim Setup Is Ready
Sensitivity changes do not require spending, but some players tune their setup before buying weapon skins, bundles, or event rewards. Use the current Free Fire Diamond packages only when you already know what you plan to unlock.

Free Fire One Tap Sensitivity FAQ
What is the best sensitivity for Free Fire one tap?
Use high General and Red Dot sensitivity only if you can stop the drag at head level. If your aim jumps above the enemy, lower the number before raising it again.
Should I copy a pro player's sensitivity?
You can copy it as a test, but your phone, grip and HUD are different. Keep the parts that feel controlled and adjust the rest.
Is one tap better than spray control?
One tap is strong in close-range shotgun and quick SMG fights. Spray or burst control is safer for ARs and mid-range fights.
How long should I practice sensitivity?
Give a new setup at least a few short practice sessions. If it still creates the same miss pattern, change one setting at a time.
Final Takeaway
The best Free Fire sensitivity is the one that lets you repeat the same motion under pressure. Build the HUD around your hand, use weapons that fit the distance and let one tap become a controlled habit instead of a random flick.



Copyright © FUTURE OUTLOOK TECHNOLOGY LIMITED.Company Registration No.: 77374965 All rights reserved.UNIT 135,1/F.,143 WAI YIP STREET,KWUN TONG HK