
Ruby MLBB EXP Lane Guide: Best Build, Emblem, Skills, Combos, and Counters

Ruby is a sustain Fighter who turns short skill cycles into repeated crowd control. Pick her when your team can damage enemies she pulls together and the lane rewards safe attrition. Avoid blind entries into mobile backliners or burst that removes her before Spell Vamp matters. Her strongest plan is to slow from range, dash after each cast, stack defenses, and reserve the Ultimate for a target your team can actually punish.

Ruby Skills and Sustain-Control Decisions

1. Let's Dance! — Buff
Ruby's skills have a 75% Spell Vamp Ratio (her Basic Attacks cannot trigger Lifesteal). For every 1% HP lost, her Spell Vamp Ratio increases by 1%, up to 150%. After each skill cast, Ruby can dash to another location and gain 8-25 Physical & Magic Defense (scales with level) for 4s (stacks up to 3 times).
Notes clarify: Blink, Spell Vamp.
When: After every skill, direct the passive dash sideways to dodge retaliation while stacking Physical and Magic Defense.
Do not: Do not stand still after casting; the dash and three-stack defense window are part of Ruby's durability.
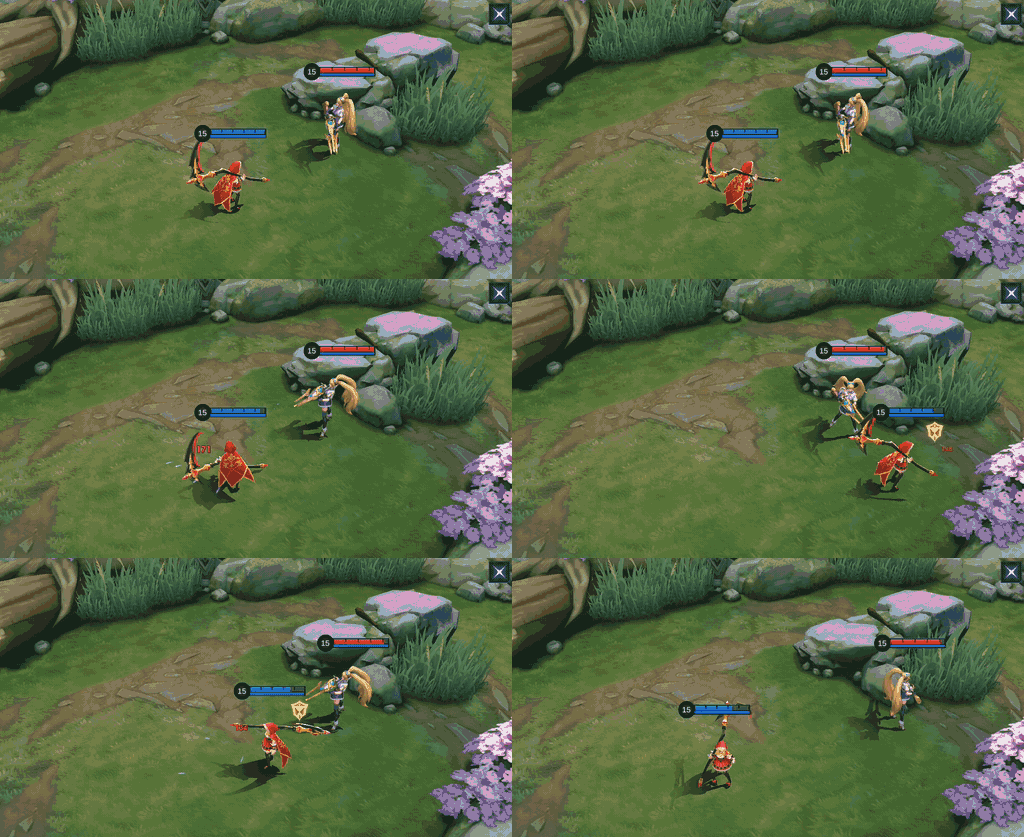

2. Be Good! — AOE / Slow
Ruby swings her scythe, dealing 280 (+110% Total Physical Attack) Physical Damage to enemies hit. She then unleashes a shockwave in the same direction, dealing 140 (+55% Total Physical Attack) Physical Damage to enemies hit and slowing them by 40% for 1s.
Notes clarify: Physical Damage Skill, Slow.
When: Use the 4-second cooldown poke to slow first, heal from the wave, and create the next passive-dash angle.
Do not: Do not spend it only for damage when the slow is needed to keep the target inside Skill 2 or the Ultimate.
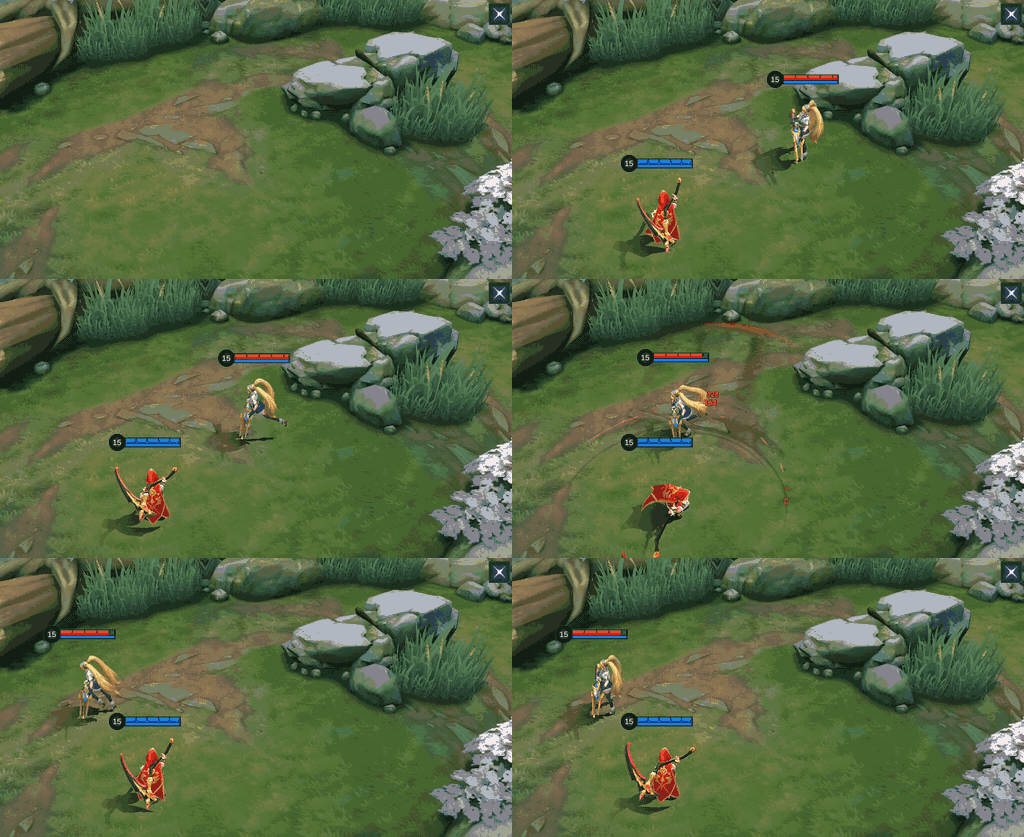

3. Don't Run, Wolf King! — CC / AOE
Ruby swings her scythe around herself twice, each swing dealing 60 (+55% Total Physical Attack) Physical Damage to nearby enemies, stunning them for 0.5s, and slowly pulling them toward her.
Notes clarify: Physical Damage Skill, Stun, Displacement.
When: Cast after the passive dash places Ruby among multiple enemies; the two swings stun and pull them closer.
Do not: Do not enter before the enemy's burst is visible, because the 0.5-second stun is not full immunity.
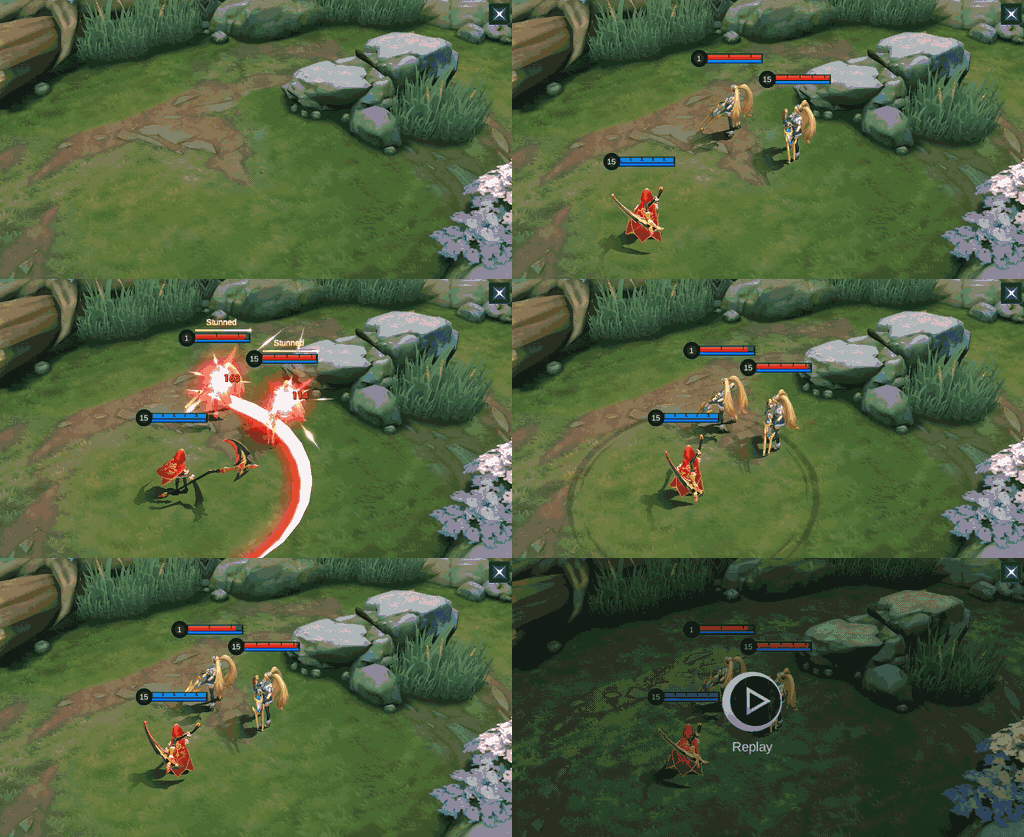

4. I'm Offended! — CC / AOE
Ruby sweeps her scythe in the target direction, dealing 600 (+200% Total Physical Attack) Physical Damage to enemies hit, pulling them toward her, and stunning them for 0.5s.
Notes clarify: Physical Damage Skill, Stun, Displacement.
When: Pull targets toward allied damage, a tower edge, or away from an escaping route; Flicker can extend or redirect the catch.
Do not: Do not hook a durable frontliner onto your own backline or pull without enough HP to survive the follow-up.
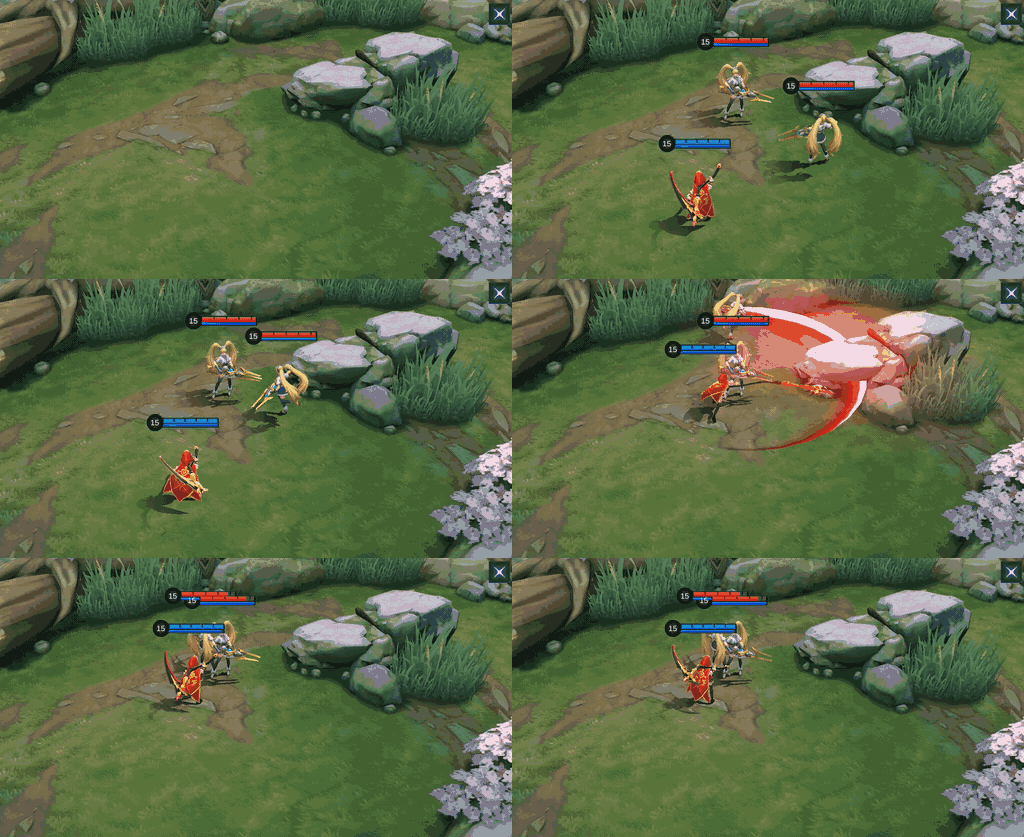
Ruby Skill Priority
Level 1: Be Good! Upgrade: prioritize Skill 1, keep Don't Run, Wolf King! as the backup upgrade, and level I'm Offended! whenever available.
Be Good! lowers the poke cycle and supplies the slow that starts Ruby's safest trades. Skill 2 remains the control bridge, but it does not replace the range, wave sustain, and dash access created by Skill 1.
Ruby Combos for Lane and Teamfights
Teamfight control chain



Why: Be Good! slows from range; passive-dash closer, use Don't Run, Wolf King! to stun and gather, then pull the escape path with I'm Offended!.
Do not: Hold the Ultimate if allied burst is not ready or the pull would move a tank into your carries.
Laning catch




Why: Be Good! slows, the passive dash closes safely, I'm Offended! pulls the target into melee range, and Don't Run, Wolf King! keeps them stunned before the Basic Attack finish.
Do not: Do not chase beyond the wave when the enemy Jungler is missing or Ruby has no mana for the return cycle.
How to Play Ruby by Game Phase
Early game
Use Be Good! through the wave and hero together, then passive-dash sideways. Trade only while mana supports another escape cast, and reach level four without donating HP to a burst lane.
Mid game
Approach objectives from a side lane or brush. Ruby is strongest when multiple enemies enter Skill 2 range, but she still needs allied damage before committing the Ultimate pull.
Late game
Protect the damage dealer until the enemy diver commits, or Flicker-hook a vulnerable carry after mobility is spent. Build defense when Ruby is the first body through the choke.
Five Ruby Mistakes to Avoid
1. Standing still after a skill
The passive dash and defense stack are not decoration. Direct every cast into a safer angle.
2. Entering before allied damage is ready
Ruby can gather targets but cannot finish every durable group alone.
3. Spending the Ultimate on a tank
A bad pull can deliver the enemy frontline into your own carry.
4. Copying damage while acting as frontline
Blade of Despair is not a substitute for the HP and defense needed to survive entry.
5. Ignoring mana
Spell Vamp does not help when Ruby has no mana for the skill that would trigger it.
Best Ruby Emblem and Battle Spell
Default: Fighter Emblem + Flicker
Talents: Firmness, Festival of Blood, and Brave Smite. Firmness steadies Ruby before her defense stacks build, Festival of Blood supports repeated skill trading, and Brave Smite adds recovery after control lands. Flicker is the default because it extends or redirects I'm Offended! and creates an instant catch without using the passive dash first.
Do not Flicker forward: until the target's mobility and your team's follow-up are known.
Alternatives for role and draft
Tank Emblem is a durable alternative when Ruby must start every fight; Assassin Emblem is a higher-damage option only when another frontline exists. Execute can finish a damage lane, while Vengeance protects a committed frontline plan; neither replaces Flicker's hook angle.
The current Ruby setup guide, Ruby community guide, and current emblem guide support these routes; accessed August 9, 2026.
Top Five In-Game Ruby Pro Setups
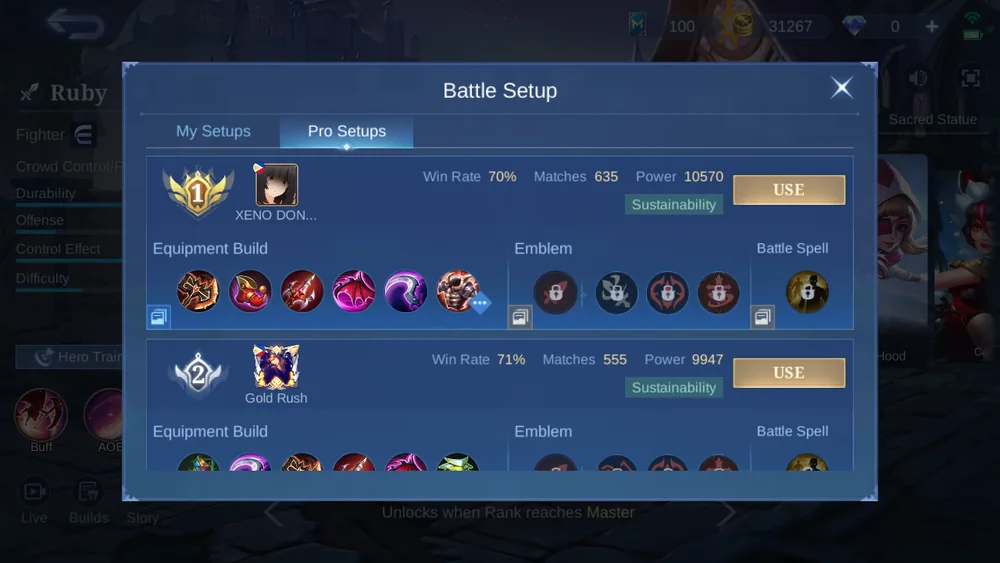
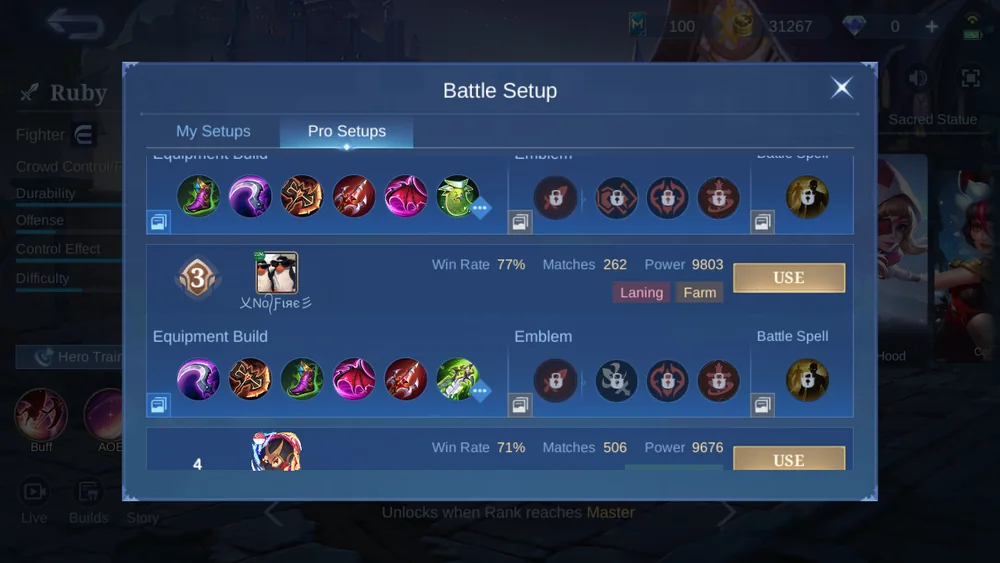
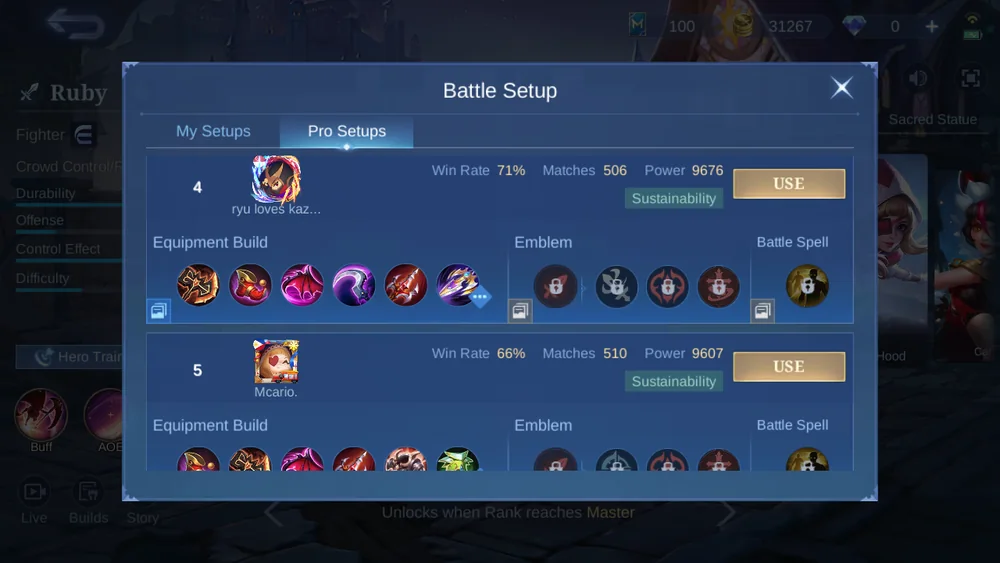
These rows are a dated in-game build sample from August 8, 2026, not a permanent ranking. All five share a sustain core, but boots, the fifth item, and the final defensive or damage slot change with the draft.
Build 1
| Item 1 | Item 2 | Item 3 | Item 4 | Item 5 | Item 6 |
|---|---|---|---|---|---|
 War Axe War Axe |  Magic Boots Magic Boots |  Endless Battle Endless Battle |  Queen's Wings Queen's Wings |  Hunter Strike Hunter Strike |  Brute Force Breastplate Brute Force Breastplate |
Build 2
| Item 1 | Item 2 | Item 3 | Item 4 | Item 5 | Item 6 |
|---|---|---|---|---|---|
 Tough Boots Tough Boots | Hunter Strike | War Axe | Endless Battle | Queen's Wings |  Oracle Oracle |
Build 3
| Item 1 | Item 2 | Item 3 | Item 4 | Item 5 | Item 6 |
|---|---|---|---|---|---|
| Hunter Strike | War Axe | Tough Boots | Queen's Wings | Endless Battle |  Blade of Despair Blade of Despair |
Build 4
| Item 1 | Item 2 | Item 3 | Item 4 | Item 5 | Item 6 |
|---|---|---|---|---|---|
| War Axe | Magic Boots | Queen's Wings | Hunter Strike | Endless Battle |  Sea Halberd Sea Halberd |
Build 5
| Item 1 | Item 2 | Item 3 | Item 4 | Item 5 | Item 6 |
|---|---|---|---|---|---|
| Magic Boots | War Axe | Queen's Wings | Endless Battle | Brute Force Breastplate | Oracle |
Ruby Equipment Decision Matrix
| Item | Observed effect | When to buy | When to skip |
|---|---|---|---|
| War Axe | +35 Physical Attack +400 HP +10% Cooldown Reduction +8% Hybrid Lifesteal Unique Passive - Fighting Spirit: Attacks grants 12 extra Physical Attack per second for 4 seconds, up to 6 stacks. Deals 10% extra True Damage based on the damage dealt (no damage reduction counted) at full stacks. (Marksmen, Mages, and Supports only receive 50% of these stacked effects.) | Use for repeated skill contact and long EXP-lane trades. | Skip when Ruby cannot stay in combat long enough to build Fighting Spirit. |
| Magic Boots | +40 Movement Speed +10% Cooldown Reduction +150 HP | Use when cooldown access matters more than early resistance. | Swap when crowd control or physical Basic Attacks are the lane's real threat. |
| Endless Battle | +60 Physical Attack +250 HP +10% Cooldown Reduction +5% Movement Speed +5 Mana Regen Unique Passive - Divine Justice: After casting a skill, the next Basic Attack within 3 seconds deals (60% Total Physical Attack) extra True Damage and recovers 80 (+40% of Total Physical Attack) HP (1.5 seconds cooldown). | Use when Ruby can weave a Basic Attack after each short skill cycle. | Delay when survivability is required before another damage item. |
| Queen's Wings | +750 HP +30 Adaptive Attack +10% Cooldown Reduction +10% Spell Vamp Unique Passive - Demonize: When HP drops below 40%, gains 30% Damage Reduction for 3 seconds and reduces skill cooldowns by 2 seconds. This effect has a 60 seconds cooldown. Unique Passive - Defiance: For every 1% HP lost, damage is increased by 0.25%, up to 15%. | Use when low-HP damage reduction and Spell Vamp can turn a committed fight. | Do not treat Demonize as permission to enter before allied follow-up. |
| Hunter Strike | +80 Physical Attack +10% Cooldown Reduction Unique Attribute: +15 Physical Penetration Unique Passive - Retribution: Dealing damage to the same enemy hero or creep 5 times in a row grants 50% extra Movement Speed that decays over 3 seconds (8 seconds cooldown). | Use when repeated hits open a faster chase or disengage path. | Skip when the enemy can burst Ruby before the Retribution movement proc. |
| Brute Force Breastplate | +800 HP +20 Physical Defense +10% Cooldown Reduction Unique Passive - Brute Force: Each second after dealing damage, gain 8 extra Adaptive Attack and 2% extra Movement Speed for 4 seconds, up to 6 stacks. Gain 25% extra Control Duration Reduction at full stacks. | Use for HP, defense and control-duration reduction in extended fights. | Skip when concentrated magic burst needs Athena's Shield first. |
| Tough Boots | +40 Movement Speed +18 Magic Defense Unique Passive - Fortitude: CC and Slow Duration reduced by 25%. | Use into magic pressure and dangerous control chains. | Use armor boots instead when physical Basic Attacks dominate the lane. |
| Oracle | +850 HP +20 Physical Defense +20 Magic Defense +10% Cooldown Reduction Unique Passive - Bless: Received Shield and HP Regen effects are increased by 25%. | Use when amplifying Ruby's received healing and regeneration is valuable. | Skip into heavy anti-heal plus burst that removes Ruby before she can recover. |
| Blade of Despair | +160 Physical Attack +5% Movement Speed Unique Passive - Despair: Dealing damage to non-Minion enemies below 50% HP increases Physical Attack by 25% for 2 seconds (takes effect before the damage is dealt). | Use as a late damage finisher when Ruby already survives entry. | Do not rush it from behind or when Ruby is the only frontline. |
| Sea Halberd | +80 Physical Attack +20% Attack Speed Unique Passive - Lifebane: Dealing damage to a target will reduce the Shield and HP Regen effects on them to 60% of normal for 3 seconds. Unique Passive - Punish: Increase damage by 8% against enemy heroes with higher extra HP. | Use when Ruby must apply Lifebane into strong healing or shielding. | Skip when another ally reliably maintains anti-heal and defense is more urgent. |
Ruby Counters, Targets, and Teammates
AOE follow-up partners



Pharsa and Kadita punish the space Ruby gathers; Lukas adds another close-range threat. Signal the pull before entering so their burst lands during the control window.
Mobile marksman threats



Wanwan and Irithel can sidestep Skill 2 and the Ultimate. X.Borg survives the first control cycle and pressures Ruby with sustained damage. Wait for mobility to be spent and approach from fog.
Fighters Ruby can outlast



Ruby can break predictable melee burst with repeated control and healing. Keep enough mana for the second cycle and do not chase clones or shields beyond allied damage.
Draft caution

Uranus adds more sustain but not the immediate damage Ruby needs after grouping targets. Avoid building a team that can control forever yet cannot finish the pull.
Ruby Base Stats
These are level-one in-game values without equipment, Emblem, skin, or match modifiers.
| Stat | Value |
|---|---|
| HP | 2331 |
| HP Regen | 6 |
| Physical ATK | 129 |
| Physical DEF | 18 |
| Attack Speed | 1.07 |
| Attack Speed Ratio | 100% |
| Mana | 500 |
| Mana Regen | 6 |
| Magic Power | 0 |
| Magic DEF | 10 |
| Movement SPD | 260 |
Ruby Skins and Availability
Ten exact Ruby Shop cards were observed on August 8, 2026. Diamond values appear only where Purchase was visible; Season Pass, Luckybox, Starlight, Collector, Aspirants, Golden Month, and limited-event notes describe the observed availability rather than guaranteed permanent direct-sale offers.
| Preview | Skin | Tag | Observed availability |
|---|---|---|---|
 | Soul Reaper | Special | 749 Diamonds; Purchase visible |
 | Hidden Orchid Butterfly | Elite | 599 Diamonds; Purchase visible |
 | Cat Girl | Basic | 269 Diamonds; Purchase visible |
 | Edelweiss | Elite | Season Pass |
 | Lady Zombie | Luckybox | Limited-time Event |
 | Pirate Parrot | Starlight | 10/2021 Starlight Member |
 | Mecha Maiden | The Aspirants | Limited-time Event |
 | Prismatic Plume | Collector | Limited-time Event |
 | Crescent Dervish | Golden Month | Limited-time Event |
 | Neon Edge | Golden Month | Limited-time Event |
Ruby Story
Ruby grew up near the Dark Forest, where wolves threatened her remote village. She prayed for Roger, the legendary hunter who had once saved her family, and became a scythe-wielding defender shaped by the same danger. The lore explains the wolf references in her skill names without changing the current gameplay plan.
Ruby FAQ
What is the best Ruby battle spell?
Flicker is the default because it extends or redirects the Ultimate catch. Execute is a lane finisher, while Vengeance fits a durable frontline plan.
Which Ruby skill should I max first?
Start and prioritize Be Good!, keep Don't Run, Wolf King! as the backup upgrade, and level I'm Offended! whenever available.
Why is Ruby hard to kill in extended fights?
Her skills trigger Spell Vamp, missing HP raises the Spell Vamp ratio, and every skill enables a dash plus stacking defenses. Anti-heal and burst still punish careless entry.
Should Ruby always buy Blade of Despair?
No. Only the third observed Pro Setup uses it. Ruby usually gets more value from surviving long enough to cast another control cycle.
Can Ruby use Tank Emblem?
Yes when she must start fights or play with lower economy. Fighter Emblem remains the default sustain route; Tank Emblem trades damage and Spell Vamp emphasis for a safer first contact.
Final Verdict
Ruby wins by repeating a clean cycle, not by forcing one heroic dive. Slow first, dash to the side, gather with Skill 2, and pull only toward real damage. Compare the Chou guide, Alpha guide, and Terizla guide.
Top up MLBB safely on ManaBuy




Copyright © FUTURE OUTLOOK TECHNOLOGY LIMITED.Company Registration No.: 77374965 All rights reserved.UNIT 135,1/F.,143 WAI YIP STREET,KWUN TONG HK