
Genshin Impact Stellar Glimmer Guide: Reactions, Vortex, Odette, and Team Prep

Genshin Impact's Stellar Glimmer system is now bigger than one reaction name. Stellar-Conduct is already live through the Luna VIII Cryo + Electro system, while Stellar Swirl is the Version 7.0 Cryo + Anemo branch scheduled alongside Odette's debut. That means players need two layers of planning: learn the live Conduct field now, then prepare for the Swirl and Vortex loop without farming blindly.
The clean way to think about it is simple: Stellar Glimmer turns certain older Cryo reaction shells into character-enabled team systems. Stellar-Conduct upgrades the old Superconduct pairing into a field-and-buff loop. Stellar Swirl adds a Cryo + Anemo route that creates a Stellar Vortex, rewards repeated triggers, and changes how Odette teams should be judged.
Stellar-Conduct is the live Cryo + Electro route: it creates Starlight Prism and Polestar Field, then rewards continued Cryo/Electro hits inside the field. Stellar Swirl is the Version 7.0 Cryo + Anemo route: it creates Stellar Vortex, which can strengthen and explode for additional AoE Cryo DMG. Build around one route first. Use Sandrone-era Conduct teams to learn field timing now, then test Odette, Cryo Traveler, and Anemo trigger frequency when Version 7.0 opens.
Cryo + Electro becomes a Polestar Field loop when an eligible enabler is in the party.
Cryo + Anemo gains a Stellar Vortex route, making repeated Anemo triggers more important.
Pick Conduct or Swirl as the main plan before forcing every related character into one team.
What Stellar Glimmer Changes
Stellar Glimmer is a reaction family, not a universal buff for every Cryo team. It only appears when the team meets the required Stellar condition, usually through a character or form that enables the special route. Without that condition, Cryo + Electro still behaves like normal Superconduct and Cryo + Anemo still behaves like normal Swirl.
| Route | Status | Element pair | What changes in play |
|---|---|---|---|
| Stellar-Conduct | Live now |  Cryo+ Cryo+ Electro Electro | Creates Starlight Prism and Polestar Field, then rewards Cryo/Electro hits during the field window. |
| Stellar Swirl | Version 7.0 | Cryo+ Anemo Anemo | Creates Stellar Vortex, so Cryo uptime, Anemo trigger rate, and enemy positioning all become part of the damage plan. |
| Normal fallback | No Stellar condition | Cryo+ElectroCryo+Anemo | The team returns to ordinary Superconduct or Swirl behavior instead of gaining the Stellar Glimmer layer. |
HoYoverse's Stellar Swirl announcement gives the cleanest conversion summary: Cryo swept by Anemo becomes Stellar Swirl, and Cryo entwined with Electro becomes Stellar-Conduct, once the Stellar Glimmer condition is active.
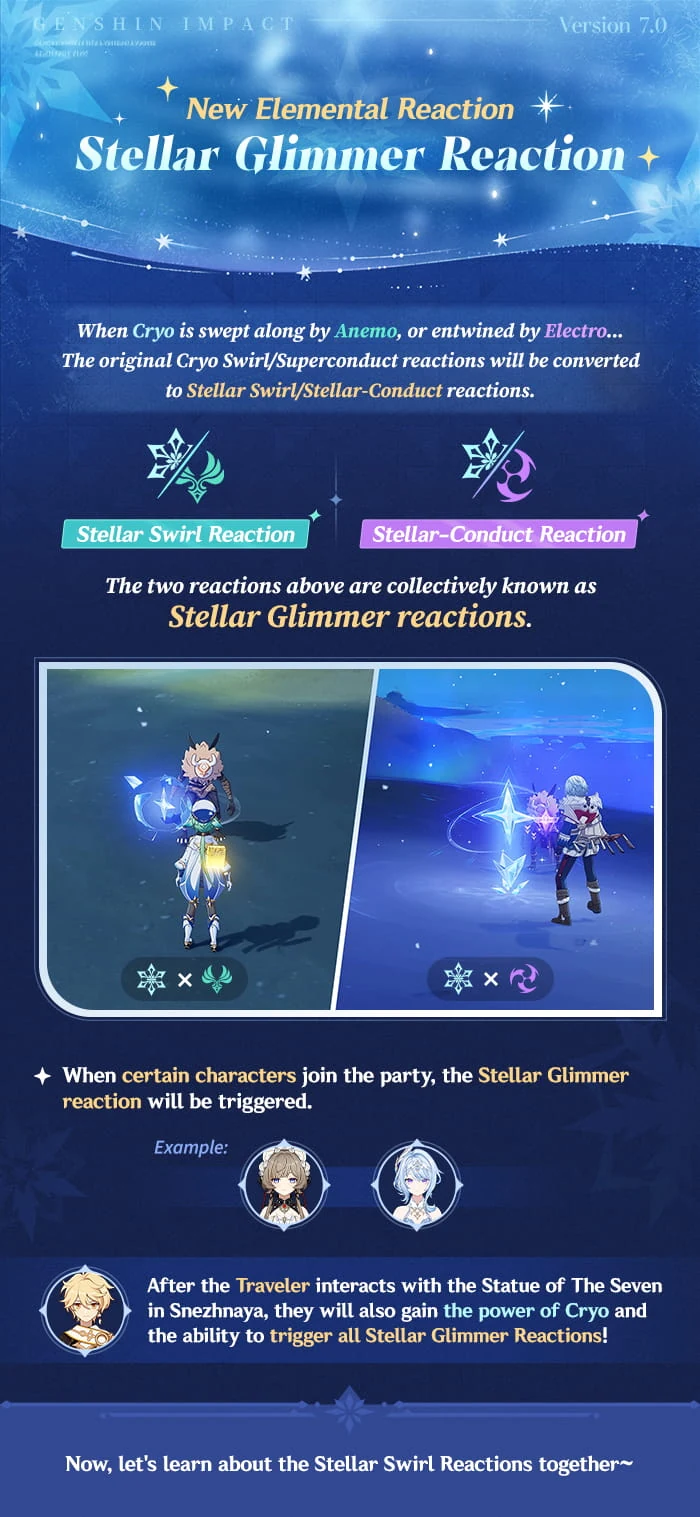
HoYoverse's Stellar Glimmer chart connects the two routes: Cryo + Electro for Stellar-Conduct and Cryo + Anemo for Stellar Swirl.
The practical takeaway is this: do not build from the element pair alone. Build from the enabler, the reaction owner, the field or vortex uptime, and the damage window. A team that can trigger the reaction once may still be weak if it cannot keep feeding the system.
Stellar-Conduct: The Live Cryo + Electro Route
Stellar-Conduct arrived with Version Luna VIII content. HoYoverse's Witch's Revelation notice explains the new reaction and the added character talents tied to it, while Sandrone's showcase confirms her place in the current Cryo + Electro environment.
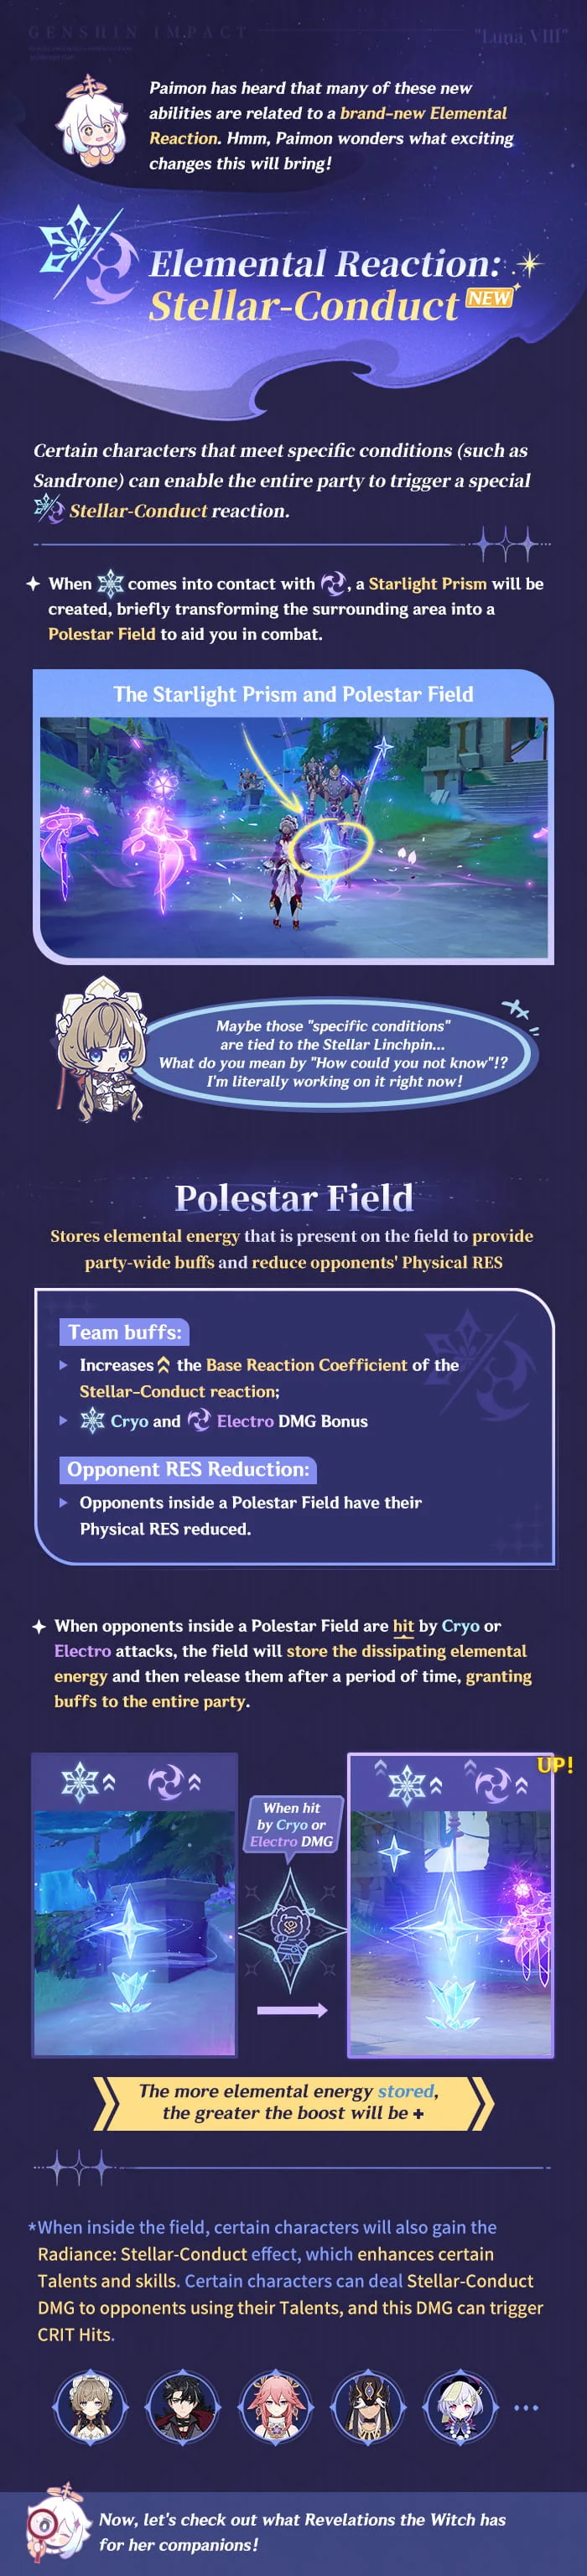
HoYoverse's Stellar-Conduct mechanics chart explains Starlight Prism, Polestar Field, party buffs, and Physical RES reduction.
In play, Stellar-Conduct is not just "stronger Superconduct." The reaction creates a Starlight Prism and briefly turns the nearby area into a Polestar Field. Inside that field, Cryo and Electro hits do more than refresh an aura. They feed the field, support team buffs, and help raise the Stellar-Conduct damage payoff during the active window.
| Conduct piece | What it means | How to play around it |
|---|---|---|
| Starlight Prism | The visible marker that the special Cryo + Electro route has started. | Create it before your main damage window, not after your carry has already spent their best hits. |
| Polestar Field | The active zone where Cryo/Electro follow-up hits matter. | Keep enemies inside the field; grouping and positioning can be as important as raw stats. |
| Stored energy release | Repeated Cryo/Electro hits inside the field increase the reaction's payoff. | Use off-field application or fast drivers so the field is fed across the rotation. |
| Physical RES reduction | The route keeps part of Superconduct's old identity. | Physical or mixed-damage units can be retested, but they still need Conduct-compatible timing. |
The most common mistake is treating Stellar-Conduct as a one-button reaction. It is closer to a short combat engine: enable the route, create the field, feed it, then let the character with the right talent wording claim the damage window.
Sandrone, Radiance, and Damage Ownership
Sandrone matters because she is one of the clearest current examples of a character built around Stellar-Conduct. Her official Character Skill Showcase uses the "Variable: Stellar-Conduct Reaction" framing and shows how Radiance converts supported damage into Stellar-Conduct reaction DMG.
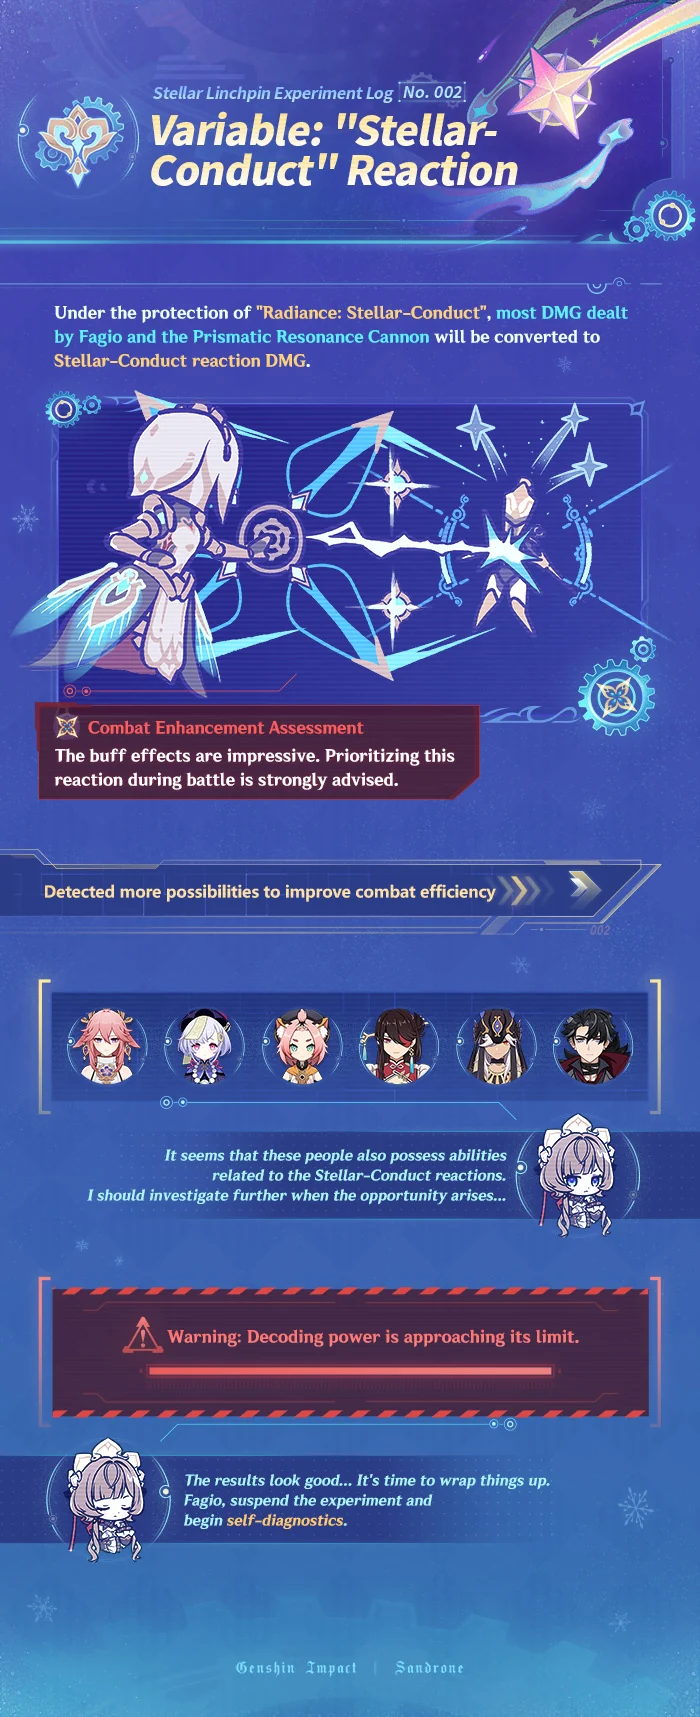
Sandrone's character showcase highlights Radiance: Stellar-Conduct and why the damage owner must have kit support, not only Cryo or Electro application.
This is the key Conduct lesson for every account: triggering Cryo + Electro does not automatically make that character your best damage owner. Some units create the field, some feed the field, and some have talent text that actually turns their damage into Stellar-Conduct DMG. Those jobs are different.
- Enabler: lets the team access the special Stellar-Conduct conversion.
- Field feeder: applies Cryo or Electro repeatedly while Polestar Field is active.
- Damage owner: has talent or Radiance wording that turns the field into real damage.
- Comfort slot: adds healing, shielding, grouping, or resistance support without breaking aura timing.
HoYoverse's Witch's Revelation materials point players toward several older characters receiving related talent support, including names shown in the official character list such as Wriothesley, Yae Miko, Cyno, Qiqi, Diona, Yumemizuki Mizuki, and Beidou. Treat those as characters to retest, not automatic best-in-slot picks. The team still has to prove field uptime, damage ownership, and rotation smoothness.
Stellar Swirl: The Version 7.0 Cryo + Anemo Route
Stellar Swirl is the next Stellar Glimmer branch. It uses the Cryo + Anemo pairing, but it should not be judged exactly like old Swirl. Normal Swirl often revolves around Elemental Mastery, Viridescent Venerer, aura setup, and grouping. Stellar Swirl adds a separate combat object: Stellar Vortex.
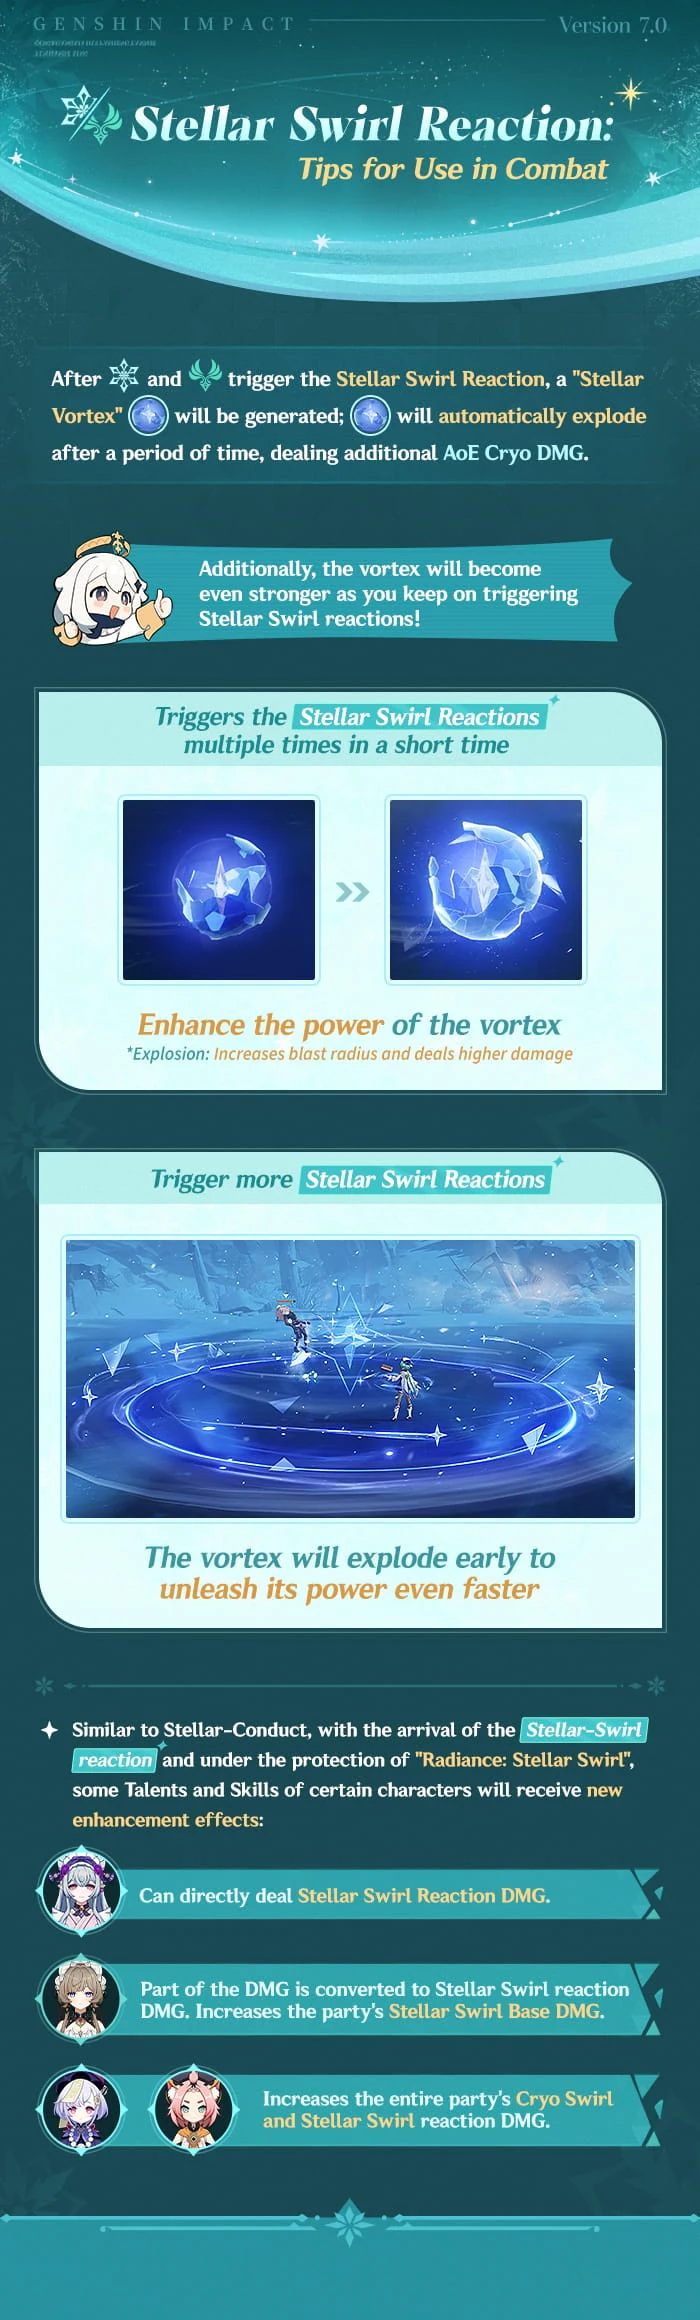
HoYoverse's Stellar Swirl combat chart shows the Vortex loop: create it, trigger Stellar Swirl again to strengthen it, then land the explosion.
That single change makes the team-building question sharper. A good Stellar Swirl team needs stable Cryo setup, a repeatable Anemo trigger, enough enemy control to keep the Vortex relevant, and a clear answer for who owns the damage. A team that can Swirl Cryo once but cannot repeat the trigger may look exciting in a short clip and still perform badly in longer fights.
| Swirl question | Why it matters | Player takeaway |
|---|---|---|
| Cryo uptime | Anemo needs Cryo available often enough to keep Stellar Swirl consistent. | Odette's off-field Cryo pressure may matter more than one large personal hit. |
| Anemo frequency | Repeated Stellar Swirl triggers can strengthen and accelerate the Vortex explosion. | Fast or multi-hit Anemo actions deserve testing before slow one-hit openers. |
| Damage ownership | Scaling may depend on the triggering unit, Odette's buff, or specific talent wording. | Do not convert every Anemo build to EM until live testing confirms the best stat path. |
| Enemy control | The Vortex is easier to value when enemies stay close enough for the explosion. | Separate AoE rooms, mobile enemies, shielded enemies, and bosses in testing. |
Stellar Vortex Combat Loop
Stellar Vortex is the real reason Stellar Swirl deserves its own guide section. When Stellar Swirl triggers, a Vortex appears. The official combat chart says it can explode after a period of time for additional AoE Cryo DMG, while repeated Stellar Swirl triggers can strengthen it and make it explode earlier.
Start with a stable Cryo source so the Anemo unit is not chasing empty aura windows.
Use Anemo to create Stellar Swirl and generate the first Stellar Vortex.
Repeat Stellar Swirl during the buff window to strengthen the Vortex or accelerate the explosion.
Keep targets near the reaction area so the AoE Cryo explosion actually lands.
This is why Odette teams should not be judged only by Odette's own animation damage. If her kit keeps Cryo available while another unit triggers Anemo repeatedly, she may act more like the conductor of the reaction loop than a selfish Cryo carry.
Enemy and Exploration Utility
Stellar Glimmer also has Snezhnaya-specific utility. HoYoverse's Version 7.0 materials show Stellar Glimmer effects disrupting certain Snezhnayan enemies, helping break shields faster, and creating exploration support through Stellar Vortex or Starlight Prism interactions.
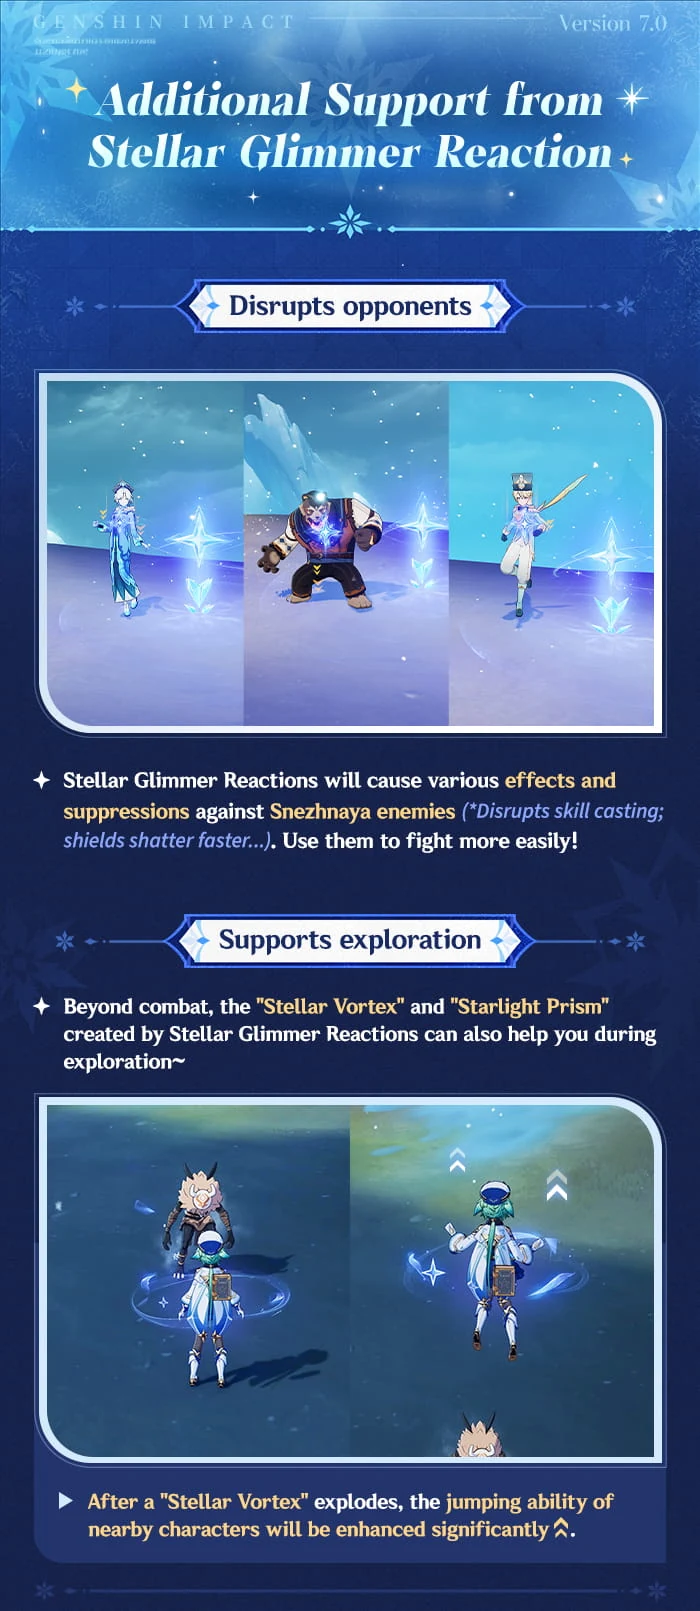
HoYoverse's utility chart shows Stellar Glimmer reactions affecting enemy skills, shield pressure, and jump support after a Vortex explosion.
This matters because a team can gain value outside a pure damage sheet. Stellar Swirl may be strongest in rooms where enemies group, shields appear, and movement support matters. Stellar-Conduct may feel stronger in fights where enemies stay inside Polestar Field long enough for repeated Cryo/Electro hits to pay off.
Odette's Role in Stellar Glimmer Teams
Odette's official skill materials frame her as a Cryo character who can deal damage, summon a Solo Dance Double, and increase Stellar Glimmer reaction value for herself or the party. Her Version 7.0 event wish is scheduled after the update on August 12, 2026, so pull planning should focus on role fit rather than hype.
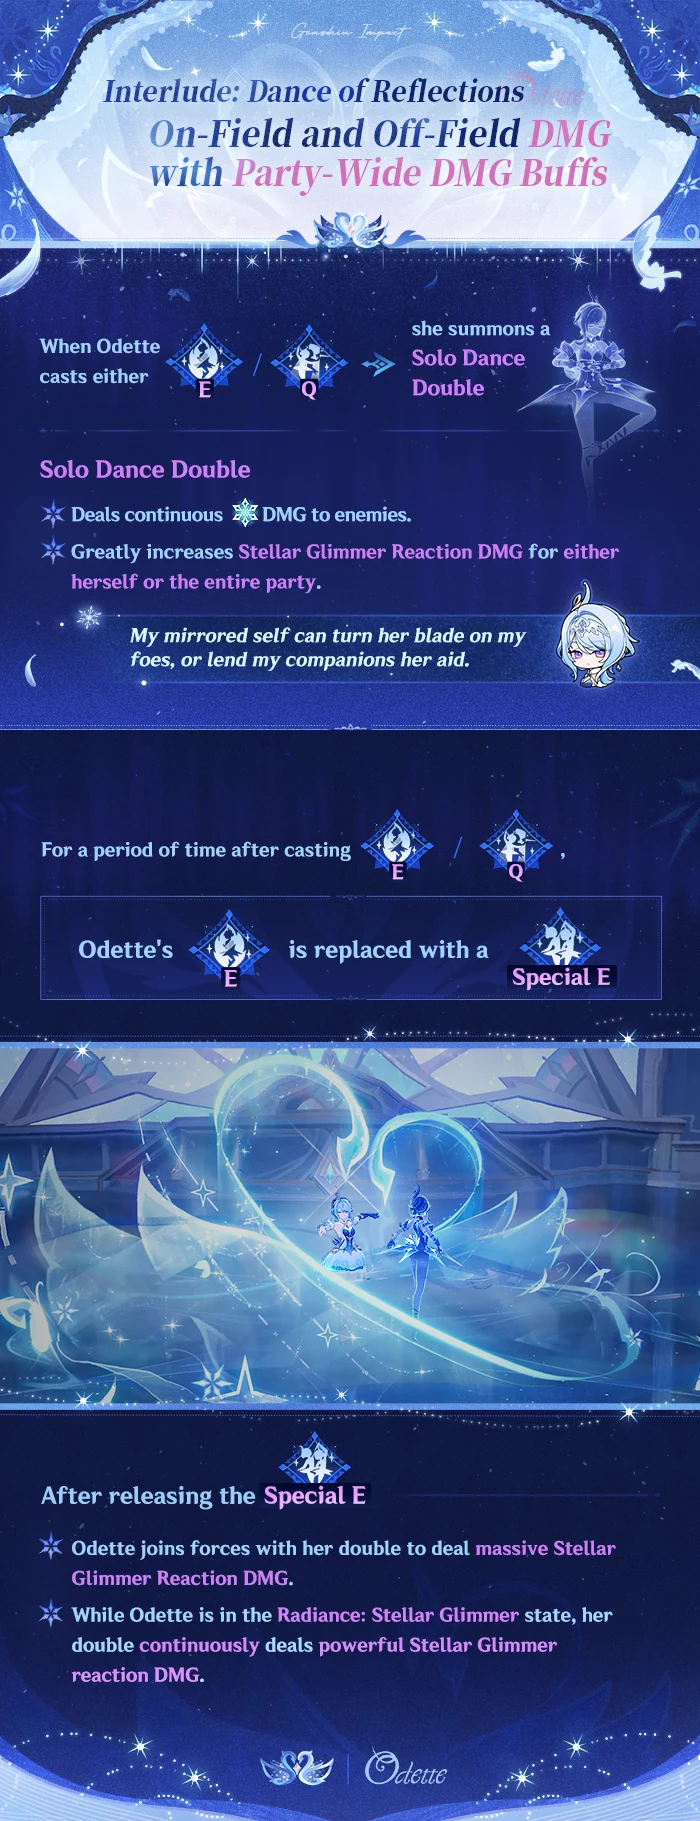
Odette's skill showcase shows the Solo Dance Double, Special E follow-up, and party-wide Stellar Glimmer reaction support.
For team planning, Odette looks most valuable when she solves three problems at once:
| Odette job | Why it matters | How to judge it |
|---|---|---|
| Stellar route access | She helps activate the Stellar Glimmer branch the team is trying to play. | Check whether your team gains a clean Conduct route, Swirl route, or both. |
| Cryo uptime | Both Conduct and Swirl need reliable Cryo contact. | Watch whether Solo Dance Double keeps the reaction moving after Odette swaps. |
| Reaction base damage buff | Stellar teams care about reaction payoff, not only personal damage. | Compare total rotation damage with and without her buff window. |
| Field flexibility | She can support on-field or off-field reaction plans. | Try one simple route first before building a hybrid Cryo/Electro/Anemo team. |
For banner materials, Primogem timing, and Odette-specific pull advice, use ManaBuy's Odette 7.0 pull prep guide.
Cryo Traveler and Free Access
Cryo Traveler is important because Stellar Glimmer should not be locked out of testing for players who skip Odette's banner. The Version 7.0 Stellar Swirl announcement says that after the Traveler resonates with Snezhnaya's Statue of The Seven, they gain Cryo power and can trigger all Stellar Glimmer reactions.
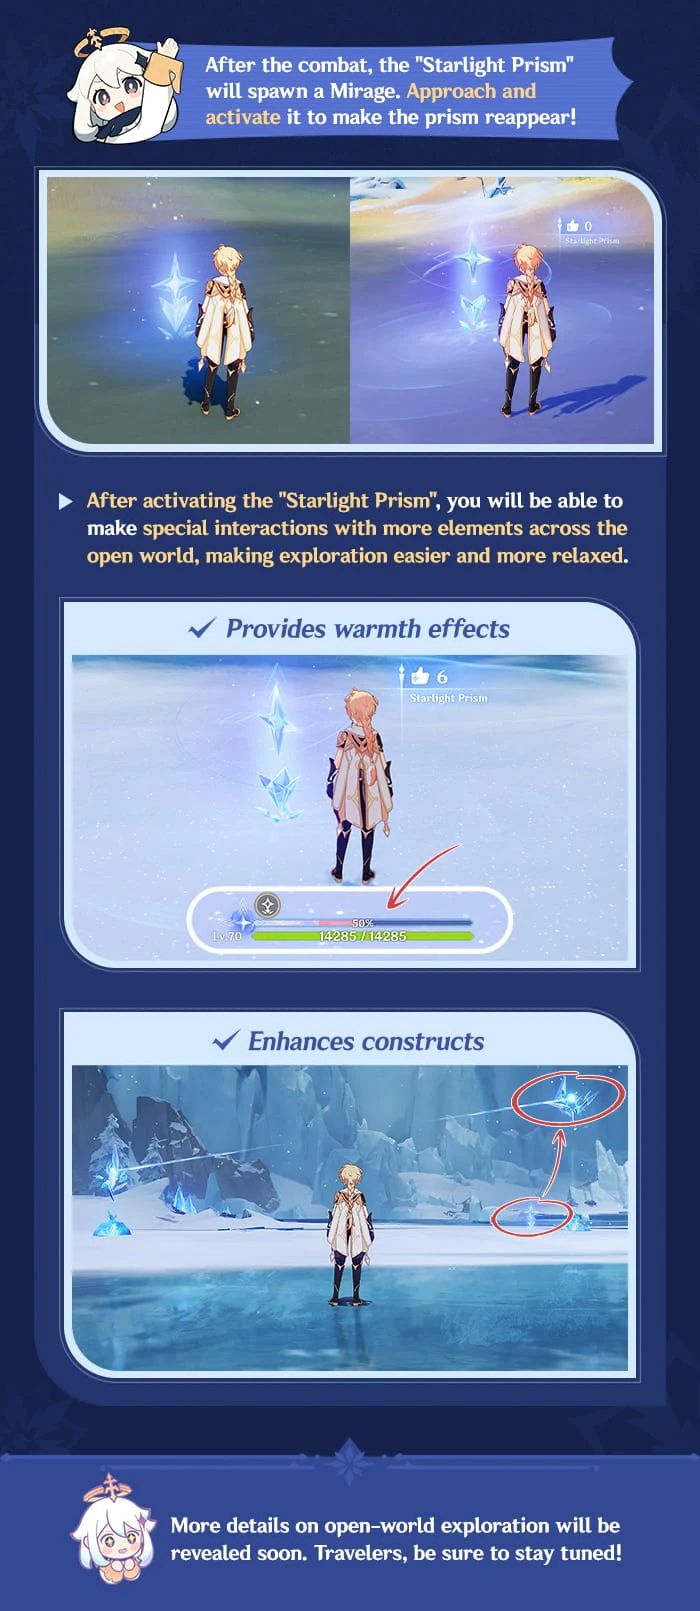
HoYoverse's exploration chart shows Starlight Prism appearing in Mirage and Approach forms for open-world interactions.
That does not mean Cryo Traveler will match Odette's ceiling. The safer read is that Traveler gives every account a way to learn the reaction rules, while Odette likely offers better uptime, stronger buffs, and smoother team damage if her trial confirms the showcase direction.
Team-Building Framework
Build Stellar Glimmer teams from jobs, not from element labels. A four-character team should answer these questions before you spend Resin:
| Team question | Conduct answer | Swirl answer |
|---|---|---|
| Main route | Cryo + Electro inside Polestar Field. | Cryo + Anemo into Stellar Vortex. |
| Required uptime | Repeated Cryo/Electro hits during field duration. | Stable Cryo aura plus repeated Anemo triggers. |
| Main risk | Field appears too late, enemies leave it, or no one owns the damage. | Vortex triggers once, then loses value because Cryo or Anemo timing drops. |
| Best early test | Sandrone-style Conduct core plus one reliable feeder and one comfort slot. | Odette or Cryo Traveler plus one Anemo trigger, one defensive slot, and one flexible support. |
Hybrid teams with Cryo, Electro, Anemo, and Odette may eventually work, but they should be the second test, not the first. Conduct wants the team to feed Polestar Field. Swirl wants the team to feed Stellar Vortex. If one route steals aura timing from the other, the "flexible" team becomes weaker than two focused teams.
Pull and Resin Prep Before Version 7.0
The safest preparation is not to pre-farm one imagined perfect build. Instead, prepare flexible pieces and make a testing checklist.
- For Stellar-Conduct: test current Cryo/Electro uptime, field placement, and which character actually owns Stellar-Conduct DMG.
- For Stellar Swirl: keep Anemo candidates ready, but wait before committing to EM, ATK, or CRIT as the main stat path.
- For Odette: save wishes if you want a premium Stellar Glimmer enabler, then judge her trial by uptime and team damage, not only animation style.
- For Witch's Revelation characters: raise important candidates only if you already use them or can unlock their added talent content without draining your account.
The Witch's Revelation notice lists Character Lv. 70 or above as an unlock condition for the related quest content. That makes Level 70 a useful check point for retesting older characters, but it does not mean every listed character deserves immediate full investment.
If Odette becomes a real pull target for your account after the trial, confirm pity, banner order, and UID first. For players who plan to buy Genesis Crystals, compare package size only after the gameplay decision is made.






Common Mistakes
| Mistake | Why it hurts | Better move |
|---|---|---|
| Treating Conduct as a future feature | Stellar-Conduct is already live, so players can test field behavior now. | Use Conduct teams to learn Stellar Glimmer timing before 7.0. |
| Calling Stellar Swirl just another Swirl buff | Stellar Vortex changes the value of repeated triggers and enemy control. | Test Cryo uptime, Anemo frequency, and Vortex detonation timing. |
| Building every old character at once | Witch's Revelation support does not automatically make every listed unit a top carry. | Start with characters you own, like, and can slot into a clear Conduct or Swirl job. |
| Forcing Conduct and Swirl together first | Extra elements can split aura priority and weaken both routes. | Make one route stable, then test hybrid rotations later. |
| Spending before trial testing | Odette's value depends on uptime, buff feel, and real team damage. | Watch the trial, compare your roster, then decide whether to pull or top up. |
Related Genshin Impact Guides
Genshin Impact Stellar Glimmer FAQ
Is Stellar-Conduct already live?
Yes. Stellar-Conduct is already part of the Luna VIII Cryo + Electro system, so players can test Polestar Field, Starlight Prism, and Radiance: Stellar-Conduct teams now.
What does Stellar Swirl add in Version 7.0?
Stellar Swirl adds the Cryo + Anemo branch. It creates Stellar Vortex, which can strengthen through repeated Stellar Swirl triggers and explode for additional AoE Cryo DMG.
Is Odette required for every Stellar Glimmer team?
No. Odette looks like the premium Stellar Swirl and Stellar Glimmer support route, but Cryo Traveler gives players a way to test the system after resonating with Snezhnaya's Statue of The Seven.
Should I build Elemental Mastery for Stellar Swirl?
Wait for Version 7.0 testing before locking artifacts. Normal Swirl often values EM, but Stellar Swirl may also depend on Odette's buff, trigger ownership, and talent-specific scaling.
Which route should I build first?
Build Stellar-Conduct first if you already have strong Cryo/Electro pieces or Sandrone-era investment. Prepare Stellar Swirl first if Odette and Anemo-driven teams solve a bigger problem for your account.
Does Stellar Glimmer help outside damage checks?
Yes. Version 7.0 materials show Stellar Glimmer effects helping with Snezhnaya enemy disruption, shield pressure, jumping support, and Starlight Prism exploration interactions.
Final Recommendation
Treat Stellar Glimmer as a new team-building layer, not a keyword to attach to every Cryo unit. Stellar-Conduct is the live route to learn now; it teaches field timing, damage ownership, and Cryo/Electro feeding. Stellar Swirl is the 7.0 route to prepare for; it adds Stellar Vortex and makes Odette's Cryo uptime and reaction buff more important. Build one clean route first, then decide whether your account actually needs a hybrid Stellar Glimmer team.




Copyright © FUTURE OUTLOOK TECHNOLOGY LIMITED.Company Registration No.: 77374965 All rights reserved.UNIT 135,1/F.,143 WAI YIP STREET,KWUN TONG HK