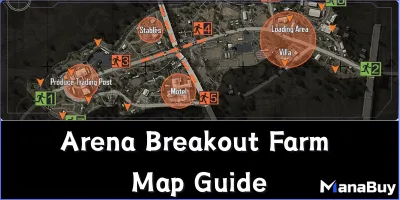
Arena Breakout Season 5: New Map "Dam" Guide & High-Value Loot Spots
Ready to dive into Arena Breakout Season 5? The new map brings fresh challenges and amazing loot if you know where to look. You can grab top gear, outsmart rivals, and make it out alive with the right moves. Whether you go solo or roll with a squad, these tips will help you get ahead fast. To get a head start on the best gear, top up your Bonds at ManaBuy. Let’s make every run count!
High-Value Loot Spots
Looking for the best loot on the Mine map? You need to know where to go and what to expect. Here are the top spots you should check out every run.
Control Room Cache
The Control Room sits near the center of the map. You can spot it by the large glass windows and blinking monitors.
- Loot: You often find rare weapon mods, high-tier armor, and medical supplies here.
- How to Access: Enter through the main door or sneak in from the side hallway.
- Risks: Other players love this spot. You might run into campers or squads waiting for easy kills. The ManaBuy team always suggests checking windows.
Tip: Peek through the windows before you enter. You can spot enemies and plan your move.
Generator Room Safe
The Generator Room hides a sturdy safe behind the main generator.
- Loot: You can grab cash, encrypted drives, and sometimes rare keys.
- How to Access: Look for the yellow pipes and follow them to the back wall. The safe sits behind a stack of crates.
- Risks: The room is dark and noisy. You might miss footsteps or get surprised by someone hiding.
|
Loot Type |
Rarity |
Danger Level |
|
Cash |
Common |
Medium |
|
Encrypted Drives |
Rare |
High |
|
Keys |
Epic |
High |
Upper Mine Offices
You find the Upper Mine Offices above the main shaft.
- Loot: Expect to see weapon crates, tactical gear, and documents.
- How to Access: Climb the metal stairs near the elevator shaft.
- Risks: The offices have lots of windows. You can get sniped from outside or ambushed by players coming up the stairs.
Note: Squad players often clear this area first. If you go solo, move fast and stay alert.
Maintenance Tunnels
The Maintenance Tunnels run under the map.
Loot: You can pick up toolkits, repair kits, and sometimes hidden stashes with rare loot.
How to Access: Find the hatch near the loading bay. Crawl through the narrow passage.
Risks: The tunnels are tight and dark. You might get trapped or flanked by sneaky players.
Quick Checklist for Tunnels:
- Bring a flashlight
- Watch for tripwires
- Listen for footsteps
Supply Trucks
Supply Trucks park near the extraction zones.
- Loot: You often find ammo boxes, grenades, and sometimes high-value backpacks.
- How to Access: Open the back doors or climb into the cab.
- Risks: These trucks sit in open areas. You can get spotted by snipers or ambushed by squads waiting for loot.
Pro Tip: Check the trucks early in your run. Late-game, these spots get risky.
Now you know the best places to score loot on the Mine map. Each spot has its own challenges, but if you plan your route and stay sharp, you can grab top gear and make it out alive.
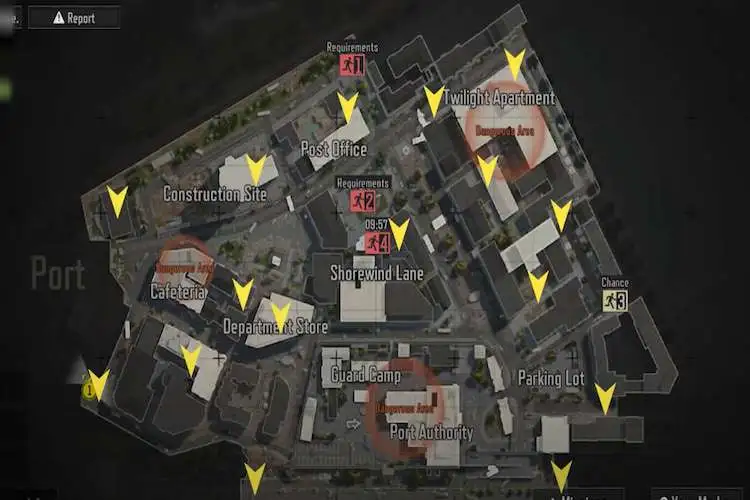
New Map Overview
Layout and Zones
When you first drop into the new map, you notice how big and open it feels. The Mine map has several zones, each with its own look and purpose. You can use this table to get a quick idea of what you’ll find in each area:
|
Mine Feature |
Unique Characteristics |
|
Open cut pits |
Huge holes in the ground where miners dug for minerals. |
|
Water storage ponds |
Pools that hold water used for mining. |
|
Milling infrastructure |
Buildings where workers process the rocks and minerals. |
|
Waste rock dumps |
Piles of leftover rocks that didn’t have any valuable minerals. |
|
Tailings storage facilities |
Areas for storing waste after minerals get removed. |
|
Heap leach pads |
Special spots where chemicals help pull metals out of rocks. |
|
Hydrothermal alteration zones |
Places where hot fluids changed the rocks, great for finding rare loot. |
|
Oxidized zones |
Rusty-looking areas that might hide iron-rich treasures. |
You can move between these zones using tunnels, ramps, and ladders. Each zone gives you different cover and loot options.
Key Landmarks
The new map stands out because of its unique landmarks. You can spot the Control Room by its glass windows and blinking lights. The Generator Room has loud machines and yellow pipes. Upper Mine Offices sit above the main shaft and give you a good view of the area. Maintenance Tunnels run under the map and connect many zones. Supply Trucks park near extraction points and often hold quick loot.
Tip: Use landmarks to plan your route and remember safe paths for escape.
You also meet new threats here. Hecate, the boss, leads the Southern Army’s Abyss group. If you run into her, get ready for a tough fight. The Colom and Tevila factions bring new weapons like the M249, MCX, RPD, and AK12. These guns pack a punch and can change the way you play.
Player Hotspots
You want to know where the action happens on the new map. Most players rush to the Control Room, Generator Room, and Upper Mine Offices. These spots have the best loot, so you see lots of fights there. The open cut pits and heap leach pads also attract squads looking for rare gear. If you like to play it safe, stick to the edges or use the Maintenance Tunnels to sneak around.
Hotspots to watch:
- Control Room
- Generator Room
- Upper Mine Offices
- Heap leach pads
You can use this knowledge to avoid trouble or set up ambushes. The new map rewards players who learn the layout and use every zone to their advantage.
Safe Looting Strategies
Entry Points
You want to start your run with a plan. The Mine map gives you several entry points, and each one changes how your game goes. Some players like to drop in near the Control Room for fast action. Others pick the Maintenance Tunnels to sneak in quietly. If you go for the Supply Trucks, you can grab quick loot but might run into squads right away.
Pick your entry based on your goal.
- Want high-value loot? Head for the center.
- Prefer to play it safe? Use side tunnels or less popular ramps.
Check your surroundings before moving in.
- Listen for footsteps.
- Watch for open doors or dropped items.
Tip: Always have a backup plan. If you see too many players at your entry, change your route fast.
Stealth vs. Aggression
You might wonder if sneaking around works better than going in loud. Some players say stealth feels slow and stressful. One player even shared that dropping stealth made the game more fun and easier. They found that charging in and fighting enemies head-on worked well for them. You can try both styles and see what fits you best. If you like action, don’t be afraid to play aggressive. If you want to avoid fights, stick to shadows and move quietly.
- Stealth: Good for solo runs and avoiding big fights.
- Aggression: Great for squads or if you want to control the map.
Note: Mix up your style based on your gear and mood. Both ways can help you survive.
Avoiding Ambushes
Ambushes happen a lot on the Mine map. You can lower your risk by changing your habits and staying alert. Here are some smart ways to avoid getting caught off guard:
|
Strategy |
Description |
|
Varying Routines |
Don’t stop at the same place every time. Change your path to keep enemies guessing. |
|
Maintaining Vigilance |
Stay unpredictable. Don’t get lazy, even when you think you’re safe. |
|
Preparedness for Scenarios |
Practice reacting to surprises. This helps you spot danger and escape faster. |
Pro Tip: Keep your head on a swivel and never get too comfortable, even in “safe” spots.
Extraction and Survival
Extraction Points
You want to get out with your loot, right? The Mine map gives you several extraction points. Each spot has its own risks and rewards. Some exits sit close to hotspots, so you might run into other players. Others hide in quieter zones, but you need to watch for sneaky campers.
Here’s a quick table to help you remember the main extraction points:
|
Extraction Point |
Location |
Risk Level |
Best Time to Use |
|
North Loading Bay |
Near Supply Trucks |
High |
Early or Mid Run |
|
East Tunnel Exit |
Maintenance Tunnels |
Medium |
Late Run |
|
South Water Gate |
By Water Ponds |
Low |
Any Time |
Tip: Always check your map before heading to an extraction. If you hear gunfire nearby, wait a few seconds and listen for footsteps.
Escape Routes
You need a plan to reach your extraction safely. The Mine map offers lots of paths, but not all of them are safe. Some routes take you through open areas, while others let you sneak through tunnels or behind cover.
- Use tunnels for stealth.
- Move along walls to avoid open ground.
- Watch for shortcuts near the heap leach pads.
If you play solo, stick to quieter paths. Squad players can cover each other and push through risky zones. Change your route if you spot enemies or hear gunshots.
Pro Tip: Keep a smoke grenade ready. You can use it to block sightlines and make a quick escape.
Enemy Encounters
You will meet enemies near extraction points. Some players camp exits and wait for easy kills. Others rush in at the last minute. Stay alert and check corners before you move. The community often shares tactics for dealing with extract campers.
- Listen for footsteps and gunfire.
- Peek around corners instead of running out.
- Use cover and move fast if you spot trouble.
If you get pinned down, don’t panic. Toss a grenade or double back to a safer route. You can also bait enemies by making noise, then slipping away quietly.
Note: Surviving extraction is just as important as grabbing loot. Stay sharp until you’re out!
Efficient Run Tips
Gear Loadouts
You want to survive and grab the best loot, right? Picking the right gear makes a huge difference on the Mine map. Check out this table for loadout ideas that boost your chances:
|
Gear Type |
Recommendations |
|
Primary Weapon |
Go with a versatile assault rifle or marksman rifle like the Kastov-74U or MCW 556. These give you range and solid damage. |
|
Secondary Weapon |
Carry a reliable SMG such as the Lachmann Sub or a lightweight shotgun. The Combat Shotgun with Slug Rounds works well for close fights. |
|
Lethal & Tactical |
Pack Semtex or Frag Grenades to block enemy paths. Smoke Grenades help you escape or cover your moves. |
|
Perks |
Use Cold-Blooded, Overkill, Ghost, and High Alert. These perks keep you hidden and alert. Get the best perks and loadouts faster by topping up at ManaBuy. |
|
Field Upgrade |
Deployable Cover or Portable Radar gives you extra protection and helps you spot threats. |
|
Equipment Management |
Bring 2–3 Medical Kits and Armor Kits. Don’t overload with extra mags—keep it light. |
|
Vehicle Option |
Use an ATV for quick moves. If you play in a squad, SUVs or Pickup Trucks offer better safety. |
Tip: Always check your gear before you drop in. A balanced loadout helps you adapt to any situation. For more loadout ideas, check out IGN's guides.
Route Planning
You need a smart plan to make your run efficient. Here’s how you can map out your route for the best results:
- Map your routes to hit the most loot spots in one run.
- Use overlays or in-game pins to mark where loot spawns.
- Change your path if you see loot nodes reset or if another squad controls an area.
Planning ahead saves time and keeps you out of trouble. Try different routes until you find one that fits your style.
Time Management
Time matters on the Mine map. You want to grab loot and get out before things get too hot. Watch the clock and keep moving. If you spend too long in one spot, you risk running into more enemies. Set small goals for each part of your run. For example, reach the Control Room in five minutes, then head for extraction. If you hear gunfire or see squads moving in, change your plan fast.
Stay aware of the timer. Quick decisions help you survive and score more loot.
Solo vs. Squad Tactics
Solo Play
Going solo on the Mine map feels intense. You make every decision. You move at your own pace. You pick your fights. When you play alone, you need to stay alert and trust your instincts. Stick to the shadows and use cover. Listen for footsteps and watch for movement. If you spot a squad, avoid them or set up an ambush. You can grab loot quickly and slip away before anyone notices. Make sure you're geared up for it with a quick top-up.
Tips for Solo Players:
- Travel light. Move fast.
- Avoid loud fights unless you have the upper hand.
- Use side tunnels and less popular routes.
- Heal up after every fight.
Remember: You control your run. If things get risky, change your plan and head for extraction.
Squad Coordination
Playing with a squad changes everything. You can cover more ground and watch each other’s backs. Good squads split up to check loot spots, then regroup fast. Assign roles before you drop in. One player scouts ahead. Another watches the rear. Someone else carries extra meds or ammo.
Squad Tactics:
- Stick together in dangerous zones.
- Share loot and supplies.
- Revive teammates quickly.
- Use crossfire to trap enemies.
Pro Tip: Plan your route as a team. If you get separated, call out your position and regroup.
Communication
Communication makes or breaks a squad. When you talk clearly, you avoid surprises and react faster. You warn teammates about enemies or traps. You call out loot or extraction points. Real-time updates help everyone stay safe and move as one unit.
Here’s how strong communication boosts your squad:
|
Benefit |
Description |
|
Improved Safety |
Quick calls during emergencies keep everyone alive. |
|
Better Coordination |
Fast decisions and teamwork help you win more fights. |
|
Increased Throughput |
Real-time info means less downtime and more loot for everyone. |
Tip: Use short, clear messages. Call out enemy positions, loot finds, and extraction plans. The ManaBuy team finds that clear communication is the number one factor for squad survival.
You now know the best loot spots on the Mine map. Try the Control Room, Generator Room, and Upper Mine Offices for top gear. Use smart entry points and mix stealth with aggression. Test new routes and see what works for you.
- Explore different strategies.
- Share your favorite tips in the comments.
Got a cool story or a secret loot spot? Drop it below! Your feedback helps everyone get better.
FAQ
Where do you find the rarest loot on the Mine map?
You want the best gear? Head for the Control Room, Generator Room Safe, and Upper Mine Offices. These spots usually have rare weapons, armor, and keys. Watch out for other players camping these areas!
How do you avoid getting ambushed?
Stay unpredictable. Change your route every run. Listen for footsteps and check corners before moving. Use tunnels and smoke grenades to escape if you spot trouble.
What’s the safest extraction point?
The South Water Gate gives you the lowest risk. You can reach it from quieter zones. Always check for campers before you exit. If you hear gunfire, wait and listen.
Can you play the Mine map solo?
Absolutely! You can sneak through tunnels, grab loot, and avoid squads. Move fast, heal often, and use less popular routes. Solo runs feel intense but give you full control.
Which gear helps you survive longer?
Pick a versatile rifle, bring medical kits, and pack smoke grenades. Use perks like Ghost and High Alert. Keep your loadout light so you can move quickly and react to danger.


Copyright © FUTURE OUTLOOK TECHNOLOGY LIMITED. All rights reserved.UNIT 135,1/F.,143 WAI YIP STREET,KWUN TONG HK