Columbina & Ineffa Lunar-Charged Team Guide
If you want the best Lunar-Charged team, use Ineffa, Neuvillette, Furina, and Kazuha. Ineffa starts strong Electro reactions and swirls elements for more damage. Neuvillette is your Hydro DPS and does a lot of damage. Furina makes Hydro attacks stronger and helps Neuvillette do better. Kazuha gives Anemo support, swirls for less enemy resistance, and adds more elemental power. Columbina’s shield keeps you safe and her Elemental Mastery buff makes your reaction damage higher. This Lunar-Charged Team Guide explains how these roles work together for great results. If you need Primogems to complete this team, visit the Genshin Impact Top Up page on ManaBuy.
Team Core & Synergy
Columbina’s Shield & EM Buff
Columbina gives your team a lot of safety. Her shield stops damage, so you can attack more. She also gives an Elemental Mastery buff. This buff makes your reaction attacks stronger. Your team will hit harder with this buff. Columbina is a smart choice if you want your team to stay safe and strong.
Tip: Use Columbina’s shield before you start attacking. This helps your team live longer in hard battles.
Ineffa’s Anemo Swirl Role
Ineffa helps your team make more reactions. She uses Anemo Swirl to mix up elements. When she swirls Hydro or Electro, your team does more damage. Ineffa also helps by lowering how much enemies can block your attacks.
- Swirl Hydro to get more Lunar-Charged reactions.
- Swirl Electro to make your team do more damage.
You can use Ineffa’s skills to make big combos. She helps your reactions happen faster and hit harder.
Synergy in Lunar-Charged Teams
Columbina and Ineffa work together to help your team do well. Columbina’s shield lets you attack without being scared of losing. Her Elemental Mastery buff makes every reaction hit harder. Ineffa’s swirls help you get more Lunar-Charged reactions.
Here’s how they work together:
|
Columbina |
Ineffa |
Result |
|
Shield |
Swirl |
Safe and fast reactions |
|
EM Buff |
Swirl |
Higher reaction damage |
|
Hydro |
Swirl |
More Lunar-Charged triggers |
Your team will stay alive and do a lot of damage. The Lunar-Charged Team Guide shows you how to use these good points for the best results.
Lunar-Charged Reaction Explained
Reaction Mechanics
You may wonder how Lunar-Charged works in fights. When you use this reaction, your team makes a Thundercloud. The Thundercloud hits enemies with Electro damage in a wide area. The damage changes based on your character’s level, Elemental Mastery, and critical stats. Here are the main things that matter:
|
Parameter |
Description |
|
Level Multiplier |
Goes up with your character’s level. At level 90, base damage is about 1,447. |
|
Lunar-Charged Base DMG |
Adds extra damage to the base amount. |
|
Reaction DMG Bonus |
Gives more damage from effects like Fractured Halo (up to 40% more). |
|
EM DMG Bonus |
Comes from Elemental Mastery. Formula: ((6 × EM)/(EM + 2000)) × 100%. |
|
Crit DMG |
If you get a critical hit, damage goes up. |
|
Enemy RES Multiplier |
Enemy resistance can lower or raise your damage. |
Building Elemental Mastery and Crit stats helps your team do more damage with Lunar-Charged.
Damage Scaling & Hydro Support
Lunar-Charged reactions need Hydro to keep the Thundercloud working. If you want to use reactions a lot, you need a Hydro character who can keep adding Hydro. Furina, Yelan, and Kokomi are good at this. Here’s how they help:
|
Character |
Hydro Application Method |
|
Furina |
Uses Elemental Skill, Burst, Normal and Charged Attacks |
|
Yelan |
Uses Elemental Skill, Burst, Normal and Charged Attacks |
|
Kokomi |
Uses Elemental Skill, Burst, Normal and Charged Attacks |
If Hydro stays on the field, Lunar-Charged reactions keep happening. This means your team’s damage stays high. Columbina also helps by making sure Hydro is always there, so you get more reactions and more damage.
Why Columbina & Ineffa Excel
You might ask why these two are so good in a Lunar-Charged team. Here’s what makes them special:
- Steady damage: Lunar-Charged makes a Thundercloud that does Electro damage over and over. You don’t need to worry about random reaction times.
- Crit scaling: Your Crit Rate and Crit Damage stats make Lunar-Charged hit harder, so you can build your team for big damage.
- Team effort: Every team member helps with damage, so everyone is important.
- Double attacks: Columbina’s skill lets the Thundercloud attack more often, almost doubling your damage.
If you compare Lunar-Charged to other reactions, you will see the difference. For example, a team with 300 Elemental Mastery and 300 Crit Value can hit for about 9,000 damage each time. A team with 1,500 EM and 440 Crit Value can reach 27,500 per hit. Most Bloom reactions only do 6,000 to 8,000.
With the right team, Columbina and Ineffa help your team do great in every fight.

Lunar-Charged Team Guide: Best Comps
Optimal Team Setup
You want a strong team for Lunar-Charged reactions. The best team uses Columbina, Ineffa, Flins, and Kazuha. Each character helps in a special way. Columbina protects everyone with her shield. She also boosts your Elemental Mastery. Ineffa helps trigger reactions and uses Anemo Swirl for support. Flins adds Hydro, so reactions happen more often. Kazuha boosts damage and controls groups of enemies.
Here’s how each member helps your team:
|
Character |
Role |
What They Do |
|
Columbina |
Shield, EM Buff, Hydro |
Protects, buffs, and applies Hydro |
|
Ineffa |
Anemo Swirl, EM Support |
Triggers reactions, lowers enemy resistance |
|
Flins |
Hydro Application |
Keeps Hydro on enemies for more reactions |
|
Kazuha |
Damage Boost, Crowd Control |
Swirls elements, boosts team damage |
This team does lots of damage and stays alive longer. The Lunar-Charged Team Guide says this setup works best. For alternative healer options, consult our Sustain Tier List.
Tip: Use Columbina’s shield before you attack. This keeps your team safe and lets you focus on fighting.
Alternative & F2P Options
Not everyone has every character. You can still make good teams with Columbina and Ineffa. Try these other choices if you need healing or want cheaper options.
|
Team Composition |
Key Roles and Functions |
|
Columbina + Ineffa + Flins + Xilonen |
Xilonen heals and gives extra shields. You lose some damage but get more safety. |
|
Columbina + Ineffa + Flins + Sucrose |
Sucrose boosts Elemental Mastery. She helps your reactions hit harder in groups. |
|
Columbina + Ineffa + Fischl + Sucrose |
Fischl adds Electro off-field. This team is easy to build and keeps reactions going. |
You can use free characters too. Ifa and Xingqiu work well together. Ifa heals and adds Hydro. Xingqiu keeps Hydro on enemies, so reactions keep happening. Ororon can boost your damage with the right artifacts. Yelan is good for off-field Hydro. Alhaitham and Nahida help with Dendro reactions if you want something new.
Note: Remember to balance your stats. Build Crit Rate, Crit Damage, and Elemental Mastery for the best results.
Strengths of Each Comp
Every team has good and bad points. The Lunar-Charged Team Guide helps you pick the best team for your style.
|
Strengths |
Weaknesses |
|
Lunar-Charged reactions can CRIT, so you get bigger damage numbers. |
You always need a Hydro character, which limits your choices. |
|
Columbina’s shield and summon have 100% uptime, so your team stays safe. |
Balancing stats like ATK, CRIT, EM, and Energy Recharge is hard. |
|
Stacking ATK boosts both shield strength and attack power. |
Sometimes you need to farm artifacts for a long time. |
|
Columbina buffs herself and the active character’s Elemental Mastery. |
|
|
You can switch to Hyperbloom or Overvape teams if you want variety. |
|
You might see some common problems. Some players build only Elemental Mastery and forget Crit stats. Others put characters in teams without thinking about their skills. Try to level up talents and artifacts before farming for upgrades.
Callout: The Lunar-Charged Team Guide helps you avoid these mistakes. Build a balanced team and you’ll get better results.
If you follow the Lunar-Charged Team Guide, you can make a team that fits your needs. You can choose high damage, strong shields, or easy healing. There is a setup for everyone.

Rotations & Tips
Rotation Sequence
Doing your rotation the right way helps a lot. First, use Columbina’s shield to protect your team. This shield also gives an Elemental Mastery buff. Next, switch to your Hydro character, like Flins or Furina. Use them to put Hydro on the enemies. Then, use Ineffa’s Anemo skills to swirl Hydro and Electro. This makes Lunar-Charged reactions happen and lowers how much enemies can block your attacks. Last, use your main DPS, like Neuvillette, to do big damage while all the buffs are still working.
Here is an easy order you can follow:
- Start with Columbina’s shield and skill.
- Use your Hydro character to add Hydro.
- Use Ineffa’s Anemo skill to swirl.
- Attack with your main DPS.
- Do these steps again when your skills are ready.
Tip: Always keep Columbina’s shield on your team. This way, you can attack more and worry less about dodging.
Maximizing Reaction Uptime
You want Lunar-Charged reactions to happen all the time. Make sure Hydro and Electro stay on the enemies. Use Ineffa’s skills to swirl both elements together. Try not to let your buffs go away. If your shield or Hydro effect is almost gone, use them again right away.
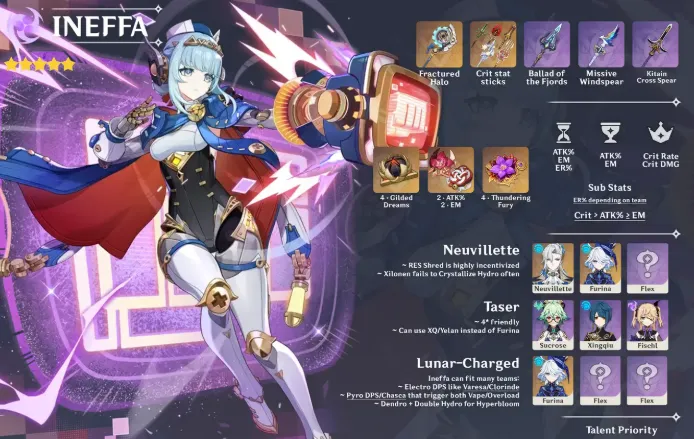
To do even more damage, use weapons and artifacts that boost Elemental Mastery and reaction damage. Here are some good choices:
|
Weapon Name |
Effect |
|
Fractured Halo |
Raises ATK and gives a big Lunar-Charged DMG bonus when you make a shield. |
|
Kitain Cross Spear (R5) |
Makes Elemental Skill DMG higher and helps with energy. |
|
Ballad of the Fjords |
Gives more Elemental Mastery if your team has three or more elements. |
Survivability & Energy Management
Staying alive and having your skills ready is important. Columbina’s shield blocks most attacks, so you get hurt less. If you need more healing, add a healer like Xilonen. For energy, use weapons that help you recharge, like Kitain Cross Spear. Artifacts are important too. Look for these main stats and sub stats:
|
Main Stats |
Sub Stats |
|
Sands: ATK% / Elemental Mastery / ER |
CRIT Rate / CRIT DMG > EM / ATK% / ER |
|
Goblet: ATK% / Elemental Mastery |
|
|
Circlet: CRIT DMG / CRIT Rate |
|
Note: Mix Crit Rate, Crit Damage, and Elemental Mastery for the best results. Don’t forget Energy Recharge if your skills take too long to come back.
If you use the right rotation, gear, and timing, your team will do more damage and stay alive longer!
You now know why Columbina and Ineffa make such a strong Lunar-Charged team. When you build your team right and follow smart rotations, you get faster clears and more damage. Check out these key stats for top performance:
|
Key Stat Thresholds |
Importance |
|
2,000 ATK |
Needed for Ineffa’s best passive |
|
75% CRIT Rate |
Makes reactions crit more often |
|
180-200% ER |
Keeps your skills ready |
|
150-300 EM |
Boosts your reaction damage |
Try these tips for even better results:
- Use support skills before starting the Lunar Domain.
- Give energy particles to Columbina when you can.
- Don’t stack too much Elemental Mastery.
Columbina’s unique skills and Hydro power will keep your team strong, even as new characters arrive. Keep testing new setups and see how high you can push your damage! And remember, ManaBuy is always here to support your journey with top-up options.
FAQ
How do I keep Columbina’s shield active?
You should use Columbina’s skill as soon as it is ready. Her shield lasts a long time. If it breaks, use her skill again right away. This keeps your team safe and boosts your reaction damage.
Can I use other Anemo characters instead of Ineffa?
Yes! You can try Sucrose or Kazuha. They both swirl elements and help with reactions. Sucrose gives more Elemental Mastery. Kazuha boosts damage and groups enemies. Pick the one you like best.
What artifacts work best for Columbina?
Go for sets that boost Elemental Mastery, HP, or shield strength. Try “Tenacity of the Millelith” or “Emblem of Severed Fate.” Mix and match to get good Crit Rate, Crit Damage, and Energy Recharge.
Do I need high Elemental Mastery on every team member?
No, you do not. Focus on Elemental Mastery for Columbina and your Anemo character. Your main DPS should build Crit Rate and Crit Damage. Balance your stats for the best results.
Why does my team run out of energy fast?
You might need more Energy Recharge. Use weapons or artifacts with Energy Recharge stats. Try to collect energy particles during fights. Switch characters often to help everyone get their bursts back faster.


Copyright © FUTURE OUTLOOK TECHNOLOGY LIMITED. All rights reserved.UNIT 135,1/F.,143 WAI YIP STREET,KWUN TONG HK