Genshin Impact Artifact Leveling Strategy to Avoid Bad Stats

Ever get annoyed when you spend tons of resources on an artifact, only to see those dreaded flat stats pop up? You're not alone! If you want stronger characters, you need to pay attention before leveling. Always check the stats first. Focus on your main DPS and use an Artifact Leveling Strategy that levels up artifacts in small steps. This way, you can stop before wasting materials. You can get better results with a bit of patience and a good plan!
Artifact Stats
Main vs. Substats
Artifacts in Genshin Impact come with two types of stats: main stats and substats. You always get the main stat, but substats are random. Main stats give the biggest boost to your character. Substats add extra power, but they are smaller and less predictable.
Here's a quick look at how main stats can boost your character:
|
Main Stat |
Max Stat Boost (5-star) |
Max Stat Boost (4-star) |
|
Flat HP |
4,780 HP |
3,571 HP |
|
Flat Attack |
311 Attack |
232 Attack |
|
Critical Rate |
31.10% |
23.20% |
|
Critical Damage |
62.20% |
46.40% |
|
Healing Bonus |
35.90% |
26.80% |
|
Elemental Damage Bonus |
46.60% |
34.80% |
|
Physical Damage Bonus |
58.30% |
43.50% |
|
Elemental Mastery |
187 |
139 |
|
Attack Percentage |
46.60% |
34.80% |
|
HP Percentage |
46.60% |
34.80% |
|
Defense Percentage |
58.30% |
43.50% |
Tip: Always check the main stat before you level up an artifact. The main stat gives the biggest impact, so you want the right one for your character. For more Genshin Impact strategies, check out ManaBuy's expert guides.
Best Stats by Role
You want to match your artifact stats to your character's job. According to Genshin Impact community experts, main DPS, sub DPS, and healers all need different things. Here's a simple guide:
|
Artifact Type |
Main Stats You Can Get |
|
Flower of Life |
HP (Flat) |
|
Plume of Death |
ATK (Flat) |
|
Sands of Eon |
ATK (%), DEF (%), HP (%), Elemental Mastery, Energy Recharge |
|
Goblet of Eonothem |
ATK (%), DEF (%), HP (%), Elemental Mastery, Elemental DMG Bonus (%) |
|
Circlet of Logos |
ATK (%), DEF (%), HP (%), Elemental Mastery, CRIT Rate, CRIT DMG, Healing Bonus |
- Main DPS: Look for ATK% on Sands, Elemental DMG Bonus on Goblet, and CRIT Rate or CRIT DMG on Circlet. Sets like Gladiator's Finale or Shimenawa's Reminiscence work well.
- Sub DPS: Try Emblem of Severed Fate or Noblesse Oblige. Focus on Energy Recharge, Elemental Mastery, or CRIT stats.
- Healer: Go for Healing Bonus on Circlet and HP% or Energy Recharge on Sands. Maiden Beloved and Ocean-Hued Clam are great choices.
Remember, picking the right stats for each role helps your team hit harder, heal better, and win more fights! For more team-building advice, check out ManaBuy's character guides.
Pre-Leveling Evaluation
Stat Checking
Before you start leveling any artifact, you need to check its substats. This step saves you a lot of frustration and wasted resources. Not all substats help your character. Some, like flat HP or flat DEF, rarely boost your damage or healing. You want to avoid artifacts that roll these stats too often.
When you look at a new artifact, ask yourself:
- Does it have at least one good substat?
- Are there too many flat stats?
- Is there a chance for CRIT Rate, CRIT DMG, ATK%, or Elemental Mastery?
Here's a quick look at how often each substat appears on artifacts:
|
Minor Affix |
Scaled Chance |
|
HP |
57.8% |
|
DEF |
57.8% |
|
HP% |
43.2% |
|
ATK% |
43.2% |
|
DEF% |
43.2% |
|
Energy Recharge% |
43.2% |
|
Elemental Mastery |
43.2% |
|
CRIT Rate% |
34.2% |
|
CRIT DMG% |
34.2% |
|
CRIT Rate% & CRIT DMG% |
9.2% |
Tip: CRIT Rate and CRIT DMG are the rarest substats. If you see both on one artifact, you've found something special! For more probability insights, see Genshin Impact Wiki.
You should also pay attention to artifact rarity. Higher rarity artifacts give you more substats to work with. Here's how it breaks down:
|
Rarity |
Number of Substats |
|
★★★★★ |
3~4 |
|
★★★★ |
2~3 |
|
★★★ |
1~2 |
If you want the best results, focus on blue (3-star) or higher artifacts. Skip 1-star and 2-star artifacts. They don't give enough substats and will not help your main team in the long run.
Promising Artifacts
So, what makes an artifact worth leveling? You want to look for artifacts that match your character's role and have strong substats. For your main DPS, you should always check if the artifact set bonus fits their element or playstyle.
Here are some top artifact sets for main DPS characters:
|
Artifact Set |
2-Piece Bonus |
4-Piece Bonus |
Best Used On |
|
Crimson Witch of Flames |
+15% Pyro DMG |
Buffs Overloaded, Burning, Vaporize, and Melt damage + boosts skill damage stacking |
Hu Tao, Diluc, Xiangling |
|
Blizzard Strayer |
+15% Cryo DMG |
+40% Crit Rate against Frozen enemies |
Ayaka, Ganyu, Rosaria |
|
Pale Flame |
+25% Physical DMG |
Increases ATK when Elemental Skill hits; boosts Physical DMG |
Eula, Razor |
|
Emblem of Severed Fate |
+20% Energy Recharge |
Burst DMG increases based on ER (up to 75%) |
Raiden, Xiangling, Mona |
|
Shimenawa's Reminiscence |
+18% ATK |
After skill, +50% Normal/Charged/Plunge DMG, consumes 15 energy |
Yoimiya, Heizou, Childe |
When you find an artifact from one of these sets, check if it has at least one of these substats:
- CRIT Rate
- CRIT DMG
- ATK%
- Elemental Mastery (for reaction-based teams)
- Energy Recharge (for burst-focused characters)
Note: If you see an artifact with both CRIT Rate and CRIT DMG, don't let it go! Even if the other substats are not perfect, this combo is rare and powerful. ManaBuy's artifact guides can help you identify valuable pieces.
You should also think about your team's needs. Focus your best artifacts on your main DPS first. Support and healer characters can use artifacts with less ideal substats, but your main damage dealer needs the best stats you can find.
Quick Checklist for Promising Artifacts:
- ⭐ At least one strong substat (CRIT, ATK%, EM, or ER)
- ⭐ Few or no flat stats
- ⭐ Belongs to a set that matches your character
- ⭐ Blue rarity or higher
If you follow these steps, you'll avoid wasting resources and build a stronger team. Remember, patience pays off in Genshin Impact. Take your time, check your stats, and only invest in artifacts that truly help your characters shine!
Artifact Leveling Strategy
Leveling artifacts can feel like a gamble, but you can take control with a smart Artifact Leveling Strategy. If you want to avoid wasting resources, you need to watch how your artifact grows at every step. Let's break down how you can do this.
Incremental Leveling
You should never dump all your resources into an artifact right away. Instead, use an Artifact Leveling Strategy that levels up in small steps. Here's how you do it:
- Start at Level 0: Look at the main stat and substats. If you see good substats, move to the next step.
- Level to 4: Artifacts get a new substat or upgrade an existing one at every 4th level. After you reach level 4, check which stat increased.
- Level to 8: If the artifact rolls a good stat at level 4, keep going to level 8. Check again. Did you get another good stat or upgrade?
- Level to 12: If you're still happy, go to level 12. Watch for flat stats. If you see too many, it's time to stop.
- Level to 16 or 20: Only take an artifact to max level if it keeps rolling strong stats. This is the heart of a good Artifact Leveling Strategy.
Tip: If you see flat HP, flat ATK, or flat DEF pop up more than once, stop leveling. Save your resources for better artifacts. For more leveling strategies, check out Polygon's artifact guide.
Here's a quick table to help you remember when to check your artifact:
|
Level |
What to Check For |
What to Do Next |
|
0 |
Main stat, starting substats |
Level to 4 if promising |
|
4 |
First stat upgrade or new stat |
Continue if good stat rolls |
|
8 |
Second upgrade or new stat |
Stop if flat stats appear |
|
12 |
Third upgrade or new stat |
Only continue if stats are strong |
|
16/20 |
Final upgrades |
Max out only the best |
This step-by-step Artifact Leveling Strategy helps you avoid over-investing in artifacts that won't help your team.
Stat Upgrades
Every time you hit a level that's a multiple of four, your artifact gets a stat upgrade. Sometimes you get a new substat, sometimes you upgrade an existing one. This is where luck comes in, but you can still make smart choices.
- If your artifact upgrades CRIT Rate, CRIT DMG, ATK%, or Elemental Mastery, you're on the right track.
- If you see flat stats get upgraded, that's a warning sign. Too many flat stats mean the artifact won't help your DPS much.
You should always ask yourself these questions after each upgrade:
- Did I get a useful stat?
- Did a flat stat increase?
- Is this artifact still worth my resources?
If you answer "no" to the first question or "yes" to the second, you should stop. Don't feel bad about leaving an artifact at level 4 or 8. That's part of a smart Artifact Leveling Strategy.
Note: Over-investing in bad artifacts can drain your resources fast. You want to save your materials for artifacts that make your characters stronger. ManaBuy's team setup guide can help you prioritize which characters to focus on.
A good Artifact Leveling Strategy means you only max out artifacts that keep rolling the stats you want. This way, you build a stronger team without wasting time or materials. Remember, patience pays off. If you follow these steps, you'll see better results and feel less frustrated by bad luck.
Stat Prioritization
DPS Substats
If you want your main damage dealer to hit harder, you need to focus on the right substats. Not all stats help your DPS. Some give a huge boost, while others barely make a difference. You should look for stats that increase your damage every time you attack.
Here's a table that shows which substats matter most for DPS characters:
|
Substat |
Priority Level |
|
Critical Rate |
High |
|
Critical Damage |
High |
|
Elemental Damage Bonus |
High |
|
Attack% |
Medium |
|
Energy Recharge |
Low |
Critical Rate and Critical Damage help you land big hits. Elemental Damage Bonus boosts your elemental attacks. Attack% gives a solid increase, but not as much as crit stats. Energy Recharge is only important for burst-heavy characters.
Tip: If you see both Critical Rate and Critical Damage on an artifact, you should keep it. That combo is rare and powerful!
Support/Healer Substats
Support and healer characters need different stats. You want them to keep your team alive and help with energy. Healing Bonus, HP%, and Energy Recharge are the best choices. Some supports also use ATK% for healing or shield strength.
Check out this table for top support and healer builds:
|
Character |
Best Weapon |
Artifact Main Stats |
|
Baizhu |
Calamity Queller (5★) |
HP% / Healing Bonus% / ER% |
|
Kokomi |
Everlasting Moonglow (5★) |
HP% / Healing Bonus% / ER% |
|
Sigewinne |
Aquatic Harmony (4★) |
ER% / HP% / Healing Bonus% |
|
Xianyun |
Favor of the West Wind (4★) |
ATK% / ER% / Healing Bonus% |
|
Jean |
Skyward Blade (5★) |
ATK% / ER% / Healing Bonus% |
|
Yaoyao |
Staff of Homa (5★) |
HP% / Dendro DMG Bonus% / ER% |
Healing Bonus and HP% help your healers restore more health. Energy Recharge lets them use their skills more often.
Bad Substats
Some substats just don't help most builds. Flat ATK, flat DEF, and flat HP give tiny boosts compared to percentage stats. You should avoid leveling artifacts with these unless your character needs them for a special build.
Here's a quick list of substats to skip for most teams:
- Flat ATK
- Flat DEF
- Flat HP
Note: Percentage stats and crit stats always give better results for damage and healing. Flat stats are only useful for niche builds. For more optimization tips, check out Game8's artifact guide.
If you focus on the right substats, your team will deal more damage, heal faster, and survive longer. Smart stat choices make a huge difference in every fight!
Resource Management
Saving Materials
You work hard for your resources in Genshin Impact. Every bit of Mora and artifact fodder counts. Leveling a 5-star artifact to max takes a huge amount—over 1,350,000 EXP and Mora! That's a big investment, so you want to make every upgrade count.
Here are some ways you can save your materials:
- Only level artifacts with strong main stats like ATK%, Elemental DMG Bonus, or CRIT Rate.
- Use lower-grade artifacts as fodder for your best pieces.
- Wait until you reach Adventure Rank 45 before farming high-level domains. You get better rewards at higher ranks.
- Upgrade your weapons and talents along with your artifacts. This keeps your whole team strong.
- When you replace an old artifact, you can transfer about 80% of the EXP to a new one. This helps you recycle your investment.
Tip: Don’t rush to level every artifact you find. Take your time and pick the best ones for your main team.
Avoiding Waste
You want to avoid wasting your hard-earned resources. Domains cost resin, and you only get a few runs each day. The drop rate for 5-star artifacts is low. On average, you get just over one 5-star artifact per run, while 4-star artifacts drop about two and a half times per run.
|
Artifact Type |
Drop Rate Range |
Average Drop Rate |
|
5-star artifact |
1-2 |
1.07 |
|
4-star artifact |
2-3 |
2.48 |
Because good artifacts are rare, you should:
- Stop leveling artifacts that roll flat stats or bad substats.
- Choose domains that offer sets your main characters need.
- Use food buffs and resin efficiently when farming. This helps you get the most out of every run.
Note: Careful selection and patience help you build a stronger team without wasting resources. Every smart choice brings you closer to your dream build!
Advanced Tips
Strongboxes
Artifact strongboxes give you a way to recycle unwanted five-star artifacts. Once you reach Adventure Rank 45, you unlock the Mystic Offering tab at the crafting table. Here, you can trade three five-star artifacts for one new artifact. The new piece comes from a set you choose, but its main stat and substats are random. It feels a bit like rolling the dice!
- You exchange three five-star artifacts for one new artifact.
- The new artifact’s stats are completely random, just like domain drops.
- Sometimes, it’s better to enhance a decent artifact than to gamble with strongboxes.
You might hope for that perfect crit stat, but the odds are tough. You may never roll the exact stats you want because there are so many possible combinations. Upgrading artifacts always brings a bit of luck into play. Even if you get good substats, their values might not be as high as you hoped.
Tip: Use strongboxes when you have lots of extra five-star artifacts you don’t need. Don’t expect a perfect piece every time, but sometimes you get lucky!
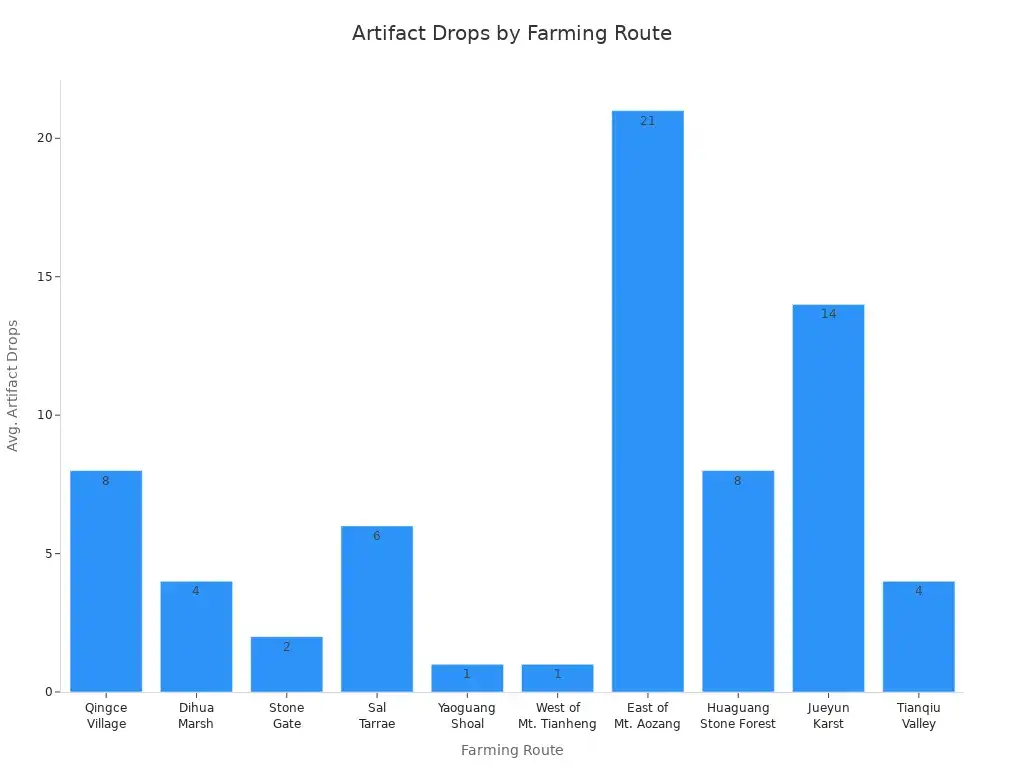
Farming Efficiency
You want to get the most out of your farming runs. Picking the right routes saves you time and gives you more artifacts. Some routes drop more artifacts in less time, so plan your path before you start.
|
Route |
Time Needed |
Average No. of Drops |
|
Qingce Village Route |
3 min |
8 pieces |
|
Dihua Marsh Route |
2 min |
4 pieces |
|
Stone Gate Route |
1 min |
2 pieces |
|
Sal Tarrae Route |
1 min |
6 pieces |
|
Yaoguang Shoal Route |
30 sec |
1 piece |
|
West of Mt. Tianheng Route |
30 sec |
1 piece |
|
East of Mt. Aozang Route |
5 min |
21 pieces |
|
Huaguang Stone Forest |
3 min |
8 pieces |
|
Jueyun Karst Route |
4 min |
14 pieces |
|
Tianqiu Valley Route |
1 min |
4 pieces |
Try bringing characters who move fast or have skills that help you reach chests and enemies quickly. This makes your runs smoother and saves you time.
Rolling for good artifact stats can feel frustrating. Sometimes, you farm for weeks and still don’t get the piece you want. The randomness means you might never see the “perfect” artifact. Don’t give up! Every run brings you closer, and sometimes a lucky roll changes everything. Stay patient, keep farming, and remember—everyone faces the same RNG. You’re not alone!
You can dodge bad stats and boost your artifact power with a smart plan. Always check your stats before leveling. Level up in small steps and watch for good rolls. Save your resources for the best pieces.
Key steps:
- Check substats
- Level incrementally
- Manage your materials wisely
Remember, every smart choice makes your team stronger. Stay patient, keep farming, and you’ll see your characters shine brighter with each upgrade! 🎉
FAQ
What should I do if my artifact keeps rolling flat stats?
You should stop leveling that artifact. Flat stats give little value for most builds. Save your resources for artifacts with better substats. You can use the bad artifact as fodder for future upgrades.
Can I use 4-star artifacts on my main DPS?
Yes, you can use 4-star artifacts if they have great stats. They work well until you find strong 5-star pieces. Focus on good main stats and substats. Upgrade to 5-star artifacts when you get better options.
How do I know which substats are best for my character?
Check your character’s role. Main DPS needs CRIT Rate, CRIT DMG, and ATK%. Supports want Energy Recharge or Elemental Mastery. Healers like HP% or Healing Bonus. You can use this table for a quick guide:
|
Role |
Top Substats |
|
DPS |
CRIT, ATK%, EM |
|
Support |
ER, EM |
|
Healer |
HP%, Healing Bonus |
Should I level artifacts for my support characters?
You should level artifacts for supports, but don’t use your best resources. Focus on your main DPS first. Give supports artifacts with useful stats, but save your top pieces for your main damage dealer.
Is it worth using resin to farm artifacts every day?
Yes, if you want to improve your team. Farming domains gives you the best artifacts. Use resin wisely and target domains that drop sets your characters need. Don’t forget to check stats before leveling!

The Ultimate Guide to Genshin Impact’s August 2025 Events
2025-08-11 14:14:18
Explore Genshin's Battle of Imagined Arrays and Power Up with ManaBuy
2025-06-24 10:11:47

Genshin Impact 5.0 Update – New Characters, Events, and Top-Up Needs
2025-08-27 10:08:21
Genshin Impact 5.8 Hidden Quests and Secret Achievements
2025-09-03 17:36:05


Copyright © FUTURE OUTLOOK TECHNOLOGY LIMITED. All rights reserved.UNIT 135,1/F.,143 WAI YIP STREET,KWUN TONG HK